There’s a fast way to add many photos to a PowerPoint presentation using the long-standing Photo Album feature.
Since at least PowerPoint 2003, there’s been a Photo Album option in PowerPoint for Windows. It’s a fast way to add many photos to a presentation. Alas, it’s not available in PowerPoint for Mac or in a browser.
For novices, it’s a simple and quick way to turn a collection of photos into a nice on-screen presentation.
More experienced PowerPoint users know that Photo Album is a nifty shortcut when there’s a lot of photos that have to be inserted into a presentation. Photo Album makes the slides with images which can then be changed and included in a large presentation.
The Photo Album creates a series of slides from images you choose. Once the slides are created, you can adjust those slides and content just like any other slide.

It’s a lot faster than manually adding photos to individual slides because you can select many photos at once.
New Photo Album in PowerPoint

Go to Insert | Images | Photo Album or in pre-ribbon PowerPoint, Insert | Picture | New Photo Album.
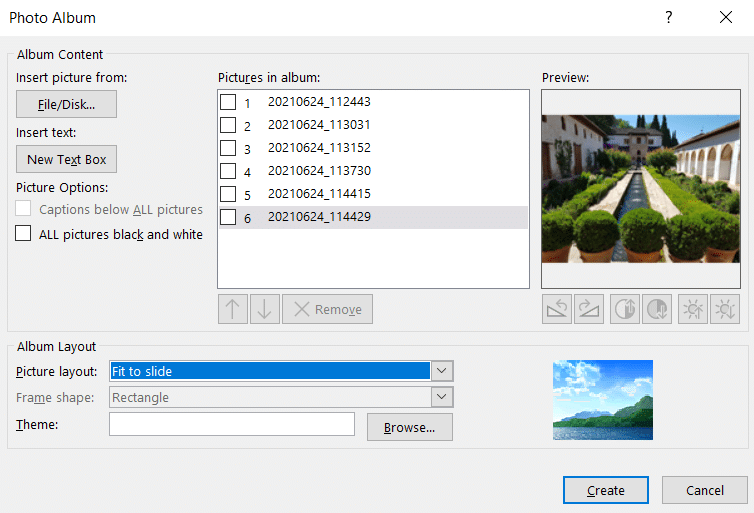
Insert picture from
Click on the File/Disk button to selection images for the album. You can select multiple images by using the Shift or Ctrl keys.
Insert text
The name might mislead you. This button adds another slide that you can enter text in, perhaps as a divider between parts of a photo album.
It does not add a text box to an existing slide. To do that use the Picture layout option below.
Captions below ALL pictures
If you choose any layout except ‘Fit to Slide’ you can add text boxes under each picture. The file name is inserted by default, you can change that on each slide once created.
Alas the ‘caption’ doesn’t copy the caption EXIF data that can be stored in the image file.
All pictures black and white
This will change the photo display to grayscale for all images. You can adjust individual images in PowerPoint after the album has been created.
Picture Layout
This option controls how many images are placed on each slide. There is an example pane on right.
- Fit to slide – fits the image to fill the slide as much as possible
- 1 picture – puts the image into the slide with a border
- 2 pictures – two images on a slide, side-by-side
- 4 pictures – four images on a slide,
- 1 picture with title
- 2 pictures with title
- 4 pictures with title
The titles are standard text boxes (placed above the image) that you can edit after the slides are created.
Frame Shape
Various framing options for use, except with Fit to Slide.
- Rectangle
- Rounded Rectangle
- Simple Frame – White
- Simple Frame – Black
- Compound Frame, Black
- Center Shadow Rectangle
- Soft Edge Rectangle
Theme
Choose one of the PPT themes from the .thmx files available.
The layout options apply to all slides in the album. If you want different layouts you can create separate albums, one for each layout type. Once the slides are created you can move them to a single presentation and re-order the slides with the Slide Sorter in the usual way.
Pictures in Album
A list of the images in the album. Select an image or images then use the buttons below the list:
Up & Down – re-arrange the image order with these buttons
Remove – remove from the album but not the original file on the computer
Image Adjustment: these six buttons let you tweak the image a little. Rotate left or right. Contrast and Brightness.
Alas, the preview pane to see the Contrast and Brightness changes is often too small to be useful. There is no ‘Undo’ for these buttons. The only way to fully reverse the photo edits is to click on ‘Cancel’ and get out of the dialog box without saving any changes.
There are more options available in PowerPoint once the album is created. In recent versions of PowerPoint, click on the image in the main slide designer and use the Picture Tools.
Pictures with text – a summary
Adding text to pictures is a little confusing from the Photo Album settings. Here’s how it pans out.
To add text ABOVE an image – choose one of the ‘… with title’ Picture Layout options.
To add text BELOW an image – choose the ‘Captions below ALL pictures’.
These choices will add text boxes to the slides that you can edit to suit your needs.
When you’re ready, click on Create. Slides will be added to the presentation.
Editing the photo album
The Photo Album settings can be changed by going to Insert | Images | Edit Photo Album. Any changes you make will be applied to all the album-made slides.
This is where you can add, remove or move the photos in the album.
Changing the photo album slides
Once the slides are created you can adjust them individually, in some cases you’ll definitely need to.
If you choose a ‘with title’ layout then you’ll need to go through the slides and add text.

Similarly, if you chose the ‘Caption’ option you’ll probably want to edit the default file names to more informative text.
An opening slide is always created using the background and two text boxes. You can edit the text or delete the slide entirely.

If the default background doesn’t suit, go to any slide, choose Design | Format Background, choose a new background and ‘Apply to All’ to change all slide backgrounds.
- Videos in PowerPoint Kiosk mode
- Self-running or kiosk display in PowerPoint
- Avoid the black slide at the end of a slideshow
- Change default slide number in PowerPoint
- Compress Video/Audio Files in PowerPoint 2010
- Making PowerPoint files smaller
- Nudge, nudge PowerPoint
- Master your PowerPoint slides
- PowerPoint 2007 photo albums
- Powerpoint save and publishing options
- Maps of Europe for PowerPoint
- Powerpoint – beyond slides
- Gmail does Powerpoint
- Powerpoint portability
- PowerPoint Presenter view