Redaction is ‘black-lining’ a document so other people can’t see personal or confidential information. Governments, companies and individuals all do it, though few go as far as the European Commission which released a 14 page letter from a tobacco company with almost completely redacted including, in some cases, the page number (see bottom right).

Redaction isn’t just for corporate secrets. Before forwarding information to others, we all need to hide account details, credit card numbers, passwords or other information. For example this car rental invoice:

In this article we’ll show you how to remove personal details or fully redact Office documents.
Redaction Tool
Microsoft used to have an Office Redaction Tool but they dropped it. However, the code was made open source and is available as the separate and unsupported Redaction Tool.
https://redaction.codeplex.com/ officially for Word 2007/2010 for Windows however we’ve successfully used it with Word 2013 and Word 2016. All the examples below are taken from Word 2016 running on Windows 10.
Why isn’t redaction a supported feature in Office? It’s an often requested feature by governments and organizations but Microsoft won’t budge. Most likely, Redmond is worried about complaints and lawsuits from redaction issues so it prefers to stay away from the whole concept of redaction.
Download the redaction tool from here. It installs easily and should also install any .NET Framework and VSTO Runtime that’s necessary. You may have to restart Word to see the Redaction tools.
The tools appear in the middle of the Review tab.

It’s a two-step process. Firstly Mark the text and other elements to redact. Do that by selecting in the usual way then choosing Review | Redact | Mark

The Marked parts appear as grey shaded text. Pictures can also be marked for redaction.

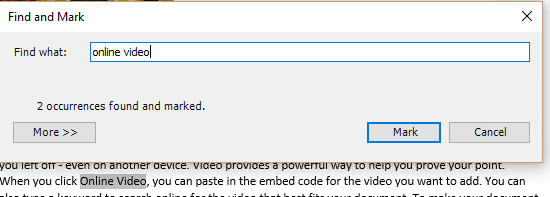
There is an option to Find text and immediately mark it. Useful for redacting names, account numbers or other recurring text.
Of course, you can also select text and Unmark it or Unmark everything.
After you’ve marked everything required, choose Review | Mark | Redact Document. This will create a copy of the original document and replace all the marked items with black bars or boxes.

As you can see, there’s a button for the next step, Inspecting the document, to check for common (but not all) other hidden details that you may want to remove before sending out the redacted document.
Finally, save the new, redacted, document. Send the redacted doc either as a Word document or as a PDF file.
How it’s done
The black bars are made with apostrophes which are then ‘highlighted’ in black. There’s no way to recover the original ‘marked’ text because it’s been removed.

Any picture is replaced with a black image.