By Mayurakshi Mohapatra
Adding a picture to an Outlook contact is a good way to make the contact more identifiable. If you are bored seeing the initials or boring graphic next to the Outlook contact name, no worries, at all.

Outlook lets you add, change or remove an existing picture from any Outlook contact or group.
With a picture in an Outlook contact, you get to see the picture of the contact in the message header and other places related to that contact.

If you have a shared contact list (via a cloud service like Outlook.com, Google etc) then the contact image will show up on other devices like a smartphone. The contact’s face can appear whenever they call you.
This feature of Outlook has not changed much since it was introduced, even though customers have begged for some improvements.
Where to contact pictures come from?
In large organizations, the contact picture is added from the company directory.
Small business and personal users did get many contact images added automatically via Facebook and other social media. But Microsoft pulled the plug on the Facebook link to Outlook for Windows. A contact image may be linked from Skype, but we’ve found that to be unreliable.
That leaves many users with picture-less contacts, thanks Microsoft.
Save a picture
First step is saving a picture of the contact to a file.
Despite many requests, Outlook does NOT have the ability to paste an image directly from the clipboard; only import from a file. That adds a lot of unnecessary work to maintaining contact images.
There’s also no way to get an existing picture, crop it to show just a face, then add to the contact. All editing of the image must be done before adding to Outlook. For pity’s sake, that’s a basic feature most online social media services have but not Microsoft’s main software.
Sometimes you can right-click on a web image (maybe from Facebook, other social media or a web search) and save to a file.
Or get an existing image and crop it to include just the face.
The Windows 10 Photos app has a cropping feature that will take a group photo like this.

And turn it into a contact picture.

Make sure you choose ‘Save a copy’ to avoid overwriting the original photos.
Another way to get a contact image is taking a small screenshot from an image, other software or web page.
Tip: because the contact photo takes up very little screen space, crop very tightly around the face. A lot more tightly than you normally would and, in fact, more tightly than the Win10 Photos app will allow in the above example.
Open a contact
Now you have an image ready, switch to Outlook and open the full contact. Not just the simple pane view but the complete contact details.
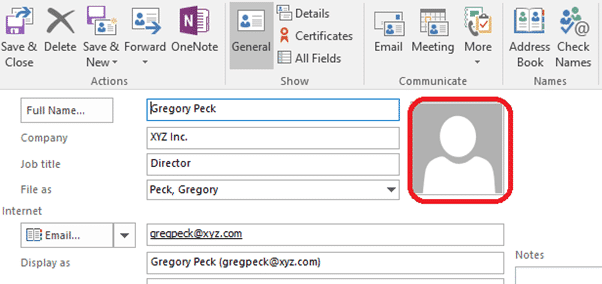
This is the only place you can change the contact photo.
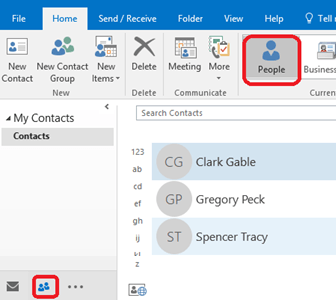
Click the people icon on the Navigation bar | then click the people icon from the Current View tab to view the contact list.
Select the contact and click the Outlook Contacts link under the View Source tab to access the Outlook contact card. The Outlook contact card stores the details of the contact person.

Or right-click on a contact and look for the ‘Edit Contact’ option

Add a contact photo
From the full Outlook contact, you can import a picture for the contact.
There’s a Picture | Add Picture item on the Contacts ribbon but it’s hardly necessary. Just click on the ‘blank’ image to begin.

A standard File | Open dialog appears. Select the picture you want to assign for your Outlook contact and press OK.

If you’re having trouble finding the right image, change to one of the icon views (top right of the Open dialog) or open the preview pane (the button to the right of the view selector).

Now you can view the picture, you just added, appearing adjacent to the contact name. Well, if you are happy with the picture click on Save & Close to update the changes that you just made.

You have successfully added a picture to your contact. The following screenshot is how your Outlook contact list will appear after saving the picture to your Outlook contact.

Note: Outlook supports jpg, png, gif, bmp or tif formats.
Change a contact picture
To change or remove an existing photo, right click on the picture and select the action you want to perform. Change to another contact image or remove.

Don’t forget to click Save & Close at the end of your action for the changes to appear on your Outlook contact list.
Copy a contact photo
It’s simple to copy an existing contact photo, right-click on the image (see above) and there’s a Copy option below the Change and Remove choices.
That copies the image to the clipboard where it can be pasted anywhere that accepts images including a Word document, PowerPoint presentation or Outlook email.
Don’t have a picture?
What if you don’t have a picture of the contact? You can leave it blank or add some fun placeholder that’s a reminder of the persons job or hobby.
A business contact can have their logo or shopfront image.
Outlook Groups can have an image of the group or something that is appropriate. A group of book club member can have a book image, a diving group could have a picture of a scuba tank, mask or diving board (depending on the type of diving).