Under Excel’s Home | Alignment ribbon you can change the indents, alignment or angle of the text in selected cells. As usual, a seemingly simple set of buttons have some hidden tricks.
See Text formatting in Excel with wrapping, line breaks and merging
Alignment
Adjust alignment of the text, both across and up/down, use the six buttons on the left-hand side of the Alignment tab. The top row aligns the text vertically (top, middle, or bottom of the cell) and the bottom row aligns it horizontally (left, center or right-justified).
In the example below, we want the header row of the table to be center- aligned, and vertically in the middle of the cell, so we have selected the header row and clicked the two middle buttons.

Number and currency are usually right-justified, so we select all of that and click the right-justified button.

Indents
The indent buttons on the Alignment tab can be a little confusing at first, until you get the hang of how they work. The directions of the arrows on the buttons don’t necessarily reflect the direction the text is going to move, but whether you are moving the text further away from, or closer to, the cell boundary. The direction will depend on which way the text is justified.
- For left-justified text, the Increase Indent (right) button will move the text to the right, away from the left border The Decrease Indent (left) button will move it back towards the left border again.
- For right-justified text, the Increase Indent (right) button will move the text to the left, away from the right border The Decrease Indent (left) button will move it back towards the right border again.
In the screenshot below, in the first two lines we have clicked Increase Indent to move the text away from the relevant border, and in the second two lines, we have clicked Decrease Indent to move it back to the border.

Using the indent buttons on centered text has unexpected results, and is not normally recommended. If you increase the indent on centered text, it may appear on the first click that the text moves left, but then moves right on subsequent clicks. Why? This is because if you try to increase the indent on centered text, Excel changes it to left-justified and then applies the indent to the left-justified text.
If you attempt to decrease the indent on center-justified text, nothing will happen, the text will stay centered and will not move.
Note how in the screenshot below, the top line of text is now left-justified after having its indent increased, and the bottom line of text is still centered.

NOTE: The indent buttons can only be used to indent all of the text in a particular cell. If you want to indent only part of the text in a cell, you will need to use the space bar, but if you later resize the cell, the spacing may change (splitting the cell might be a better approach).
Changing Text Direction
The Orientation button on the Alignment tab allows you to change the direction of text so that it is diagonal or vertical in the cell. This can be very useful when you have narrow cells and still want to be able to see the whole of the cell heading.

Here’s how each orientation looks

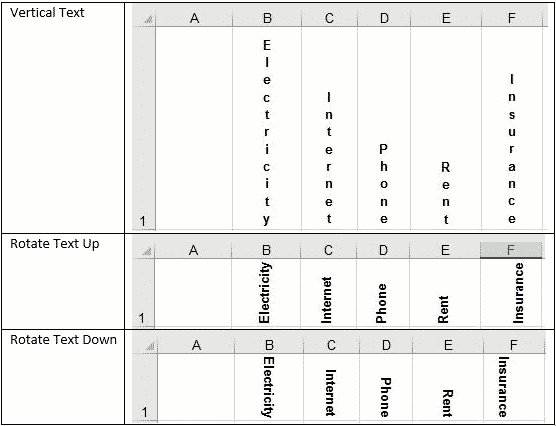
If you want to return to horizontal text, the Vertical Text option is a toggle – so whatever orientation you are currently on, just select Vertical Text to make the text vertical, then select Vertical Text again to restore it to horizontal.