Make the same drive letter or patch appear for the same removable drive, plugged into Windows computers. Keep Microsoft Office Open menus working for external drives.
Jenny N writes:
“I have a problem with Word when working with documents on my flash drive. If I insert the drive days later and try to use the recently used file list, Word sometimes says it can’t find the document.
I’ve worked out that when I insert the flash drive it’s not always using the same drive letter – it’s F or G drive but occasionally even later in the alphabet.
How can I change the flash drive letter or, even better, make it appear as the same drive letter each time? “
Jenny’s problem isn’t with Word but it does show up a problem with Windows and how it works with plug-in drives.
Migrating drive letters is a problem when programs remember fixed drive letters in paths to documents. All Office programs do that in their MRU (Most Recently Used) list. You can workaround it simply by opening the document directly using Windows Explorer. However some programs don’t let you alter the path once it is set.
Adding to the problem can be network settings that force you to allocate a drive letter/s to shares on the network.
There are some solutions. One is both manual and tedious yet it is the one that you’ll see in many Windows tips columns.
Office Watch suggests two better solutions which work well and gives you a consistent and unchanging drive letter or special path to each external drive.
What Windows does
Each time you insert a removable drive (USB memory ‘key’, digital camera memory or external drive etc) Windows will ‘mount’ the drive and assign it to a drive letter.
Windows automatically assigns the next available drive letter when you insert a drive. For example if the ‘highest’ drive in use is F then the new drive will be assigned ‘G’ and so on. Some devices like memory card readers have multiple slots and will be assigned several drive letters.
The problem comes because there’s no direct way to control the exact drive letter that’s applied when you insert a new drive. Drive letter assignments normally depend on the order in which you insert and remove external drives.
Workaround: for regularly used external drives, manually allocate a ‘high’ drive letter like Z: Y: X: U: etc. Those letters won’t conflict with Windows auto-allocation which starts from D: at the other end of the alphabet.
We have an external backup drive (for File History backups etc) allocated to Drive Z: . That won’t ever conflict with another external drive. It also means that Windows File History will always work after setting Z: as the destination.
Manual assignment
Manually change the drive letter assigned to the external drive though the Disk Management tool. This app has been in Windows for many years and works much the same, albeit with a few interface changes.
Go to Control Panel | Administrative Tools | Computer Management and look on the left under ‘Storage’ for the Disk Management tool. Or search for Disk Management in modern Windows.

Select the external drive, right-click and choose ‘Change Drive Letter and Paths …’ . Use the Change button to assign your preferred letter.
If the drive letter you want is not on the list it means that it’s already been allocated to another drive. If you really want that drive letter, you’ll have to remove the drive linked to that letter or re-assign that drive first.
Warning: don’t do anything with the Disk Management tool unless you’re very certain of what you’re doing. People who decide to ‘play around’ with the Disk Management tool can end up with broken or erased drives.
Windows will remember your drive choice as long as another drive doesn’t take that letter first.
That’s why we recommend assigning ‘high’ letters towards ‘Z’ to drives you want to have a consistent drive letter, because they are less likely to be taken automatically by Windows.
Permanent assignment basics
Drive letters aren’t the only way to reach a file, in fact they are quite old-fashioned. There are better and more flexible ways to point to folders, drives or computers than C: or D: etc.
It sounds strange but we do it already. Even a small network you’ll probably access files by pointing to a machine and folder for example //France/Paris/Eiffel.docx is a document Eiffel.docx in the folder ‘Paris’ on the machine ‘France’ . Similarly on the internet a link like https://office-watch.com/default.aspx is the same (a document called ‘default.aspx’ on the machine office-watch.com) except you also specify the type of transport used across the internet with the ‘https:’ prefix.
When administrators assign drive letters to network computers they often don’t need to. It’s done out of habit, consistency or to deal with old programs that must have a drive letter. Modern networks have clever ways to assign permanent network paths, but that’s beyond the subject of this article.
We’ve mentioned all this hoping you’ll be more comfortable with the idea of dropping the whole idea of drive letters for external devices. That’s the key to unchanging paths to external drives.
Permanently assigning drive paths to external drives
Modern Windows releases will let you allocate a path to an external drive instead of a drive letter. The path looks like a folder on your hard drive but it’s really a re-direction to the external drive.
This path is ‘saved’ by Windows so the same path works for the external drive whenever it is plugged in.
Here’s how to do it:
Go to Control Panel | Administrative Tools | Computer Management and look on the left under ‘Storage’ for the Disk Management tool. This is a really useful tool and we’re just focusing on one element of its power here.

Warning: don’t do anything with the Disk Management tool unless you’re very certain of what you’re doing. People who decide to ‘play around’ with the Disk Management tool can end up with broken or erased drives.
In the example you can see there’s a physical ‘Disk 0’ containing drive C plus a small partition used by the computer maker. Note that Drive C is labelled ‘NTFS’ which is important for this tip. We’re NOT touching Disk 0 at all – hands off!
Disk 1 is an external hard drive plugged in via the USB socket, in this case a cute LaCie device.
Tip: label external drives via the volume label, this makes it easier to work out which drive you’re using when several are plugged in at once. Usually include the capacity as well.
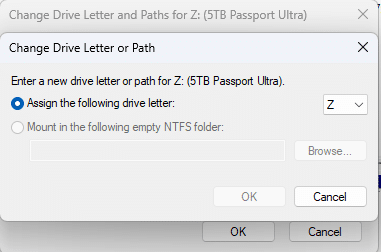
Right-click on the external drive and choose ‘Change Drive Letter and Paths …’

Then click on Add to create an additional path to the device:

The drive letter option is greyed out because a letter is already allocated by Windows. But the option we want is available ‘Mount in the following empty NTFS folder’.
Click on browse to point to an empty folder.

The first time you do this you’ll have to decide where to put the empty folder and probably create some new folders using the ‘New Folder’ button. See below for some tips on that.
Click OK to see a new path to your external drive.

And OK again to confirm the change.
Switch over to Windows Explorer and go to the folder you just created – in this case C:/External Drives

You can see there’s two items – one we just created and the other is for another, currently unattached, device called Wolverine.
Each is called a ‘File Folder’ but have shortcut icons instead of standard folder icons.
The LaCie ‘folder’ has a size (the capacity of the device) because it’s plugged in, the other is zero because it’s not online.
Open Windows explorer and go to the folder you set on the hard drive – for example C:/external drives/LACIE55GB and lo! the contents of the external drive will appear just as if it was part of the hard drive.

All sub-folders appear under the ‘root’ path you’ve created. For example a document in the Paris folder on a flash drive will now appear as C:external drivesflashParis
Now open a Word document from the flash drive, but instead of going to say G:\docs point to C:\external drives\flash\docs . You can work on the document as usual, save and close it then remove the external drive.

Come back later, plug-in the drive, go to the MRU list in Word and open the document normally.
Where to put the empty NTFS folder
You can put the re-direction NTFS folders almost anywhere on your hard drive and call them most anything you want.
We’ve gone for a folder called ‘External Drives’ because its obvious and put it directly off C:/ because these days most people don’t browse around the root folder of hard drives.
You may prefer to put the re-direction folder in /Documents and Settings or /Users (depending on your version of Windows).
Each empty NTFS folder is given the same name as the volume label for device – eg LaCIE55GB but that’s not required. We’ve just done it that way for consistency.
More Info
This isn’t magic and it’s not even a new feature. It’s been in Windows for some time but could get more use now that more people have external storage.
- This isn’t caching or copying the contents of the external drive. You’re not taking up space on your hard drive.
- The drive space used by the mounted external drive on the fixed drive is trivial and not linked to the capacity of the plugged-in storage.
- Once you remove the external drive the contents are unavailable. If you try to go to the linked folder you’ll get a ‘refers to a location that is unavailable’ error.
- Any version of Windows with an NTFS hard drive will let you allocate a path to an external drive instead of a drive letter. This includes modern Windows 11/10/8.1 way back to Windows 2000 Workstation, XP and Vista. Chances are good that your fixed drives use NTFS because it’s been the default in Windows for some years.
- Only the fixed drive accepting the mounted path has to be NTFS – the external drive can be in any format accepted by Windows. In fact it’s common that small external devices use FAT32 formatting.
- Because the external drive appears as part of the fixed drive some Explorer defaults will change. If you drag a file between drives, Windows will copy the file unless you choose otherwise. If you drag a file between an external drives folder and a real fixed drive folder if will be moved (not copied) because that’s the standard drag behaviour between folders on the same drive.
- This applies ‘per computer’ – the same external drive in another computer will be assigned a drive letter in the usual way. For true consistency setup mounted external folders on each of your computers so that your external drive shows up in the same ‘folder’ on each of your computers.
- Any ‘new’ external drives you plug in will be assigned a drive letter in the usual way.
Opening Office documents from removable storage