One of the eye-catching features since PowerPoint 2010 right up to PowerPoint 365 is turning your mouse into a virtual laser pointer. A ‘laser pointer’ transforms the boring mouse pointer to something striking and easier to see on the screen.

This is especially useful while delivering presentations as it eliminates the need to carry additional hardware which many presenters use to point at specific items in the presentation.
A virtual laser pointer doesn’t have the risk of shining in the eyes of audience members like real laser devices can do.
You can turn your mouse into laser pointer either in slide show view or in reading view. To do this in slide show view open a presentation and click on “Slide Show” tab in the ribbon. Here depending on which slide you want to add the laser pointer i.e. current slide or from the beginning click on the option from “Start Slide Show” menu.

Here when you click on “From Beginning” the slideshow begins. Now press and hold the CTRL key and left mouse button at required place on the slide. You will see the laser pointer as a red dot.
You might see the mouse pointer along with the laser pointer. To remove the mouse pointer press and hold the CTRL key before taking the mouse pointer onto the slide. In other words move the mouse off the edge of the slide/screen, then press CTRL and move the pointer onto the slide. Sometimes the mouse pointer automatically disappears once the laser pointer appears on the screen.
To add laser pointer in Reading view click on View | Presentation Views | Reading View.

In Reading view, press and hold the CTRL key and click the left mouse button anywhere on the screen. The laser pointer will appear on the screen.
Customize Laser Pointer
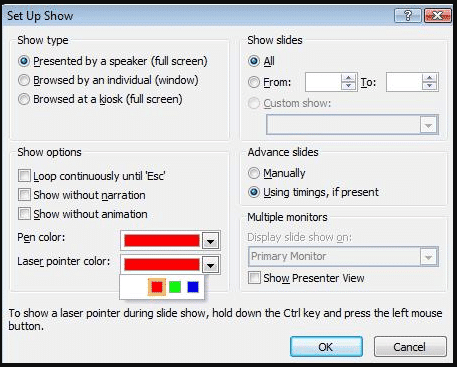
By default the laser pointer will appear in red. You can modify its color. Three options are available for this, Red, Green and Blue. To change the laser pointer color click on Slide Show | Set Up Slide Show. Here in the “Set Up Show” window that pops open under “Show options” select from the given three colors, Red, Green and Blue. After making the selection, click on OK button for the change to take effect.
Sadly, there’s no way to make the ‘laser pointer’ the permanent pointer in a slide show. You have to keep your finger on the Ctrl button all the time.
Add Laser Pointer while Recording
You can also add laser pointer while recording a slide show which can be converted to video as well. Laser pointer used in video will make it more effective. For this click on Slide Show | Set Up | Record Slide Show. Here either select “Start recording from Beginning” i.e. from the first slide or “Start Recording from Current Slide” option.

In the “Record Slide Show” dialog box select the checkbox “Narrations and laser pointer” and if you want to record the slide and animation timings then select that checkbox as well.

Click on “Start Recording” button. Press and hold the CTRL key and click on the left mouse button on any required place on the screen. The laser pointer will appear. Move wherever you require the laser pointer and then stop the recording process.
To view the recorded laser pointer movements click on Slide show | Start Slidehsow | click on either of the two option i.e. From the beginning of the slide or from the current slide. The slideshow with recorded laser pointer movements will appear.