Office 2016 for Windows will soon support scalable vector graphics (SVGs). Preview/Insiders can try them now and it’ll be available to all Office 365 subscribers in 2017.
That means you’ll be able to make your documents look even better with vector-based SVG files that won’t pixelate when increased in size. SVG support has been a long time coming to Office. Now it’s finally here, it’s nice to see that Microsoft has done a decent job … up to a point.
We’ll show how to use SVG’s in Word, Excel and PowerPoint but also the limitations in Microsoft’s work. The limitations you won’t see mentioned in their hype.
Still graphics only
Before SVG aficionados get too excited … Office 2016 for Windows only supports static SVG graphics. Sadly no support for animations or interactive features of SVG.
About SVG graphics
SVG are graphics or drawings, not photos or images that you might take with your camera.
Instead of dots or pixels to make an image, each SVG file contains instructions for what to draw on the screen or page. For example, here’s what you’ll find inside a simple SVG
<svg width="300" height="300">
<circle cx="75" cy="75" r="35" stroke="blue"

stroke-width="4"fill="green" />
</svg>
It’s the description of a green circle with blue edge. If you change the width/height settings, the circle is redrawn to a new size. That means the SVG can be as small or large as you need without loss of quality.
Of course, normally SVG’s are very complicated and are drawn in graphics programs not hand-coded. SVG files can be animated or combined with video, CSS and Javascript.
Office doesn’t just import the SVG and display it in your Word, Excel or PowerPoint document. You can change the graphics settings to change the look of the graphic. In other words, it rewrites part of the XML description you saw above.
Adding an SVG
Inserting an SVG into an Office document is the same as any other image. Insert | Pictures and choose the .SVG file from a folder.
Once inserted it looks like a standard image and you have all the usual sizing, positioning, rotate, layer, wrapping and cropping options.
Our example SVG is called Creepy Mouth. It’s a clever and educational use of SVG animation – open the link in a modern browser and click on the buttons. We chose this SVG because it shows some limitations in the Microsoft Office SVG support.
What’s different from a usual JPG or GIF image is the ribbon which shows Graphics | Format options with some editing choices on the left.
Change Graphic – exchange the current graphic for another image or graphic. This is in Office already as ‘Change Picture’ on the Picture Tools ribbon or right-click menu.
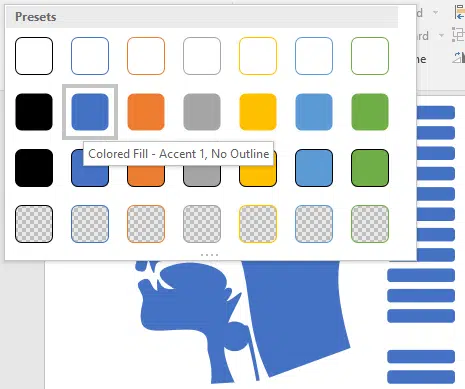
Graphics Styles – there’s a gallery of preset color choices. Live Preview will change the graphic as you hover over each selection.
Hover over a style to see a limitation in Office’s SVG support.
Office changes the color of the entire SVG, even if the original SVG had different colors! That’s great for simple icons or graphics but not anything more.
To change the color of just a part of an SVG you’ll need to use a separate graphics editor or hand-change the SVG code.
Fill, Outline and Effects
Looking back to our simple SVG example, you can see that an SVG graphic has two parts – the outline of a shape (stroke="blue" stroke-width="4") and the fill or color inside the shape (fill="green").
Office lets you change those settings and more with the three little buttons next to the Graphics Style gallery. However, it will change all the outline and fill settings to a single choice.
Fill – the standard Office color picker. Changes the fill of all SVG graphics, leaving the outline unchanged.
Outline – the same Office color picker but this time changes the outline setting of all shapes.
The thickness and type of outline can also be changed from the Weight and Dashes sub-menus.
Here’s an example with the outline changed to dashes and the thickness greatly increased.
Effects – this changes the outline and shape of the overall SVG image. You can simply add a shadow effect to the graphic or try one of the 3D options to radically change the look of the SVG.
Save As … limitation
Like any other image in an Office document, you can right-click and choose Save As Picture … to save a separate copy.
Sadly, Office doesn’t save an existing SVG to that format. Instead it converts the SVG to a bitmap (JPG, GIF, PNG etc) which destroys the flexibility of the SVG format.
There’s no good reason for that. SVG graphics are saved in Office documents in the SVG format (we peeked inside a .docx and, sure enough there’s a .svg file plus a .png version).
To get an SVG graphic from an Office document, Make a copy of the .docx, .pptx etc and change the file name to a .ZIP ending. Then unpack the .zip and look in the /media sub-folder.


