Hiding in plain sight are some useful tricks for picture formatting within a shape. It’s possible to fit or fill the image within the shape and, importantly, move the picture around with shape outline.
Office Watch has already talked about various ways to change the look of an image within a shape. There are more options available beyond the basic features to put an image within a shape.

We’re very grateful to Tiffany D from California who pointed out that positioning a cropped shape is possible.
After applying ‘Crop to Shape’ or ‘Shape Fill with Picture’ go to Picture Format | Size | Crop | Fill or Fit.
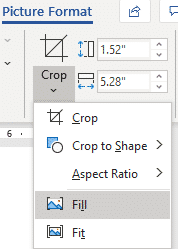
Fill – resizes the image to the shapes width and height (whichever is larger), cropping where necessary.
Fit – resizes the image to the picture area (both height and width) with no cropping.
Try both and see which one suits you best.
Hidden positioning feature
Once you’ve done Fit or Fill you can move either the shape or the picture around. Either can be moved or resized to get exactly what you want.
Select the shape with the black bar handles, the same as the bars used for cropping an image.
Choose the image with the circle handles.

Sometimes it can be hard to select the shape or image because one fully covers the other. If that happens, try moving the visible element aside. Failing that, choose Crop | Fit or Fill which will reveal all the handles.
The shape and image are treated as a single shape or picture in the Selection Pane.
If the shape has Yellow handles you can adjust sizes within the shape.
