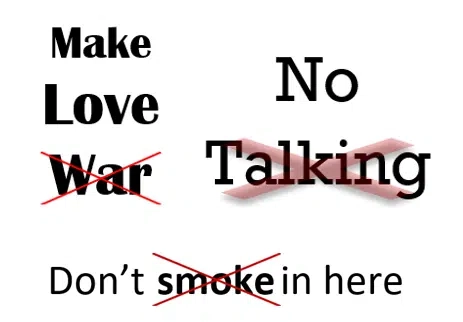
Need a bolder alternative to strikethrough? An overlaid X works far better than a thin line when you have large headings, signs, or slide text to cross out. This guide walks you through three reliable ways to overlay an X on text in Microsoft Word and PowerPoint: a quick image overlay, a smart table border trick, and a stable text box plus icon combo. Each method has its own pros and cons, so you can pick the one that suits your document, signage, or presentation.
There are at least three different ways to get the X overlay effect. Instead of just showing you one option, Office Watch will show you all three choices with their pros and cons. You can choose which method suits best and, if nothing else, you’ll learn some nifty Word tricks along the way.
See Three sources for the X in Word or PowerPoint for ideas on how to get an X symbol in different styles.
Image over or under text
A simple option but may not be practical for ongoing use.
Any line of text can be overlaid with a transparent graphic.

Type, format and size the text first.
Insert a Microsoft 365/Office 2019 icon or other graphic. If necessary, change the fill color to No Fill (Icons have No Fill by default).
Change the color and transparency level to suit, see ‘Transparency’ below.
Change the Layout Options to ‘In front of text. Make sure the ‘Move with text’ is ON.

Then drag the image over the text. Resize the graphic as necessary.

If you’re having trouble positioning, check out the Layout dialog for the image at Layout Options | See more …

Make sure these options are on:
Absolute position – Horizontal and Vertical
Move object with text
Allow overlap
There are problems with this approach:
- Changes to the overall formatting, font or font size can put the image & text combo out of alignment.
- The image can be hard to select if it’s Behind Text. Use the Selection Pane to select the image.
Use this method for quick ‘one off’ needs. The other choices are more stable and tolerant of later changes to the document.
Table
Two of the lesser-known table border options let you make a simple X overlay easily. Here’s the above examples with table gridlines turned on, so you can see how it’s done.

In line, use a single line table for the X part either a word or single letter

Insert a table, perhaps even a single cell table. Add the text and format.
Then go to Table Format | Borders and choose ‘No Borders’ to remove the default outside borders.
Next, Table Format | Borders | Borders and Shading to open the dialog box and get full control over border line thickness and color.

Style – we stick with the solid line but you might try the dotted or dashed lines.
Color – change the color of the lines. We use Red because it’s clear in our examples, you can use whatever you like.
Width – the default thickness is thin, most likely you’ll want a thicker line like 2.25pt.
Apply to – important! Change to ‘Cell’. The default is to apply the border to all cells in the table. That’s probably not what you want, except in a single-cell table.
Choose diagonal lines – finally, click the two bottom corner buttons to apply the diagonal lines inside the table cell.
Close space between text and table edges
The default table spacing might not be suitable in this situation, leaving too much space between the text and the cell edges.
Tighten up the cell at Layout tab | Properties | Cell | Options.
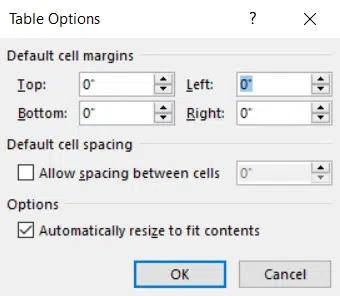
Change the cell margins to zero for all four sides.
The table option is OK but doesn’t give you good control over the size and position of the X overlay. The length of the diagonal lines can’t be shortened or made partly transparent. The table cell has limitations on its size compared to the text inside.
Text Box with icon in front
For more choices, we’ll use a text box with overlay. It’s slightly more complicated to make but the result is much more stable and easy to move around the document.
We’ll make a text box overlaid with a partly transparent X graphic made from an Office icon.

Insert a simple text box from the Insert tab. Optional, remove the outside borders of the text box.
Separately, insert an image or icon of the X you want to overlay. We’ll use an Office 365/Office 2019 icon because it gives a lot of size, proportion, color and transparency options. See below for more info.
Change the text wrapping to In Front of text.

Drag the X icon over the text box.

Then resize and position to suit.

Finally, group the text box and the icon together so they can be handled as one object and the overlay position remains. Select both text box and icon (hold down Ctrl) then Shape Format | Arrange | Group.
Still on the Arrange block, choose Selection Pane then rename the elements. This makes the whole object a lot easier to understand later.

Note: this example is a little different. The red X is under the text (in Layout Options choose Behind Text instead of ‘In Front).
Three sources for the X in Word or PowerPoint
3 Easy Ways to Get an X Symbol in Word and PowerPoint
How to Insert Symbols in Word and Outlook Instantly Using Alt + X
How to Create Custom “Don’t” or Prohibited Symbols in Word, Excel and PowerPoint
Get more than one Strikethrough in Word
Bold, Italic and Strikethrough in WhatsApp and Word
Make a ‘Stop’ circle / diagonal symbol in Word, Excel and PowerPoint
Table Border Painter make tables easier in Word
8 simple ‘Prohibited’ symbols for smoking, phones, kids and more in Word