Let’s imagine you’re in Word’s Print Preview and you’ve suddenly noticed an error in your document. You close print preview to make the change, then you go back to print preview again or you can discover Print Preview Edit Mode.
Print Preview in Word has all sorts of goodies for making the final adjustments to a document before printing (to paper or PDF). Multi-page view, margins, page size, shrink by one page.
The standard Print Preview is in the File | Print pane on the right side. You can move through the pages and zoom the view (bottom right) and that’s about it. Any other changes require backing out of this pane to the regular Word views.
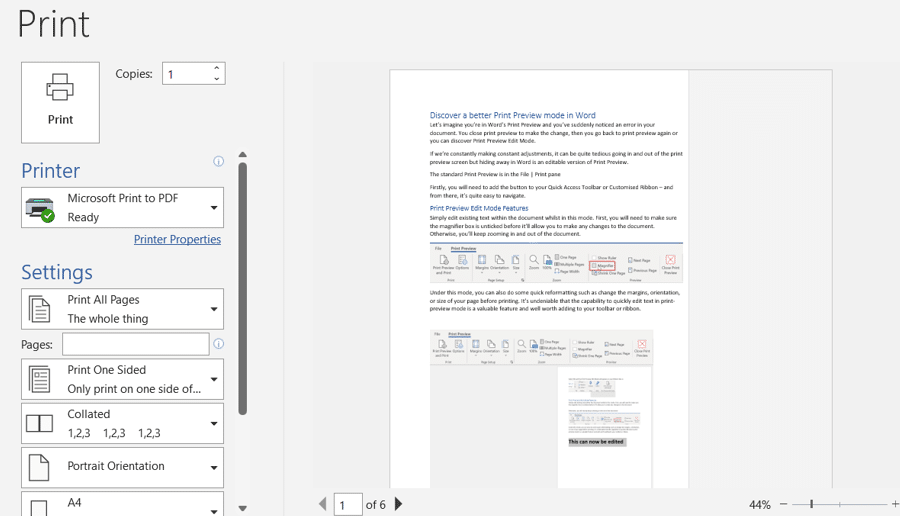
While File | Print is often called ‘Print Preview’ even by Microsoft staff, officially it’s not a ‘preview’ because there can be differences between what’s on the pane and what is printed.
Print Preview Edit Mode has been in Word for many years. Word 365 for Windows, Word 2021/LTSC and 2019 for Windows, Word 2016, 2013 and 2010 for Windows.
The Real Word Print Preview
For reasons known only to Microsoft, the real Print Preview in Word isn’t even on the standard ribbon or Quick Access Toolbar.
Firstly, you will need to add the button to your Quick Access Toolbar or Customised Ribbon – and from there, it’s quite easy to navigate. See later in this article for details.
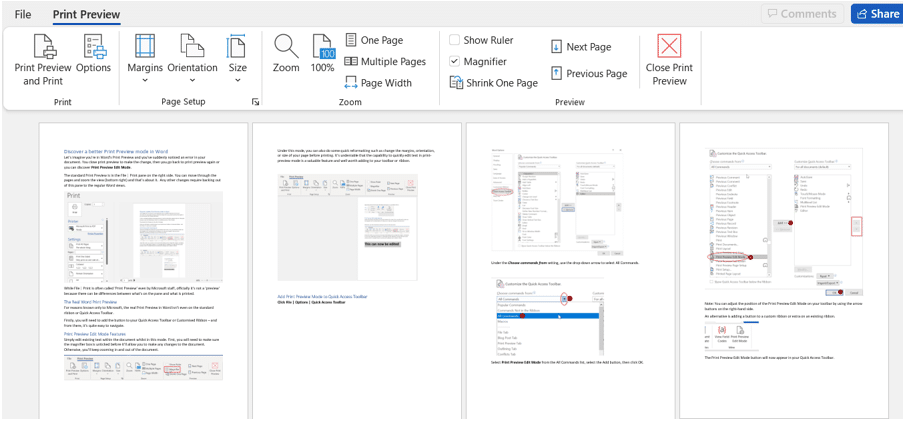
Print Preview Edit Mode Features
Simply edit existing text within the document whilst in this mode. First, you will need to make sure the magnifier box is unticked before it’ll allow you to make any changes to the document. Otherwise, you’ll keep zooming in and out of the document.

Under this mode, you can also do some quick reformatting such as change the margins, orientation, or size of your page before printing. It’s undeniable that the capability to quickly edit text in print-preview mode is a valuable feature and well worth adding to your toolbar or ribbon.

All the options on the Print Preview ribbon are present on other Word tabs.
Print Preview and Print
Opens the File | Print pane.
Options
Opens the Options dialog box where you can change how the document is viewed on screen and when printed.
Margins
Decide whether you want to set the margin sizes for the entire document or just the current section. Create your own margin format or pick from multiple commonly used ones.
Orientation
Change the page orientation – choose between two layouts: portrait or landscape.
Size
Choose the paper size for your document.
Zoom
Choose the zoom percentage, options to zoom to 200%, 100% or 75%, or choose your own percentage.
100%
Quick shortcut to zoom the page to 100%.
One Page
Zooms feature so that you can see the entire document on one page.
Multiple Pages
Zooms feature so that you can see multiple documents on one screen.
Page Width
Zooms feature so that the width of the page matches the width of the screen.
Show Ruler
The rulers appear next to your document. With the ruler tool, you can measure things, set tab stops, move table borders, line up objects, etc.
Magnifier
Turns your cursor into a magnifying glass, gives you a quick way of changing between 100% and fit whole page zoom. By unchecking this feature, you’ll be able to edit the document.
Shrink One Page
Shrinking your document down to one page. Word attempts to shrink down the size of text and gaps, a nice way of saving paper.
Next Page
Simply moves to the next page of the document.
Previous Page
Simply moves to the previous page of the document.
Close Print Preview
As it states, closes out of the Print Preview Edit Mode.
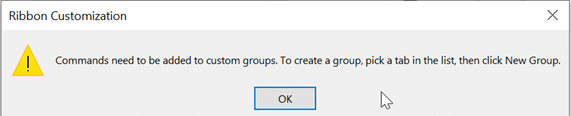
Add Print Preview Mode to Quick Access Toolbar
Click File | Options | Quick Access Toolbar

Under the Choose commands from setting, use the drop-down arrow to select All Commands.

Select Print Preview Edit Mode from the All Commands list, select the Add button, then click OK.

Note: You can adjust the position of the Print Preview Edit Mode on your toolbar by using the arrow buttons on the right-hand side.
An alternative is adding a button to a custom ribbon or extra on an existing ribbon.

The Print Preview Edit Mode button will now appear in your Quick Access Toolbar.

Add Print Preview Mode to Customised Ribbon
Right-click anywhere on the ribbon | Select Customize the Ribbon… or you can select File | Options | Customize Ribbon

Under the Choose commands from setting, use the drop-down arrow to select All Commands.
Search for Print Preview Edit Mode from the All Commands list.

Before adding the button to your ribbon, you will need to create a custom group.
Select New Group | Right-click and Rename | Add Print Preview Edit Mode to selected tab.
Use the arrows on the right-hand side to change the positioning of the group on the ribbon.
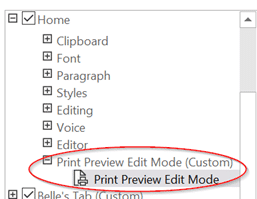
Select OK and the Print Preview Edit Mode will appear on your Ribbon like so.
Print selected pages or sections of a Word document in any order