PowerPoint can show slides on a screen as a high-tech signboard, using a self-running presentation known as Kiosk display. Here’s how to do it plus all the settings and tricks available.
We’ve all seen screens displaying information on a series of slides – maybe in a shop or conference. Maybe as a prelude or postscript to a presentation. These days it’s easy to setup a laptop with an external screen almost anywhere to make a high-tech signboard.
At a party or celebration you can use Powerpoint to display photos (with or without captions) of the guest of honor.
There’s various ways to do it but the main one is PowerPoint. Many of us have PowerPoint but never use it because we think of it as being for speeches. In fact there’s plenty of other uses.
PowerPoint Kiosk mode
At its basic level, PowerPoint’s Kiosk mode is merely a different way to display a presentation. Instead of clicking to move between slides, PowerPoint will automatically display the slides going in an infinite loop … until someone presses Escape.
Go to the Slide Show tab, Set up Slide Show … it’s a PowerPoint dialog that hasn’t changed for many years/versions.
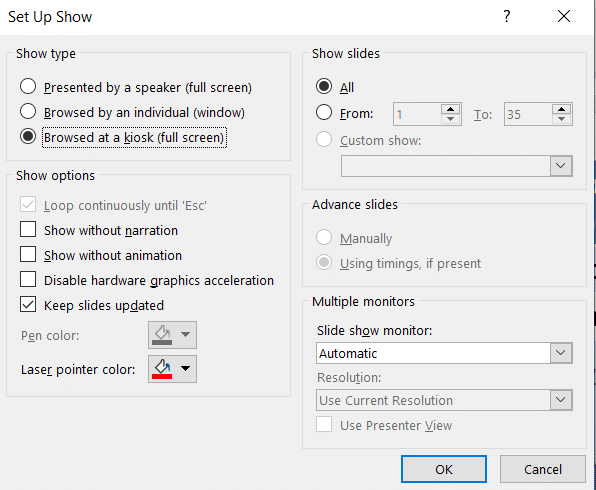
Choose ‘Browsed at a kiosk (full screen)‘ and click OK.
That’s as far as most people go in explaining Kiosk mode but, as usual with Office, there’s a lot more going on and Office-Watch.com is here to help.
Browsed by Individual
The Browsed by individual (window) option lets someone use a mouse or keyboard to move through the slides at their own pace. In this case the slides can change automatically (if no human intervention) or only when asked – see the Advance slide options on the Set Up Show dialog.
To make the self-guided presentation more accessible, you should add action buttons (forward / back etc) to the slide master so the buttons appear on all slides. Make the mouse available to users and they can click to their heart’s content.
Show without narration
PowerPoint presentations can have an audio track or narration included. This option lets you let that audio be heard as the slides progress or not. The default is for the narration to be heard (i.e selection unchecked).
Show without animation
Slides can have animations or motions on them – for example bullet points appearing one by one. Check this box if you don’t want the animations – in other words, the slide appears all at once.
Disable hardware graphics acceleration
Usually you’d leave this off, but if there are problems with the display this might help.
Show slides
Show all the slides or just a range from a larger presentation.
Advance slides
In kiosk mode, PowerPoint lets each slide appear for a few seconds unless there’s a slide timing set (at Transitions | Timing | Advance slide | After:

Multiple Monitors
Very useful if you have a second monitor. Use the pull down list to select the screen to display the presentation.
Why won’t the slide/s move?
If your kiosk presentation is stuck on a slide, or the first slide, make sure the Advance Slide timing is set higher than zero at Transitions | Timing | Advance slide | After:
After setting a value (in seconds) click Apply to All to set that as the default display time for all slides.
Sometimes the Advance Slide After: value is set to zero. If that happens PowerPoint will obey the zero timing set and never move past that slide, even though it makes no sense in Kiosk mode.
How to wait longer or shorter on one slide
Some slides deserve more time to read while others you might want to whizz by. After setting the default timing (see ‘Why won’t the slides move?’) go to individual slides and change the Transitions | Timing | Advance slide | After: for that slide only.
You can also select multiple slides from the slide sorter and apply a timing to all the selected slides in one go.
Starting Kiosk Mode
To start a kiosk presentation, just click the Slide Show | From Beginning or From Current Slide buttons.
Stopping Kiosk Mode
Stopping the presentation by just pressing the Escape button. If you don’t want people to do that, hide the keyboard out of sight.
Blocking the ESCape route
There’s always some smartie who will try to bypass the automatic presentation and get access to an unattended computer. To make things more difficult for them, use the No ESCape add-in for PowerPoint 2000-2007. This will disable the Escape key option in Powerpoint. We’ve not found an equivalent for PowerPoint 2010 and beyond.
If you use this add-in make sure you add your own escape route. Add an invisible shape to a slide (probably the last) with the on click action set to End show.
Self running presentation packages
Another option is to create a self-contained PowerPoint Show (.ppsx) that can be run on another computer without additional software.
Simple Self-running Presentations
The simplest self-running presentations are just a collection of photos. You can add captions or headings if you like or just put each photo, full size, on a slide.
A new Kiosk presentation
Aside from the setup mentioned above, there’s nothing special about presentation used in kiosk mode.
You can make a presentation that has just photos – a traditional photo album on the screen. It can be a point of discussion or derision at a party or meeting.
Below is the step-by-step to make a presentation with photos, or … you can use the easy way … PowerPoint Photo Album.
Choose a background color (probably black or white) at Design | Customize | Format Backround. The background is necessary because some images won’t be the same proportions as the screen, leaving edges where the background will appear.
Change the slide layout to one that suit you. For full screen photos, choose ‘Blank’ layout.

Then add your photos. On each new slide click Insert | Picture then adjust the image to fit the slide.
There are ‘photo only’ presentation software programs out there, just search for then. Some have the advantage of working with all the photos in a nominated folder. It’s easy to change the presentation by simply changing the images in that folder. At a pinch, a photo screen saver can be used.
Videos in PowerPoint Kiosk mode