An Excel Table Form is a simple no-code way to view a single table row in an editable box.
If a row of data is too wide, instead of scrolling left/right to find what you need, use a data form to add, edit, find, and delete rows.

Table Form is an automatically generated data form for your range or table that displays all column headers as labels within a single dialog box. Each label has an adjacent text box to enter or edit data for each column. There are a maximum of 32 columns.
Using a Table Data Form
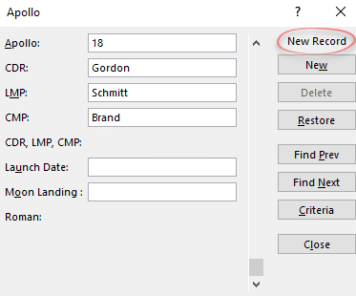
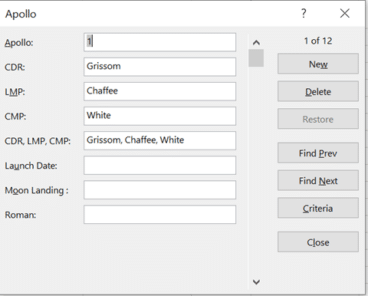
A Table Data Form has editable fields for each non-calculated field in the table. In this example all rows are editable except ‘CDR. LMP. CMP’ and ‘Roman’ which have formulas in the cells.

Table Form obeys sheet protection – locked cells on protected sheets can’t be edited. Data Validation rules are applied with the usual warning or error messages appearing.
Note: Before selecting the Form button, make sure you’ve selected a cell within your table, otherwise an error message will appear like the below.

Table Form commands
New: create a new record or table row.
Delete: This deletes the existing record/row in the form.
Restore: If you are editing an existing entry, restore reinstates the previous data in the form (so long as you haven’t clicked New or Enter).
Find Prev: Find the previous entry.
Find Next: Find the next entry.
Criteria: Search or find specific records within the table.
Close: Close the form
Scroll Bar: Navigate through the records
Adding a new row of data
- Select Form, then New

- Complete the form with the new data. You can easily navigate to each field by selecting tab to move to the next field in the row, or Shift + Tab to move to the previous field.
- Once you have completed typing out the data, press Enter to save changes and add the row to the bottom of the table.
- You can also undo any changes by clicking Restore in the data form, any data that has been typed in the fields are removed.
Another way to add a new record is to scroll to the bottom of the list using the Down or PageDown keys. If you go past the last record/row, the ‘New Record’ option appears.
Finding a row by navigating
You can easily navigate through the rows in the data form by using the following options:
- Move through rows one at a time, using the up/down scroll bar arrows
- Skip to every 10 rows by clicking on the vertical scroll bar
- Move to the next row in the range/table by selecting Find Next
- Move to the previous row in the range/table by selecting Find Prev
Finding a row by using the search criteria
- Click Criteria, then enter the comparison search criteria within the data form.
This will filter all items that begin with the comparison criteria. For example: Typing “Sc” in the CDR criterion, then enter, will bring up “Scott” and “Schirra”.

- Use Find Prev and Find Next to navigate through the rows that match the criteria
- Use Form to return to the data form to add, change or delete rows
Use a wildcard to find values that share some characters. For example:
| Use | To find … |
|---|---|
| ? (question mark) | Any single character For example, All?n finds “Allan” and “Allen” |
| * (asterisk) | Any number of characters For example, X* finds “XI”, “XII”, “XIII”, “XIV”, “XVI” and “XVII” |
| ~ (tilde) followed by ?, *, or ~ | A question mark, asterisk, or tilde For example, 17~? finds “17?” |
Changing data in a row
- Find the row that you wish to change within the data form.
- Change the data in the row
- After you finish changing data, press Enter to update the row, Excel will automatically move to the next row.
- You can undo any changes you have made by selecting Restore before pressing enter.
Deleting a row
- Find the row that you wish to delete within the data form.
- Click Delete
- You will receive a prompt to confirm the operation, you cannot undo a row deletion once confirmed.
Form Table is old and tired
Form Table hasn’t had any attention for many years and boy does it show. Microsoft has done a lot to improve Tables but nothing for Form Table. It has all the hallmarks of a ‘tick box feature’, something that Microsoft can use to ‘tick the box’ in a list of features, but really is the minimum necessary to qualify.
The interface is awful. No proper navigation tools like player buttons to jump to beginning and end also forward and back one at a time.
The form isn’t resizable. If there’s many rows/fields, they might not all appear in the same view.
The form is modal, meaning once you open the Form Table, the rest of Excel isn’t available, even other workbooks. Ideally the Table Form would be non-modal so you could switch between the table and the form. The visible row in the Form could also be highlighted in the table.
It’s a very clumsy search by modern standards. Even the button label ‘Criteria’ instead of the usual ‘Find’ or ‘Search’ seems out of place. There’s no search across all fields. The filtered Form page has no indication that it’s filtered. When you return to Form from Criteria, the Form returns to the last viewed record even if that record doesn’t match the new search. Users must know to press ‘Find Prev/Next’ to start using the criteria.
Add Form Button to the Quick Access Toolbar
To add the form button to the Quick Access Toolbar:
Click on the drop-down arrow next to the Quick Access Toolbar
Select More Commands

In the Choose commands from box, select the drop-down arrow, and choose All Commands, and then select the Form button in the list, click add then click OK.

Excel Table Cards for smartphones
What are Excel Tables and why you should use them
How to convert Excel tables to HTML tables
Stop accidental duplicates in your Excel lists or Tables