Get the best quality images in a PDF file made from Microsoft Word for Windows by changing some simple settings. There are also options in Word for Mac, Excel and PowerPoint.
Better quality images in the PDF file are possible, starting with Word’s settings for saving images within the document. Then changing the image quality option when exporting to PDF.
The default settings in Word for Windows will compress and reduce the quality of pictures in a document and that will continue when exporting to a PDF version.
Word image quality options
To get the best possible image resolution, first check the quality of images that are saved in Word documents.
Go to File | Options | Advanced | Image Size and Quality.

Choose the settings for a currently open document or all future new documents.
The Word defaults ‘optimize’ for document size. ‘Optimize’ here is a euphemism for reducing image quality when pictures are inserted into a document. The overall aim is to keep document files relatively small.
For the best quality images in the Word document saved, change these settings:
Do not compress images in file – turn ON
Default resolution – High fidelity which appears to mean insert pictures are not compressed or altered.
Those settings only apply to images added to the document from that time. Any images already in the document will have been saved using the image quality settings at the time of insertion.
Save as PDF – Optimize for image quality
Any image can lose quality when converted from Word to PDF. It all depends on how the PDF is created and the settings used.
In Word for Windows there’s a choice when Save As PDF from File | Export or File | Save As then choosing PDF as the file type.
For the best quality choose:
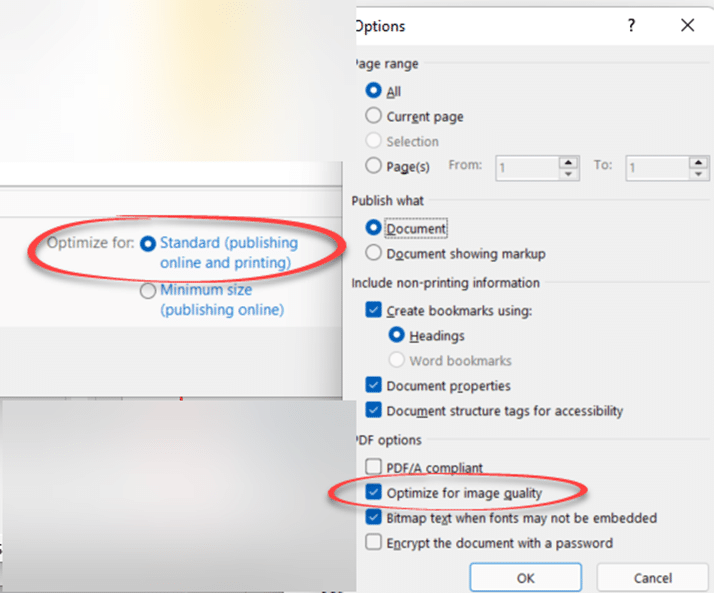
Standard (publishing online and printing)
Then in the Options:
Optimize for image quality – turn ON, here ‘optimize’ means better quality pictures.
PDF/A compliant – turn OFF
Those settings appear to stop Office from downgrading the quality of the images from the original document to the PDF version. Though Microsoft’s documentation on this is lacking.
The exported PDF will, of course, be larger. Pictures take up a lot of file space in PDFs and Office documents.
Word for Mac
Word for Mac doesn’t have any detailed PDF export options beyond ‘Electronic distribution and accessibility’ or the higher quality choice ‘Best for printing’.

What about Excel and PowerPoint?
Excel and PowerPoint can both export to PDF files but neither have any image optimize choices.
At least Excel and PowerPoint for Windows have some choices from the ‘Save as PDF’ window there’s:

Standard (publishing online and printing) – meaning higher quality and larger PDF.
Minimum size (publishing online) – smaller PDF size with lower resolution.
Choose the Options button to see the other choices, though they aren’t as extensive as Word for Windows and don’t include the image optimization option.
Conclusion
It’s possible to get higher resolution images saved from a Word document to a PDF file by choosing the right options in modern Word for Windows.
However, PDF isn’t intended to be a way to share images. If you want to send the highest quality images, share them via email or save to cloud storage. Some PDF editing/creation tools let you add attachments to a PDF, use that option to attach images at exactly the resolution you intend to share.
All the options to make a better PDF from Word
How to print a broken PDF
Two choices to make a PDF – Save or Print?
Combine, merge or split your PDFs for free