We have recently discussed how to show hidden formatting characters in Word, but it is also possible to hide text and even images in Microsoft Word, as long as you are using Word desktop on Windows or Mac.
See Find and Remove Hidden Text in Word
Hidden text positioning and formatting tricks in Word
Why hide?
Why would you want to do hide text or other elements?
Well, you might want the option to print the document without some of the text showing, or you might want different versions of the document for different people to work on without being distracted by unnecessary content.
This is not a security measure – anyone with access to the document can display hidden text and search for it. You are only hiding it for convenience or aesthetic purposes, not to keep it away from prying eyes.
A common use of hidden text is for a quiz. Instead of having two documents, one with the questions only and other with questions & answers. Use hidden text to hide the answers for a questions only version of the same document.
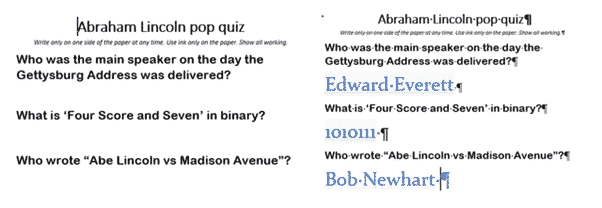 Students quiz (left) and Teachers version (right) from the same document.
Hidden vs Visible
Before we go any further, lets clarify some terms used in Word. The terms Hidden and Visible have specific meanings in Word and the difference is important.
Hidden – is a text attribute, like Bold, Italics, Subscript etc. It can be applied in the Font dialog or part of a style.
Unhidden – just means turning off the Hidden setting, which is the usual way.
Visible – means that text appears on the screen or page. As you can see above right, text can be at the same time both Hidden (with dots underneath) and Visible (shows on the screen)
Text or objects can be Hidden and Invisible (above left) or Hidden and Visible (above right). Of course, text is normally Unhidden and Visible.
There’s a trick to leaving space for answers that we’ll explain as well as using a style to quickly manage hidden text.
How to Hide Text
To hide a piece of text, select the text that you want to hide and either:
- Type Control + Shift + H
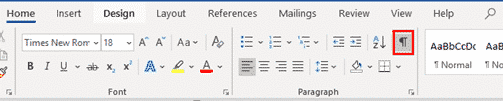
- Click the arrow at the bottom right of the Font group on the Home tab.

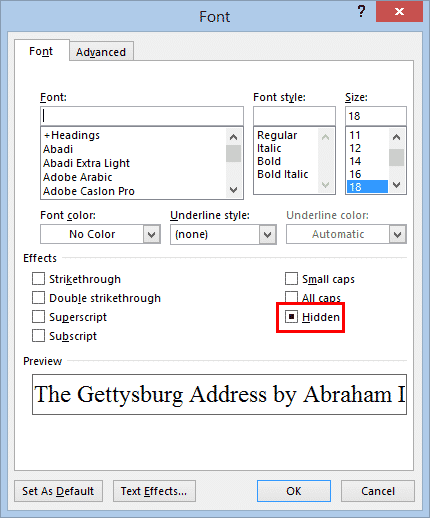
Then, in the Effects group, tick the Hidden box and click OK.

How to Hide Images or other objects.
You can hide images or any other objects in your text in exactly the same way – select the image and press Control+Shift+H or tick the Hidden box in the Font dialog.
This only works, however, if your image has been set to the default layout option of inline with text.

If your image uses one of the text wrapping options, you will not be able to hide only the image – you will instead have to select the whole paragraph that contains the image and hide that.

Show Hidden Text
To temporarily view hidden text, without actually unhiding it, you do exactly as you would if you wanted to view hidden formatting characters. – type Control+Shift+8 or click the Show/Hide Button on the Home tab.
Any hidden content in the document will now be shown again, but with a dotted line underneath it.

Show ONLY hidden text
If you want to show only hidden text without all the clutter of paragraph marks, dots-for-spaces etc, change the settings for Show All at File | Options | Display | Always show these formatting marks on the screen.
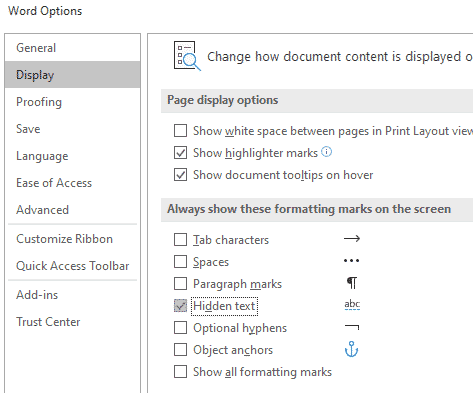
UNcheck all the boxes except make sure Hidden text is the only one selected.
Now the Hidden text is visible, just like the example above, but without the distracting extras.

Unhiding text or objects
Now that you can see the hidden text again, you can permanently unhide it the exact same way that you hid it – type Control+Shift+H or open the Font dialog on the ribbon and this time untick the Hidden box.
But it would be very time-consuming to do this for every hidden passage if you have a lot of them in a large document. If you want to permanently unhide all of the hidden text in your document, just select the whole document with Control+A and then open the Font dialog again. Note that this time, as you have selected a mixture of hidden and unhidden text, the Hidden box in the dialog will appear with a black square in it.
This time you will have to tick on the box twice – the first click will tick the box and hide all text, and the second click will untick it to unhide all the text.
Note that Control+Shift+H will not work for unhiding all the hidden text at once, because this is the equivalent to ticking the Hidden box, and will hide all of the text in your document, and hitting the same keys again won’t unhide the whole document, because it is no longer selected! If you do make this mistake, don’t panic – just type Control+A again to select all of your text and then you can use Control+Shift+H to make it appear again.
Finding within Hidden Text
Hidden text only appears in a Find when the text is visible on the page.
That’s important. If you’re searching a document with hidden text, make sure Show All is ON.
Word Counts and Pagination
Most Word features treat hidden text like it doesn’t exist.
Word Counts ignore hidden text (visible or not).
Pagination and page counts ignore hidden text when it’s not visible on the page (e.g. hide two pages and the doc page count drops).
Hiding in Styles
Hidden is a formatting option in Styles so you can switch all text in a certain style from visible to hidden in a flash.
We did that for the quiz example above. All the answers are in a character style cunningly called ‘Answers’.

Style | Format | Font | Hidden applies the hidden attribute. You can see it listed in the style description.
To switch between the full document and students only version, only the Hidden option (Format | Font) needs changing.
Why a character style not a paragraph style? That’s to leave space for answers.
Print or Don’t Print Hidden Text
When you print a document that has hidden text, by default the hidden text will not be printed, but you can choose to print it if you want. Unfortunately, you can’t choose this on a case by case basis when you’re printing; you have to set your choice in the Word Options before you print.

To set this, go to File | Options | Display. Then go down to the Printing Options area and tick or untick the “Print hidden text” box, depending on your preference.
Reveal Hidden Characters and Word’s secrets with Show All
Sort by hidden column in Word
Hidden Text Printing options and workaround for Word