Microsoft Forms can export survey/quiz results to an Excel workbook, here’s how to do that easy and efficiently and the limitations that Microsoft hasn’t fixed for most customers.
The current method of getting Microsoft Forms results into Excel isn’t very elegant. It doesn’t make use of Excel’s excellent data import and update features. Microsoft has chosen not to fix this, despite requests and the passing of at least three years.
At the moment, you have to download an Excel worksheet with the Form results to date. The Excel file doesn’t have a consistent or predictable name so it’s not possible to get the results as an updatable data feed into Excel or Excel’s PowerQuery.
Enterprise customers have a way to do it, though it’s hardly obvious. More on that below.
When or If Forms integration with Excel improves, here’s the best way to do it.
In short:
Separate the downloaded data source (‘Results workbook’) from any PivotTables and charts you make (‘Analysis workbook’).
Download the Excel file to a ‘Results workbook’ on your computer. Make a separate Excel worksheet (‘Analysis workbook’) and link it to the current results worksheet using Get & Transform. When more results arrive, download another results worksheet to the same file name/location then update your data link.
Download Forms results
Download an Excel workbook with all the survey/quiz results to date. On the Forms admin pages go to the Responses tab then ‘Open in Excel’.

Over time each download has a slightly different name. The workbook download is the Form name plus the range of results included. For example; Geography Quiz (1-52).xlsx then a later download might be Geography Quiz (1-100).xslx
Instead of saving to your computer with a different name each time, save to the same file name and location.
Make Analysis workbook
Now make a separate Excel workbook for your analysis and collation of survey data.
Go to Data | Get and Transform | Get Data | From File | From Workbook then choose the results workbook you save from the Forms site.
The PowerQuery navigator will appear to select what sheets or tables to use from the workbook.
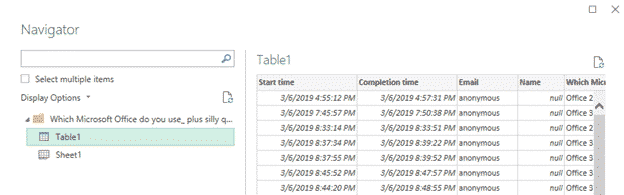
In this case the Table and Sheet are the same data. Choose the Table1 option then Load.
The survey results are loaded into a worksheet/tab. We rename that tab to something like ‘Raw Data’ for clarity.
Make a chart
Now the survey data is loaded, go ahead and make all the Charts, PivotTables and PivotCharts you like.
For example, select a single results column, the Insert | Recommended Charts. Most likely Excel will suggest a simple bar chart.

Advanced users can go into PowerQuery to make separate queries and filters on the incoming results.
Updating your worksheet
This is where separating the survey results from the analysis worksheet pays off.
Anytime later, return to the Forms site and download the survey/quiz results again. That workbook will have both the previous and latest results in one file.
Save the new .xlsx to the same name and location as your previous survey results (i.e. overwrite the previous results workbook).
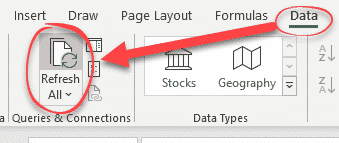
In the analysis worksheet, refresh the query from Date | Refresh All. That will update the survey results from the newly saved results workbook. All your PivotTables, charts etc will be updated to reflect the latest results.
Direct Forms import for Enterprise customers
Users on higher end Microsoft 365 Enterprise plans (E3 and higher) have the ability to import Forms data directly. To do that, the Form has to be created within Excel 365. Look on the Insert tab | Tables for a Forms button.

PowerAutomate workaround
If your Microsoft 365 includes PowerAutomate, a Flow can link each new Form Response to a separate workbook. The Flow works like this:
- Forms: When a new response is submitted
- Forms: Get response details
- Excel: add a new row into a table.
Since the Excel workbook has a fixed name and location, you can link to it from other Excel workbooks.
A modest proposal …
A simple fix for all of these clumsy workarounds is in Microsoft’s hands.
All they have to do to change the naming of the saved Forms responses to a single Excel file name, instead of adding the number of responses. Do that and all these workarounds would not be necessary.
Tricks with Form data in Excel
A few suggestions for things to do with the Forms data.
Time to complete Form
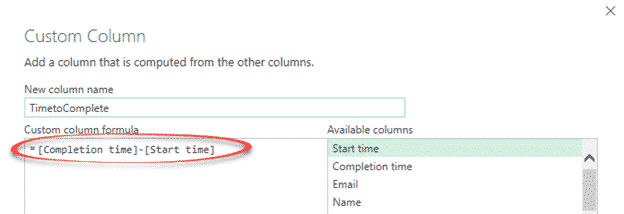
How long did each person take to complete the form? Very short times might be a bot or someone not properly reading the questions.
Time to complete the Form can be shown from PowerQuery, Add Column | Custom Column and the formula [Completion time]-[Start time]
Hide unwanted columns
As usual there are things to do beyond the basics. For example, the current results include unused Email and Name columns. To tidy up the table you see, those columns can be removed (hidden) in the PowerQuery.

Change Start or Completion to Date/Time only
Incoming dates are automatically converted into Excel date format. Use the Transform tab to change Start or Completion time to Date Only or Time Only.

Or change the times to another time zone by adding/subtracting hours.