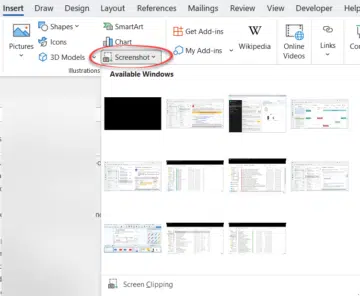
There’s a simple way to copy a screen image into Word, PowerPoint, Excel, Outlook or OneNote.
Word, PowerPoint and other Office apps for Windows (Office 2010 and later) has a Screenshot option to paste an image from any open program window into a document or email.
Go to the Insert tab of the programs, there’s a Screenshot option, click on that to display a gallery of the open program windows.

Like many Office features, the look might change a little over the years but the basic feature remains the same.
If none of the gallery items suits you click on Screen Clipping at the bottom. The Office app window minimizes and you can choose a screen area.
Whichever way you choose, the screen shot is pasted into your document as an image. Then you can move, copy, caption or edit the image just like any other picture in your document.
Office integrates taking ‘screen shots’ into
- Word
- Excel
- PowerPoint
- Outlook in email editor
This is a boon for technical writers and sundry tech geeks. But regular people have a good use for it too.
If you’re asking for technical help there’s often the problem of accurately describing what you are seeing on the screen. Outlook has screen clipping available in the email editor so you can write a support question complete with snapshots of what you are seeing (error messages etc).
Office screen clipping doesn’t cover all situations. It can only grab images of static windows; you can’t get an image of a right-click menu or even a pull-down list or gallery from the Office ribbon. In other words, Office screenshot does the basics but it’s no replacement for a more powerful tool like Snagit.
OneNote Screen Clipping
OneNote is a little different, there’s no gallery of open windows. The Insert tab has a Screen Clipping button. Click that then select a screen region to be copied into the OneNote page.
