Creating polished, consistent headers and footers in Microsoft Word is easier than you think. This guide walks you through every step—from adding page numbers and section-specific layouts to using “Different First Page” for cleaner title pages. Whether you’re preparing reports, articles, or academic papers, these techniques will help your documents look professional, organized, and reader-friendly in no time.
Once set up, they require little maintenance, yet they add a sense of polish to every page. Word has many matching header and footer designs that you can use immediately or as the starter for your own design.

Whether you’re preparing a business report, a project plan, or a professional article, using headers and footers properly ensures your document stands out. They add a professional touch to your document and displays key details such as the title, page number, author name, date, or copyright.
Accessing the Header and Footer
Double-click the top or bottom area of any page (in Print Preview mode) to open the Header & Footer editing mode. Alternatively, click on the Insert tab by choosing either Header or Footer.

You will see the Header and Footer options here. Clicking on the Header or Footer option will open a dropdown menu with several predefined styles. You can select a style from the list or choose Edit Headeror Edit Footer to create a custom layout.

Adding Content to the Header
When the header area becomes active, you can type directly into it—for instance, to add the document title at the top of every page. Format the text just as you would in the main body by adjusting the font, size, and alignment to achieve a professional look.

Inserting Page Numbers
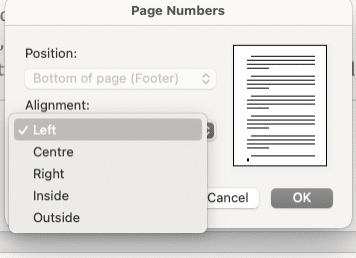
Page numbers make it easier for readers to navigate your document. To add them, navigate to the Insert tab | Page Number, and choose your preferred format.

Microsoft Word offers multiple options, including standard numbers, Roman numerals, and custom formats. You can choose where you want the numbers to appear—top right, bottom center, or another location.
Once inserted, the numbers will automatically update as the document grows.
Different First Pages
In some documents, especially formal reports, or books, you might not want the first page—such as a cover page or title page—to display a header or footer. Microsoft Word allows you to customize this easily.
Double-click the header or footer area to activate the Header & Footer tab. Then select the Different First Page checkbox. Word automatically removes the header and footer from the first page while keeping the same formatting for the remaining pages.
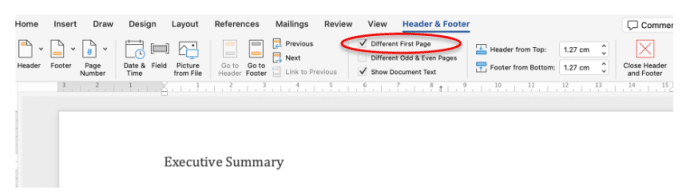
This feature helps maintain a professional and organized look, ensuring that your title page appears clean and uncluttered while the rest of your document maintains consistent headers and footers, such as page numbers, titles, or author names.
Adding Section-Specific Headers and Footers
When your document contains multiple sections, such as chapters or appendices, you may want each to display its own header or footer. To achieve this, place the cursor where you want your new section to begin, go to the Layout tab, select Breaks, and choose Next Page (or another section break type). Or create a style (probably a Heading style) which automatically adds a new section.

After creating the section, double-click in the header or footer area to open the Header & Footer editing mode. By default, headers and footers are linked to the previous section. To make them independent, turn off Link to Previous.

Link to Previous
Sometimes Headers and Footers get out of sync in a long document with multiple sections.
If that happens, go through the document and check the “Link to Previous” setting. You might need to turn it on to make the header/footer consistent.