Don’t be scared of Master Documents – just very, very careful. Master Documents is useful and sometimes essential but it’s not the most stable or reliable part of Microsoft Word.
What is a Master Document?
In Microsoft Word, a Master Document is a Word document which has links to other documents – called sub-documents. Each sub-document is another Word documents to be opened and edited separately.
The main use for Master Documents is to break a large project like a book, report or thesis into smaller manageable parts. Large Word documents can be slow and cumbersome to edit and navigate. Breaking into sub-documents makes Word run much faster.
Once all parts are done, use a Master Document to bring all the sub-documents together into one, seemingly, single document for printing or export.
Some Word experts think it’s best to avoid Master Documents completely. Having used Master Documents regularly for years and occasionally suffered for it, I’m inclined to a cautious middle path. Use Master Documents but with caution and only under certain conditions.
Safer Master Documents
Here’s some of the basic tips for safe Master Documents in Word.
Local folders only
Don’t save master or sub-documents on OneDrive/Sharepoint or other cloud service. Even if it works, Master Documents is more likely to fail.
Nothing in the Master Document (almost)
Try to have all content in sub-documents. Only the sub-doc links in the Master Document.
Open Master Document only when necessary
Edit sub-documents separately whenever possible. Only open the Master Document and sub-documents when necessary and for as short a time as possible.
Backup
Take regular backups of the master and sub-documents. Windows File History is ideal for this.
Making a Master Document
There’s three ways to make a Master Document:
- Create blank sub-documents from a Master Document
- Insert existing sub-documents into a Master Document
- Split a big Word document into sub-documents, not recommended.
Finding Master Documents
Master Documents are hiding away on the View tab under Outline. That opens an Outlining tab with section for Master Document.

Outline view shows headings and optional text of a document. It’s not often used, partly because the Navigation Pane has somewhat taken over for daily use.
Click on ‘Show Document’ to open up all the Master Document options, though many will be greyed out.

Create blank sub-documents
The easiest and most reliable way to make and link a sub-document is from the Master Document.
This is the recommended way to start a Master Document collection. If you have existing Word documents, paste from them into new blank sub-documents.
- Add a heading to the master document
- Select that heading
- Select Outlining | Master Document | Create.
The heading will change to a sub-document like this for “Limbo” with a little document icon at left and a box around the entire sub-document

Behind the scenes, Word has made a new document in the same folder as the master document, using the heading line for the document name,

Selecting multiple headings will make lots of sub-documents at once. Here’s how that looks in the Master Document

Now close the Master Document and edit the sub-document individually.
You could work on the sub-documents from the Master Document but that’s not recommended.
Insert sub-documents into Master
If you have Word documents already, they can be added to a Master Document via Outlining | Master Documents | Insert then select a Word document,
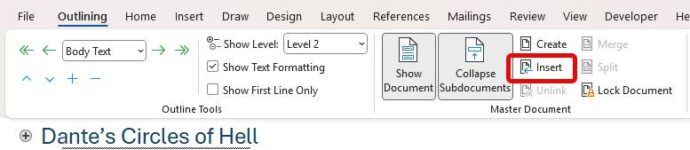
Unless the master and sub documents both use the same template, you’ll likely get style conflict warnings. It happens because both documents have a style with the same name and Word needs guidance on which style to use. The better choice is “Yes to all” so the sub-document styles match the master document.

Other Master Document options
There are other features available like Merge and Split which seem nice but add complications which Master Documents doesn’t need.
Putting it all together
There are a few things that can only happen with the Master Document, such as links between sub-documents (e.g. links between chapters) and a Table of Contents for the entire document.
Master Documents is most likely to fail when all the sub-documents are open so only do that when necessary. Here’s my checklist:
- Open the Master Document go to View | Outline | Show Documents | Expand Subdocument.
- Close Outline view and return to Print View.
- Check that the Header/Footer are consistent for the whole document.
- Make any changes necessary.
- Add internal document links which cross between sub-documents.
- Insert Table of Contents (ToC) for whole document.
- Update all links and ToC. Select All (Ctrl + A) then Update (F9).
- Output whole document
- Export to PDF
- Save a single, large document. Make a copy of the Master Document then use Unlink to put sub-doc content into the master doc.