Office Picture Manager, the much loved and simple image editor was dropped by Microsoft, but it’s still available. Picture Manager has some features that aren’t in Windows 10 to this day. Here’s how to get it for free.
There are two ways to get Office Picture Manager (OPM). Both involve doing a custom installation of a larger package, but paring down the setup to just Office Picture Manager and nothing else.
- Download the free Sharepoint Designer
Or
- Install Office 2010 from an old download or DVD you might have. Or use install media for Office 2003 through Office 2007 (the most recent version you have).
Details on each installation option are below. We’re obliged to several Office-Watch.com readers (Robert V. and Ron S. got in first) for pointing out the Sharepoint Designer option.
Using Office Picture Manager
Once it’s installed, Office Picture Manager is available on the right-click menu when you select an image. Look for the name of the primary package you installed (SharePoint Designer, Office 2010 etc).

Use ‘Choose default program’ or ‘Choose another app’ (depending on your version of Windows) to make Office Picture Manager the default program for that file type.

Helen Bradley explained Office Picture Manager for Office-Watch.com back in 2004 and it hasn’t changed much (or at all) since then.
The Compress option is explained at Making pictures smaller – some more options.
Here’s the ‘step-by-step’ detail for installing Office Picture Manager with SharePoint Designer or Microsoft Office media.
SharePoint Designer
Download Sharepoint Designer from https://www.microsoft.com/en-us/download/details.aspx?id=16573 a 260MB file. Anyone can download and install SharePoint Designer, no licence key is required.
Start the installation, as usual, until you get to choose the type of installation. Choose Customize.

For all three options under ‘Microsoft Office’ choose ‘Not Available’. Namely ‘Microsoft Office Sharepoint Designer’, ‘Office Shared Features’ and ‘Office Tools’.
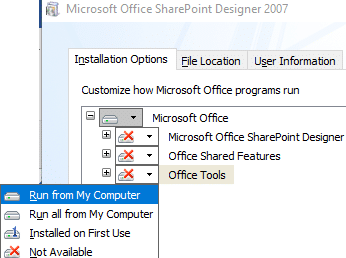
That’s turned off all the install options. Now only turn back on the Office Picture Manager option under ‘Office Tools’. Select ‘Run from My Computer’.

Continue the installation as usual.
Office 2010 and earlier
You can install just Office Picture Manager (OPM) from an ‘old’ Office installation download or disk. You’re only installing OPM so it won’t conflict with a more recent MS Office already on the computer.
Here’s how it looks with Office 2010. It’s similar steps with earlier versions of Office back to Office 2003.
Start the Office installation as usual. You’ll need your Product Key to match that version of Office. If you don’t have the key code anymore, use the SharePoint Designer option instead.
Choose a Custom install then select ‘Not Available’ for all the options, including ‘Office Tools’.

Under ‘Office Tools’ find ‘Office Picture Manager’ and select ‘Run from My Computer’.

Click ‘Continue’ to do the install.
Making pictures smaller – some more options.