If you have words or longer sections of text that you type frequently and don’t want to have to type in full each time, Word allows you to set your own shortcuts to automatically enter this text in a few keystrokes either AutoCorrect or AutoText.
There are two ways to do this. For shorter pieces of text, you can use word’s AutoCorrect feature. Just as Word by default corrects certain mistypings of words automatically, you can take advantage of this feature and tell it to treat your shortcut text as a mistyping and correct it to the full text you want. This option is limited to 255 characters. For longer blocks of text, you can use Word’s AutoText feature which is designed specifically for this purpose.
AutoCorrect
To be topical, let’s say we are tired of typing out COVID-19 and want to set up a shortcut so we can type it more quickly. We want to be able to just type “cvd” and have Word change this to “COVID-19”.
First, we type the full text that we are wanting to set up the shortcut for, and highlight it. If you have any formatting such as bold, italics or different text colors that you always want to be applied to that text, include that as well.
NOTE: It’s a good idea to have the text included in a sentence when you highlight it, or at least have something after it. If you have just typed the text on its own, Word may insert a return after it when it creates the shortcut.
Then go to File | Options | Proofing and click the AutoCorrect Options button.

The text you just highlighted should now appear in the With section under Replace Text as You Type. Make sure the Replace Text as You Type box is ticked.
In the Replace section, type the shortcut text and click Add, then OK.

Now, any time you type “cvd” followed by a space, Enter, or any punctuation mark, Word will automatically change it to “COVID-19”.
Plain Text vs Formatted Text
If your text includes formatting that you always want to be applied to that text, select Formatted Text, or select Plain text if you don’t want any special formatting applied. (I.e. using the style at the insertion point).
For multiple documents, you’ll probably want the Plain text option so the Autocorrect insertions blend into the document formatting.
Acronyms vs Full Name
Quite often there’s a common acronym for an organization as well as the full, long-winded name.
HHS – U.S. Department of Health and Human Services
MSFT – Microsoft Corporation
You’ll want to type both so an Autocorrect for ‘HHS’ to the full name will stop any acronym appearing.
Peter Deegan’s long–time tip is to add a tilde or other special character to the acronym for the autocorrect trigger. Type HHS~ and it can convert to the full name, type just HHS and nothing happens.

Changing or Deleting an AutoCorrect Entry
To make changes to, or remove an AutoCorrect entry, go back to File | Options | Proofing AutoCorrect. Find the entry by typing the shortcut into the Replace field, or scroll down the list. To remove the entry, click Delete, or to change the text that will be created, type the new text in the With field and click Replace.
Note that Replace only works to change the text that your shortcut will create, i.e. if you want the “cvd” shortcut to type something different. If, for example, you decide you want your shortcut for COVID-19 to be “cv” instead, you will need to delete the existing shortcut, and set up a new one.
AutoText
The AutoCorrect method only allows you to insert a maximum of 255 characters with a shortcut. If you have longer blocks of text that you want to insert, you can use the AutoText feature.
Just as an example, let’s say we want to be able to enter the Gettysburg Address quickly and easily. Again, we need to start by already having the text in our document. This time, we select the text and press Alt + F3.
This will open the Create New Building Block dialog. Give an easily identifiable name to the new ‘building block’ you are creating. This name should be at least four characters long. We’ll just use the abbreviation “GettAdd”.

The Gallery setting should already be set to AutoText.
Mostly you can just leave the Category as General, but if you do create a lot of AutoText entries, you can choose to create different categories for them to make them easier to manage.
In most cases, you would leave Save In set to Normal.dotm, which is the default template applied whenever you start a new document. You would only need to change this if you are working on a custom template for use on specific documents. (You would need to have this new template already created to select it here.)
The Options setting allows you to choose whether to insert the content as it is, or choose options to always insert it on its own paragraph or on a separate page.
Inserting the AutoText Entry
When the time comes to insert your AutoText Entry into a document, there are two ways to do this.
Insert Tab
Go to Insert | Text | Quick Parts.

A dropdown of your AutoText entries will appear. Just click on the right one, and it will be entered into your document.

AutoComplete
The other way to insert your AutoText snippet is to just start typing the name of the snippet. Once you get to the fourth letter of the name, a preview of the text will pop up. Just hit Enter to insert the text. (If you don’t want to insert it, and just happen to be typing something else that matches the name, just keep typing and the pop-up will go away.)

NOTE: If this method doesn’t work, you probably have AutoComplete turned off in your settings. Go to File | Options | Advanced | Editing Options and check that the Show AutoComplete Suggestions is ticked.

Editing or Deleting an AutoText Entry
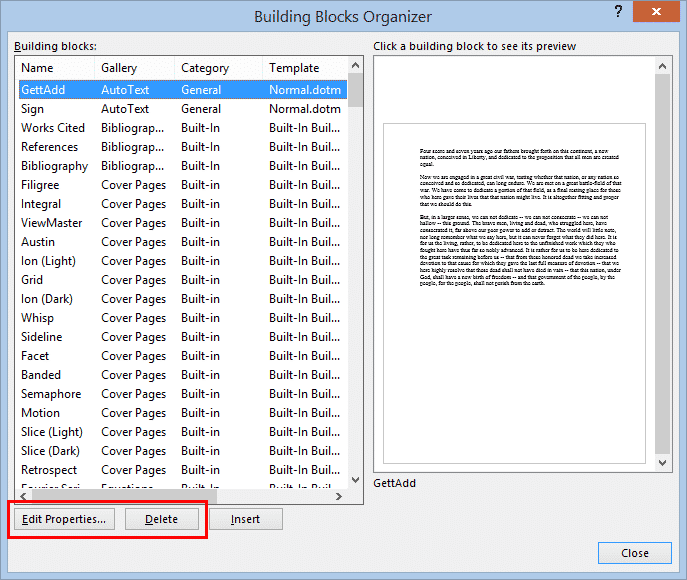
To make changes to any existing AutoText entries, go to the same place you went to insert one – Insert | Text | Quick Parts, and this time, select Building Blocks Organizer.

Find the entry that you want to change, select it, and click Edit Properties or Delete.
Note that editing an AutoText entry only allows you to change the settings in the Building Block Dialog, not the actual text that gets inserted. If you want to change the content of the text snippet, you will need to create a new AutoText entry, and either give it a new name, or delete the existing entry first.
Word’s split personality with AutoText
AutoText and the AutoTextList field
Is AutoCorrect making you boring or stupid?