There are long-standing but hidden parts to AutoText that’s worth checking out – the field codes.
Two Word field codes apply to AutoText:
{AutoText } – inserts or updates the named AutoText field automatically.
{AutoTextList } makes a menu of some or all AutoText entries to select from.
These field codes use the same AutoText entries that are on the Word ribbon (Insert | Text | Quick Parts). However, there’s no direct link between them and even the options available on the ribbon aren’t available in the field codes, or vice-versa. So don’t waste your time trying to figure out why, for example, AutoTextList uses the style to select AutoText which isn’t an option available from the menu.
AUTOTEXT
Instead of manually adding AutoText from the ribbon, you can add an {AutoText } field code to your document or template. This will insert the named AutoText at that location or update the current AutoText.
Don’t know how to insert Word field codes? See our quick guide to Word field codes.
A simple AutoText field looks like this to insert the AutoText called ‘DisclaimerFull’.
{ AUTOTEXT "DisclaimerFull" }
The AutoText name has to be exactly correct and, naturally, available to the current document (ie in an attached template).
Nesting AutoText
AutoText fields let you create an AutoText entry based, in part, on other AutoText. Handy when you have a short and long version of the same thing.
Make a new or replacement AutoText entry which includes existing Autotext in a field code. For example, here’s an Autotext with a list of main partners in a firm as AutoText (in the dark gray shading) included in a second AutoText which has the retired partners as well.

When the ‘PartnersAll’ Autotext is inserted, the included {AutoText "PartnersMain"} field is also inserted with whatever the current version of ‘PartnersMain’ is.
AutoText List
Lists of AutoText entries can be long and unmanageable. One workaround is the AUTOTEXTLIST field code.
It makes a little in-document menu of applicable AutoText entries. It’s designed to let you add parts to a document at the right places. For example, the opening paragraph to a customer – depending on whether they are new, current or lapsed.

Even after you’ve made a choice, the menu is still there to make another selection.

The above menu is made with this field code:
{ AUTOTEXTLIST \s OpeningParagraph \t "Is customer New, Existing or Lapsed?" }
This field shows a list of AutoText entries which have the style ‘OpeningParagraph’ in the formatting of the AutoText. Microsoft calls this ‘Context’.
Without a valid style or context setting you’ll get a long list of all Building Blocks! If you don’t have a \s switch, it will display all AutoText entries with the same style as the current paragraph.
If you hover your mouse over the field it will display the text after the \t switch.

Making the starting text
There should be text that appears before an AutoText entry is chosen. If not, it’s hard to know that the AutoTextList field code is there at all.
But making that text isn’t obvious. It’s somewhat glossed over in Microsoft’s documentation and not obvious from the Insert | Field | AutoTextList dialog.
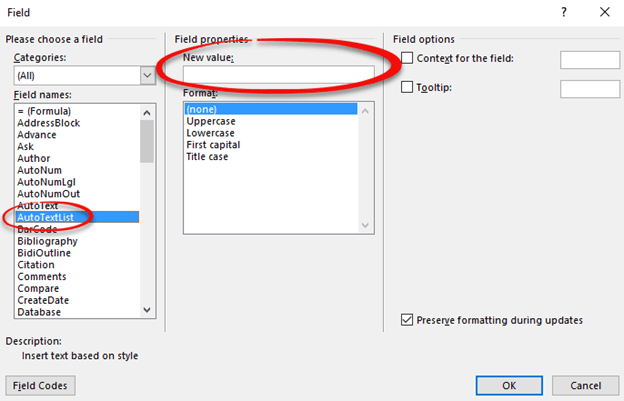
The ‘New Value’ item is really the ‘pre-selection’ text that’s visible in the document before the user chooses.
Alternatively, reveal the field code after it’s inserted and add some text immediately after the field code itself. Most likely you’ll need double-quotes before and after.
{ AUTOTEXTLIST "Right-click to choose an opening paragraph" \s OpeningParagraph }
Press Alt+F9 again to restore the display then select the field code and press F9 to update.
Now the text you entered in the field code shows in the document.

If you check the field code again, you can see that Word has removed the text you added. To change the visible text just click inside the gray field area and change the text directly.
Make AutoText menus stand out
The unselected AutoTextList field does NOT need the same style as the final text you choose. In fact, it’s better to make it different and stand out so it’s not overlooked.

When a selection is made, the formatting is replaced with the style and formatting in the AutoText entry.
The obvious ‘make a choice’ formatting can be direct character formatting or another style.
AutoText in Outlook Emails
Both AUTOTEXT and AUTOTEXTLIST work in Outlook’s email editor (which is Word in a thin disguise) but there’s tip and traps to keep in mind.
Here’s AUTOTEXTLIST in action for an email.

There’s no Insert | Field menu in the email editor so you have to make the field code manually (starting with Ctrl + F9) or make the field in Word then copy across to the email editor.
You can make a special email template which includes Word field codes. Save or update an email template with the field codes in the message body.
When you make a new email using an .oft Outlook email template, the field codes are in place but NOT updated. For example, an AUTOTEXT field code won’t show anything when you make a new email (strangely AUTOTEXTLIST will appear correctly).
To update a field code (like AUTOTEXT) you have to remember to select the entire message body then press F9 to update all fields.
Amazingly, the field codes aren’t even updated when you click Send! Word itself has an option to update field codes before printing but there’s no equivalent for Word as an email editor.