Behind the simple Mark Index feature in Word are some useful but almost hidden options. These give you many choices for making and formatting your document index.
Getting started with indexes in Word? Check out our starter, Simple Indexing in Microsoft Word.
Indexes are as much art and judgment as science so there’s always room for changes. It is always possible to add new entries, modify existing entries and delete unnecessary entries. If you’re not happy with your index, keep molding it until you are!
Select text then index
If you have selected a word and opened up the “Mark Index Entry” dialog box, the text will appear in the “Main entry” box.

The “Mark” and “Mark All” buttons are both available to you by default. The “Current page” option is also selected by default.
Mark – you are simply adding an index entry for the currently selected word into your index on the current page.
Mark All – finds all instances of the selected text and indexes it. Great for names.
Mark All
By clicking the “Mark All” button you are searching your document for every instance of the selected word/phrase and marking each occurrence as a separate page number (separated by commas) in the same index entry. For example, “Lorikeets, 1, 7, 12” would mean that the term “Lorikeets” was marked on pages 1, 7 and 12.
Multi-level indexing
The “Mark Index Entry” dialog box only has two boxes for entry levels, it actually allows for indexes to be up to seven layers deep if you want to get a little tricky.
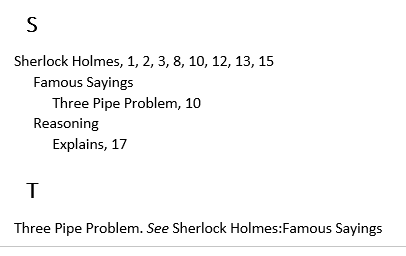
Type the entries (in either of the entry boxes) in hierarchical order separated by colons. For example, you could enter “Animals:Birds:Lorikeets” or “Sherlock Holmes:Reasoning:Explains“ to create a triple-tiered index entry.

As you can see from the field code, it doesn’t matter which entry box you complete because Word puts the whole lot together with colon separators.
{XE "Sherlock Holmes:Reasoning:Explains"}
It appears in the Index like this:

Multi-page Index Entries Pages Using Bookmarks
Normal Index Entries mark a single point in the document, the page reference is where the {XE} code is.
How do you create an index entry for something that spans a number of sequential pages in your document? Like this sub-entry for Mr Wilson …

It’s not as simple as you might expect. You can’t just select some text then Mark Index. That will just add a {XE …} code to the end of the selection.
Multi-page references are a two-step process. Add a Bookmark then Mark Index to that Bookmark.
A Word Bookmark is a label or tag for a part of the document.
To begin with, select the range of text (this could be any number of pages) that you want an index entry to refer to and navigate to “Insert | Bookmark”. In the “Bookmark name” textbox, type a name that describes the section and click “Add”. The Bookmark name doesn’t have to relate to the Index Entry but often does.
Back in the document, click at the end of the text you marked with a bookmark and use the ALT+SHIFT+X keyboard shortcut to bring up the “Mark Index Entry” dialog box. Type the index entry name in the “Main entry” textbox. Next, select the “Page range” radio button and in the “Bookmark” box select the bookmark you just created.

Clicking “Mark” will place the index entry into the index along with the page range that is associated to the bookmark selection. For example, “Microsoft Office, 7-11” refers to a range of pages referring to “Microsoft Office” that have been bookmarked.
Cross-Reference
You can also choose to “Cross-reference” one index entry with another.

‘Three Pipe Problem’ can point readers to the main entry under Sherlock Holmes.
Or “Lorikeets” could be cross-referenced with “Rainbow Lorikeets”. This would appear as “Lorikeets. See Rainbow Lorikeets” without a page number.
Cross-References don’t have to link with another part of the index. It’s just a text label so you can type anything into the field such as:
Sherlock Holmes
First Meeting. See story “A Study in Scarlet”
Introspection
Personal. See inside your own soul
Keep the Mark Index box open
The Mark Index dialog box can stay open while you move through the document.
After marking one index entry, select another piece of text in your document without closing the “Mark Index Entry” dialog box. You can then repeat the index entry process without having to constantly open and close the dialog box.
It’s the same behavior as Find/Replace/Go To or Insert | Symbol dialog boxes.
Hidden Text and The {Xe} Tag
After marking an index entry, Word will automatically turn on the “Show hidden text” and “Show all characters” options making your document appear full of strange characters. There is however a method in the madness.

Every index entry will have an { XE “index entry” } tag next to it. The {XE} tag is a hidden text index entry field that can only be seen when the show hidden text option is selected.
With the Show All characters option selected you are able to “see” whitespace formatting elements. For example, spacebar presses are represented by what looks like a slightly thicker full-stop vertically centered between two words. Paragraph symbols are also displayed where the “Enter” key was pressed. While this is not totally necessary, it does however display the exact formatting of the {XE} index entry fields.
A word of warning – if you turn off the Show All characters option and/or the show hidden text option and then attempt to mark more index entries, Word will immediately switch the options back on.
A peculiarity of {XE} field codes is that they do NOT show/hide with the Show/Hide Field codes shortcut (Alt + F9). That’s because {XE} fields are automatically marked as Hidden Text (look for the dotted underlining).
Show XE field codes but not other hidden text
Many people, including us, want to see the XE fields but not the rest of the Show All stuff like spaces and paragraph marks.

To turn off these options, go to File | Options | Display, in the “Formatting Marks” section select “Hidden Text” checkbox.

Turning off the “Hidden Text” checkbox is especially important after you have completed your index. While the hidden text is displayed, the page numbering related to index elements can quickly become inaccurate (as the {XE} index entry tags themselves increase the amount of text on any given page). Only after turning off the show hidden text option and updating the index’s page numbers will the index truly reflect the document and be ready for printing or distribution.
Bold and Italic index entries
The obvious formatting options for index entries are on the Mark Index Entry dialog.
Page number format – Bold and Italic

Those choices apply to the page number only in the index, not the index entry text.

Formatting individual index entries
Hiding on the Mark Index Entry dialog is a way to format the index entry, to make it stand out in the index.

The index entry itself can be formatted by right-clicking in the “Main entry”, “Subentry” or “Cross-reference’ field, clicking on “Font” and choosing the desired options.

If you look at the XE field code, you can see what Word is doing.

The formatting of the text in the XE field code is copied to the index entry. No need to use the Mark Index dialog, just select and format the text inside the XE field for the first entry of that word or phrase.
Size of the XE text isn’t copied to the Index but other attributes like color, style and even font are. We use this quirk to make the XE text a little larger and stand out from regular document text.
That means you can use Replace with field codes visible to change the formatting of existing index entries. Find the text in the XE code and replace with the same text but with different formatting.
Only the first formatting applies
What does Word do if there are matching XE entries with different formatting?

The format of the index entry is taken from the first XE field for that text.
In the above example, both index entries appear in the index using the red text; the blue formatting is ignored.
It’s probably wise to format all like index entries with the same formatting, just in case the first index entry changes (e.g. if the document is rearranged or opening text is deleted).
Simple Indexing in Microsoft Word
Quickly make Word Indexes with concordance or AutoMark