We’re going to talk about creating indexes in Microsoft Word. ‘Real’ books often have an index at the back which Word can create for you.
An index is a list of terms or topics that can be found within the document. Microsoft Word has the ‘fixings’ to make an index and automatic options to take some of the drudgery

These days, indexes aren’t as common as they once were. Online documents (in Word format, web pages or PDF) can be easily searched using Ctrl + F, making an index less needed.
Indexes still have a place, especially in printed books. Unfortunately, creating an index in Microsoft Word can be difficult and time-consuming to do on a large scale. This isn’t a slight against Word whose features are mostly adequate, but rather a testament to a conceptually difficult process that needs human judgement. There are professional indexers for a reason.
Hence this series in Office for Mere Mortals, starting this week with the basics; setting up a document to be indexed and then making a simple index.
Word’s Indexing features have barely changed in well over twenty years! Some button positions have moved but the core technology, field codes and shortcut are the same as in Word 6 from 1993.
Indexing in Word – the overview
In short, here’s how indexing works in Word.
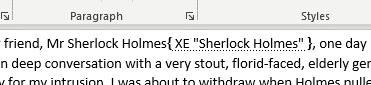
Entries are created by selecting parts of the text and adding an Index Entry. They are hidden from normal views of the document but do show up with the right settings.
This is an Index Entry {XE} for the term ‘Sherlock Holmes’.
The Index itself is made by Word which compiles all the {XE} entries into a list like this:

The {XE} we added above, appears in the Index as a reference to page 1 in the text.
Word has some dialog boxes to make formatting the index easy but underneath that is a field code.

Don’t panic … we’ll explain all this as we go along.
Preparing your first Index
Before jumping in at the deep end, we recommend that you first create a copy of your document (or another smaller document) to practice upon without having to worry about messing up the real thing. A file with a large index can get extremely complicated and confusing if you’re not certain about what you’re doing.
When you have grasped both the fundamental and, perhaps, more complex indexing techniques, come up with a method that suits your needs, then you can transfer your knowledge onto the real document without any problems.
Creating an index for an existing document involves two distinct steps:
- marking index entries
- generating the index
Making or marking a simple Index Entry
An index entry is a Microsoft Word “field code” that marks specific text for inclusion in an index. When you mark text as an index entry, Word inserts an { XE “Index Entry” } field formatted as hidden text.
To use existing document text as an index entry, first select a word or phrase that you wish to include in your index or just place the cursor at the right-place in the document. To enter your own text as an index entry instead, simply click where you want to insert it.
Use the Alt + Shift + X keyboard shortcut to insert index entries.
On the ribbon, go to “Reference | Index | Mark Entry” to bring up the “Mark Index Entry” dialog box.

The Mark Index Entry dialog box provides “Main entry” and “Subentry” boxes.
Main Entry
Most terms will fall under the “Main entry” category – a single term with its corresponding page number(s). The selected text is automatically inserted but you can change that, and often will.
Sub-entry
Or use the “Main entry” as a general heading or category for a collection of other terms otherwise known as subentries. For example, the main index entry “Animals” could have subentries “Birds” and “Mammals” – each which would be entered separately.
Here we’ve given Dr Watson a sub-entry for his weapon of choice.

Which appears in the index like this, below and usually indented from the main entry.

Add a few index entries then you’re ready to make your first index.
Word for Mac sidebar
A short aside for our Mac friends. According to Microsoft’s documentation, Word for Mac doesn’t have ANY in-built shortcut for Mark Index entry. No we could not beleive it either so we dug a little deeper.
There is an in-built Mark Index Entry shortcut Command + Option + Shift + X. It’s listed at Tools | Customize Keyboard.
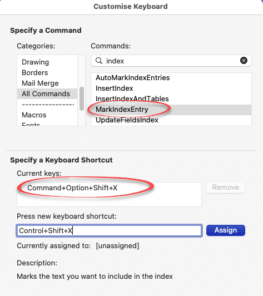
If you think that shortcut is clumsy (we do), try changing it to Control + Shift + X . That’s the closest we could get to the Winword shortcut (Alt+Shift+X isn’t possible in Word for Mac).
Show all
After marking an index entry, you will notice that the show hidden text and show all character options have both been enabled by Word. That’s so you can see and find index entries.

{XE} is the Word field code for Index Entry.
In the double-quotes is the index label. Each sub-level is separated by a colon e.g. “Dr Watson:Revolver” is the Main and Sub entry.
\b is the switch to add Bold formatting to that index entry. We’ll look at other switches later.
Create a simple Index in Word
Now there’s a few index entries in the document, let’s make an index from them.
Click the cursor at the end of your document (or wherever you want your index to appear), then navigate to “Reference | Index | Insert Index”
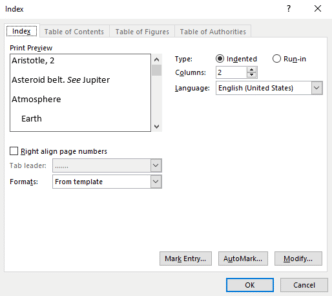
The Index dialog gives you a number of formatting options. The current formatting settings are displayed in the “Preview” pane.
Type: Indented or Run-in
The “Type” radio-button allows you to specify either an “Indented” or “Run-in” type of hierarchical display. You’ve already seen the common Indented index, here’s the run-in alternative:

Run-in takes less vertical space than Indented.
Columns
Another way to save space with an index is adding columns.
The “Columns” box allows you to specify the number of columns that the index will be displayed on per page. It’s much the same as Word’s normal multi-column support but lacks some of the column formatting choices.

The columns can be adjusted from the ruler. If you want better column control (like vertical lines between columns), try inserting multiple columns from the Layout tab then putting a single column index inside the multi-column section.
Right align page numbers
“Right align page numbers” checkbox gives more of a “Table of Contents” look to the index.
Tab leader are the characters between the entry and page number, they guide the eye along the line.

Index Formats
The “Formats” drop down box gives you a number of pre-defined styles to choose from that can be seen in the preview pane. The available styles haven’t changed much over the years, in Word 365 are:
- From template
- Classic
- Fancy
- Modern
- Bulleted
- Formal
- Simple
To design a custom style click the “Modify” button, choose a style and customize as you see fit.
When you are happy with your index layout as it appears in the preview pane, click the “OK” button and your index will be displayed in all its glory.
If you have made any changes to your index entries, always remember to click anywhere on your index and press F9 for those changes to appear in the index itself. Or right-click then Update Field.
That’s enough to get you started. In future articles we’ll look at the many hidden options in Word’s indexing plus some of its shortcomings.
Outlook is stopping Windows Indexing and how to fix it
How to STOP a specific document from being searched / indexed?
Match and Index lookup in Excel