Outlook has had a Categories feature for a long time … here’s how you can use it and why. Categories let you group Outlook items (emails, contacts, calendar and tasks) into broad topic areas or subjects … all without moving from their original folders.
They can be subjects that a normal Outlook search could not cover because the keywords may not be in all the items.
For example, here’s some messages about an upcoming trip:

Those messages may not show up in a search for the word ‘travel’ or ‘trip’ but appear immediately because they are tagged with a category.
It gets better because the search can be done across more than one folder. Here Travel category items are from email and calendar (tasks and contact items could be there too).

All that’s done with a few clicks on the Search tab and changing the search scope to ‘All Outlook items’.

Categories are a more flexible and faster alternative to having separate Outlook folders for different topics or subjects. Unlike separate folders, you can have the same email or item in different categories.
You can make a single semi-permanent folder showing messages from a category using the Search Folders feature, details on that below.
Outlook categories are also available on Microsoft’s webmail service, Outlook.com
Outlook Category Setup
When you get Outlook, there are ‘blank’ Categories ready with just the color name as labels e.g. ‘Blue Category’, ‘Yellow Category’ etc.

Each of the categories can be given a text label of your choosing. As you can see above, some have already been given the names ‘Medical’ ‘Travel’ and ‘Urgent’.
The colors themselves have no meaning except what you apply to them. The same color can be linked to different categories. You could give related or overlapping categories the same color (for example ‘Travel’ and ‘Flights’ both blue). The choice is yours.
Early versions of Outlook had preset names for the categories but many people thought they were fixed and could not be changed. Microsoft switched to the color labels in the hope that people would realize the labels can be edited.
Setting Categories
To setup your Outlook categories go to Home | Categorize:

Here’s the main Categories dialog:

Usually you’ll first change one of the unused categories like ‘Orange Category’. Select that item and rename it by either clicking the Rename button or double-click on the text label.
To change the color, click on the name then the color selector.
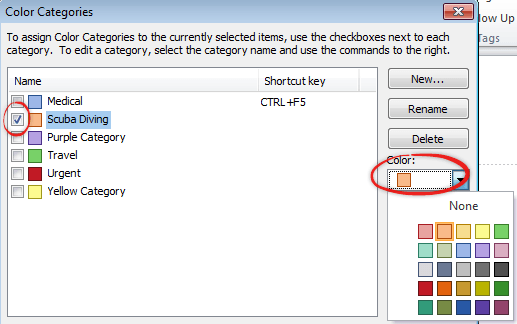
As you can see, there’s 25 colors to choose from, but not a ‘blank’ or ‘white’ selection.
Each category can have a shortcut key for quick applying to items. You’re limited to Ctrl + F key combinations. Don’t feel obliged to set a shortcut key, it is optional and not often used.
To make an entirely new Category, click the New … button, type in a name and select a color.

Warning
A warning about category names. Outlook should strip category information from outgoing messages but category information was sent out in older versions of Outlook, for example in a shared appointment or contact.
Even though the bug has been fixed. it’s still wise to avoid category labels that might be embarrassing such as ‘Fools with Money’ or ‘Simpleton Customers’, ‘Annoying Friends’ etc.
Other Category Traps
Outlook connecting to a mailbox with IMAP doesn’t support categories. You can apply categories to incoming messages via IMAP but any category settings aren’t copied back to the online mailbox store as they should be.
Category Order
There’s no way to change the order on category list so the more common ones are at the top. Microsoft locks you into alphabetical order (yes even in Outlook 2013).
The workaround is to use a trick that been around since the days of DOS, put an underscore, dot or some other characters before the text, so it appears at the top of the list.

The sorting order includes: “ . : [ ] _ { } < > before numbers then letters and finally ‘ and –
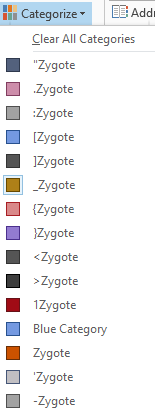
And if you think that’s a strange thing for a supposedly mature and sophisticated product … you’d be absolutely right.
Applying categories
To apply a category to an item simply select it then click on the category from the list at Home | Categorize.
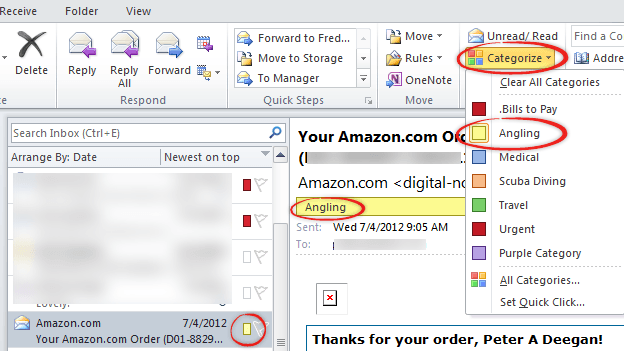
The category color and name appear above the item while the color appears on the item list.
You can apply more than one category to the same item.

To Deselect or unchoose a category simply click on that category again from the list on the ribbon.
You can also select/deselect categories from the right-click menu on the item list.
Conversations: A category is applied to an entire conversation (aka thread) including past and future messages.
Quick Click
Quick Click was added in Outlook 2010 as a way to quickly apply a category on the theory that one category is used more than most. It only works in views where there is a Category column (not all do).

The empty box means there’s no category set, You can right-click on the category box to see all options but a single click on the box will apply (or remove) the preset Quick Click category.
To preset the Quick Click category go to Home | Categorize | Set Quick Click … which is at the very bottom of the menu.

You can add categories to an Outlook view by right-clicking on the headings and choosing Categories
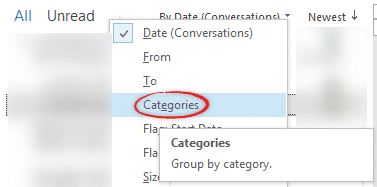
As you can see, it’s possible to group the list by categories. Or click on the heading to sort by category.
Automatically Set Categories
It’s also possible to apply a category automatically with Outlook Rules. Some incoming messages will always go into a certain category. For example, emails from an airline to ‘Travel’ or an emailed bill to a ‘Bills to Pay’ category.
To quickly make a rule, select an incoming message and choose Home | Tags | Create Rule. This adds the details of the message into a possible new rule. Select the conditions that apply; From, Subject or perhaps ‘Sent to’ then Advanced Options.

That opens the Rules Wizard. On the first stage you can change the triggers from the rule … most commonly making the tests so they catch the desired messages but not any more or less.
After clicking Next you get to the ‘What do you want to do with the message?’ choices. The second one down is ‘assign it to the Category’. Check that option then click the underlined category link to select the desired category or categories.

Here’s the finished rule with messages with ‘Lufthansa.com’ in the senders details automatically applied to the Travel category.

You’ll notice we also changed the rule trigger to ‘Lufthansa.com in the senders address’ since that’s more reliable than the simple ‘From’ rule.
This trick isn’t just for company emails. Some of our friends we only communicate about a shared interest (Tennis, Diving etc) so we’ve setup rules so any messages from that person automatically are linked to that category.
Removing Categories
There’s two parts to removing a category. Deleting the category from the Categorize list then, if you wish, removing the category tags from existing items.
Tip: to erase the category from existing items. It’s easier to do that first and later remove the unwanted category from the main category list
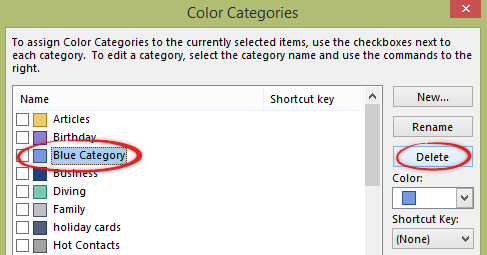
Removing a category from the selection list is easy, go to Home | Categorize | All Categories, choose the category then click the Delete button.
You can leave any existing items with the category, even after it’s been removed from the list.
If you want to remove the category appearing in existing Outlook items, find all those items (using a Search Folder, or grouping an Outlook view and selecting the items).
If only one category (the one you want to remove) is applied to the items, right-click on the selected items and choose Categorize | Clear All Categories.
If there’s a mix of category tags, select all the items, right-click and choose Categorize then deselect the unwanted category from the list (that’s why it’s better to leave the category list editing ‘til last).
Alternatively go to Categorize | All Categories then uncheck the box next to the category you want to remove.
Search Folders and Categories
Search Folders were added in Outlook 2007 and are a folder that contains the results of a specific search. If you’re regularly searching for the same thing, then a Search Folder will save you the trouble by always being ready at the click of the mouse.

With categories, you can have a search folder that will always show you the messages tagged in that category.
To make a search folder by category, right-click on the Search Folders item in folder and choose ‘New Search Folder’. The New Search Folder box has an option ‘Categorized mail’, click on that then choose the category and mailbox to search.

If you want to search by more than one criteria (e.g. Diving category plus the word ‘training’) choose the ‘Create a custom Search Folder’ option.
Search Folders have their limitations which Microsoft stubbornly refuses to address, seemingly on the basis that ‘close enough is good enough’. For example, only mail items can be shown so any calendar, contact or task items in the chosen category won’t appear in a Search Folder.
Categories and Mail Merge
If your contacts have categories applied to them, it’s possible to do a mail merge (letters or emails) to only the contacts with a certain category.
Go to Contacts view then filter or group the contacts so it’s easy to select the contacts you want to use in the mail merge.
In this example we’ve filtered by the Diving category then selected all the contacts (Ctrl + A).

You don’t have to select all, you could choose only some contacts from the list. Only those selected will be used in the merge.
Once selected, click on Home | Mail Merge. Because you’ve selected some items the ‘Only selected contacts’ option is chosen for you.

Then do a Mail Merge as usual.
Note that this option isn’t available if you start the mail merge from Word, instead of Outlook.
Under the Hood
For those of you interested, the main category list is saved in the Outlook PST file from Outlook 2007 onwards. Before then, categories were saved in the registry which drove people mad when they moved computers and their category list disappeared!
If you’re connected to Exchange Server, your categories and main category list will be copied automatically.
Outlook Profiles, important, useful but little known
Renaming an Outlook Profile
Outlook.com attachments to OneDrive: unanswered questions