Microsoft Word’s Styles Gallery can be fixed to show the styles you want, rearrange to the order you want, not the collection and order decided by Microsoft.

It makes sense to have the styles you use most frequently in a prominent place in this panel, and Word allows you to both add styles to the gallery, and to rearrange the order of them once they’re there.
Adding a Style to the Style Gallery
If the style you want to add is not in the Style Gallery at all, you can add it. First, open the Styles pane by clicking the arrow at the bottom right-hand corner of the Styles gallery, or pressing Ctrl + Alt + Shift + S.

If the style you are looking for doesn’t show in the Styles pane, click Options at the bottom of the pane.

Under Select Styles to Show, you can now select either All Styles, or if you have already used the style, select In Use or In Current Document to only show your currently used styles in the Style pane.

Once you have added the style to the Styles pane, you can now add it to the gallery. Hover over the style, click the arrow that appears, and select Add to Style Gallery.

Now if you drop down the Style Gallery, you should see your chosen style.

Changing the Order of the Styles in the Style Gallery
Changing the order of the styles in the gallery is a little more complicated. If you thought it would be a simple ‘drag and drop’ you’ll be disappointed.
Go back to the Styles pane and click the Manage Styles button at the bottom.

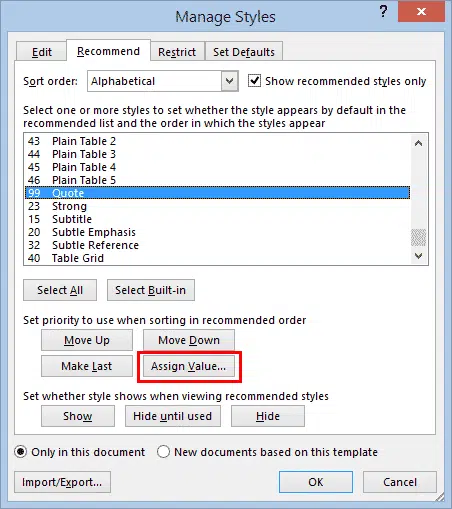
On the Recommend tab, find the style that you want to move. (Use the Sort Order dropdown and the Show Recommended Styles Only checkbox to sort and filter the list if necessary.)
Sort Order
Style Sort Order controls the position in the Style Gallery.
LOWER sort numbers appear first.
When you have found the style, choose Move Up, Move Down or Make Last.
For larger jumps in position (like moving Quote at 99 to a better position) select it and click Assign Value.

Enter the number for the position you want the style to appear in the gallery. We have decided that apart from the Normal style, we will commonly be using three levels of headings, and that quotes are our next most commonly used style after that. We want the Quote style in fifth position, so we enter 5 then click OK.

At the bottom of the dialog, we can also select whether you want this change to apply only to this document, or to all documents that use the same template.
As you can see, the top four values are taken. We chose ‘5’ but any value from 5 to 9 would put the style in the same position.

TIP: Leave gaps in the numbering so that future styles have a place to go. Otherwise you might be stuck tediously renumbering existing styles to make a gap in the style gallery order. Old time BASIC programmers might remember doing similar things with code line numbers back in the Stone Age <g>.
Click OK and the Quote style should now be the fifth one in line in the Styles Gallery.

NOTE: If, when you do this, you find the style does not appear in the position you expected, it may be because several styles have the same position number, and Word has got confused. Open the Manage Styles dialog again, and check the numbers down the side of the styles list.

Keyboard Shortcuts for Styles in Word
Styles for individual table cells in Word
Automatically Update Document Styles in Microsoft Word