Here’s the basics of how subtitling or captions works for PowerPoint. Using a simple text editor, you can create closed-caption files for videos and audio that you wish to make more accessible. It’s great for subtitling any video including one you’ve made of your PowerPoint presentation.
Closed captions or Subtitles are made and stored in text files with the .vtt extension (the WebVTT format). They can either be created manually or using a caption-creation tool.
Once you’ve created your subtitles, this can then be added to a video or audio in PowerPoint. Originally captions were only available for embedded video but in early 2023, Microsoft added caption support for audio files as well.
Make subtitles on Notepad
Even though it’s not a task that everyone can handle, creating a caption file could be a good do-it-yourself project.
First, open the Notepad app on Windows, this can be easily done by searching for it through the start menu. Any plain text editor is OK including WordPad (with Windows) or our favorite Notepad++.
Next, go to File | Save As and name your file MyClosedCaptions.en.vtt
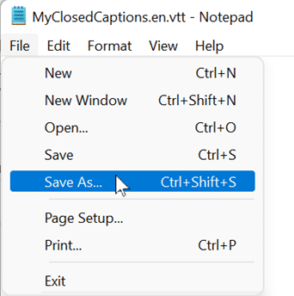
Note: EN stands for English, it’s important to have a two-letter code for the language, such as es for Spanish. You need to ensure the file extension name is .vtt not the .txt extension.
That means changing the Save as Type from Text Documents (*.txt) to All Files (*.*).

You’ll also need to make sure that the Encoding is selected as UTF-8 (located next to the Save button). This just makes sure that international characters display correctly on the screen.

Making a WebVtt text file
The first line within the webvtt file must be:
WEBVTT
After that, anything else added is simply called a cue. Including:
- Time Marker – this marks the beginning and end of time in a video.
The format of the time marker is: hh:mm:ss.ttt
(hours:minutes:seconds.thousandths of a second)
You’ll need to refer to the toolbar for playing videos within PowerPoint in Edit View.

Click the video within your slide to go into edit mode.

For example,
00:00:01.000 --> 00:00:05.910
- Text – Add the text that should appear on the screen during that specific time. It’s important to really limit the text to no more than about three lines, that way it’ll fit the screen.
There must be a blank line between each caption frame – that ensures the end of each subtitle sequence.
For example, when it’s all added altogether with text.
WEBVTT
00:00:01.000 --> 00:00:05.910
Welcome to the Office Watch Presentation.
00:00:06.510 --> 00:00:11.170
Rebel Base for Microsoft Users across the universe
Comments can also be added by using the word NOTE. The end user won’t be able to see any comments. For example:
WEBVTT – A comment can be in the title.
NOTE
This is also a comment on a new line that the viewer won’t see.
00:00:01.000 --> 00:00:05.910
Welcome to the Office Watch Presentation.
NOTE This is also another comment on the same line.
Add captions/subtitles to PowerPoint
Open your slide and select the video you want to add the Closed Caption file to.
Go to Playback | Insert Captions | Insert Captions

Select your .vtt file and then click on Insert

Now, when you play your video – the captions should appear.

Then you can go back to your .vtt file if you need to make any changes, and reinsert the caption to your slide.
Live subtitles and translation
PowerPoint already has a live subtitling with an optional translation feature, see Live subtitles and translation in PowerPoint – how it works
However that only works for live presentations and the subtitles can’t be saved for reuse or editing into permanent .vtt captions.
True Teleprompter options for PowerPoint
New Features in PowerPoint 2021
PowerPoint 365 Recording Studio in depth