Taking screenshots is an essential skill across all devices, whether you’re capturing an error message, saving a receipt, or creating a tutorial. This guide explains the fastest and most reliable ways to take screenshots on Windows, Mac, Apple iPhone, iPad and Android devices, including keyboard shortcuts, built-in tools, and tips to capture exactly what you need on any platform.
Why screen shots?
More people should use screen shots when they’re asking for computer help. Instead of trying to describe what is happening, an image of the problem or error message is usually very helpful. It’s truly a case where a picture is worth a thousand words … and a great time saver.
Taking screen shots should be taught in all beginners computer classes. It’s that important and useful.
There are other opportunities for screen shots. Taking a quick screen image of an order or other reference number on a web page … just temporary until an email arrives as a more permanent record.
The main use for screen shots is for computer support or teaching about software. As you might imagine, at Office Watch we take a lot of screen shots across many computers and devices.
Zoom in on detail
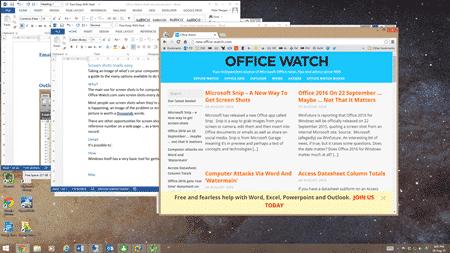
It’s possible to take an image of the entire computer screen but it’s rarely helpful.
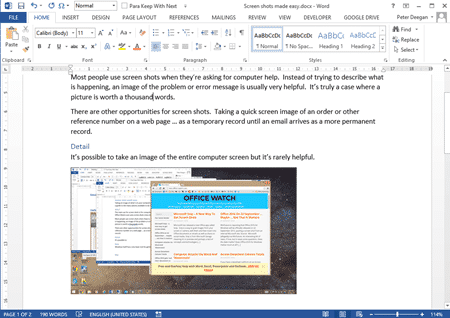
Better to zoom in on a single program:
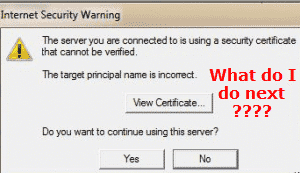
Or zoom in to a specific part of the screen … maybe add some text to the image … like a plea for help …
Or go all-out and annotate it with some text and arrows.

Privacy
Annotation and editing of a screen shot is important. Not just for highlighting parts of the image but also hiding parts like names, email, passwords or other private data. This example shows three ways to hide sensitive info; Blur (email), Draw a line (top passwords), Copy a colored block over the items (rest of the password column).

Use whichever suits you and is available in the image editor you use. Windows Paint has basic tools to hide personal info.
Clipboard or File?
After taking a screenshot, the image will be placed somewhere for you to work on, either the clipboard or a file.
Easiest is the system clipboard. From there you can paste the image into any picture editor or document you like.
I often take screen shots to the clipboard because it’s the fastest way to get a screen image into a document or email. A lot faster than saving to a file then inserting into a document.
Remember that Office has some image editing tools, like cropping, that can be very useful.
The other main alternative is saving direct to a file. The screen image will be saved to a predetermined folder. This option is great if you want to take a series of quick images to edit later.
On portable devices, screen shots are usually added to the list of recently taken images (e.g. Camera Roll). Cloud storage apps with automatic image upload (Apple, OneDrive, Dropbox etc.) will automatically copy the screen shots to online storage, just like photos taken with the devices camera.
Some third-party products have their own image editors giving you the choice to have each new screen image added directly into the picture editor.
Windows
Windows itself has tools for getting a copy of the entire screen or a region. A keyboard shortcut will take an image of the whole screen and put the image into the Windows clipboard. From the clipboard, you can paste the image into an Office document, Outlook email or image editor.
Windows 11 and Windows 10
Modern Windows has a excellent shortcut which lets you draw a rectangle over the part of the screen you want to copy.
Win + Shift + S – take image from a screen region to clipboard and, optionally, Snipping Tool.
Windows 11, 10, 8.1 and 8
Printscreen button – Full screen to clipboard
Win + PrintScreen – Full screen to file.
Alt + PrintScreen – select a program window then it’s saved to clipboard.
Windows 7
Alt + PrintScreen button – active window to clipboard
Printscreen button – Full screen to clipboard
Windows Vista and XP
Printscreen button – Full screen to clipboard
Alt + PrintScreen button – active window to clipboard
Other Tools
If that isn’t enough, there are many screen shot tools available. Many are free with some paid software with all manner of extra features. For occasional use, one of the in-built tools is usually enough.
Snipping Tool in Windows
Windows comes with either “Snipping Tool” or “Snip & Sketch” – Microsoft keeps messing about with the naming <sigh>. In Windows 11, they settled (for now) on Snipping Tool.
It has more selection options (freeform, window, rectangle, full screen) plus some annotation features.

Snipping Tool – Source: Microsoft
The Windows 10 Snipping Tool adds a ‘Delay’ option. This adds a delay between pressing the button and taking the shot. This lets you get images of pull-down menus and other interactive elements.

Use the Windows Search feature to quickly find the Snipping Tool.

Search for Snipping Tool in Windows 10/11
Microsoft Office
Microsoft Office 2010 and later have a screen shot tool on the Insert menu of Word, Excel, PowerPoint and the email editor in Outlook.
We’ve already written about this feature in Office Watch.
Free Utilities
There are many, many, free screen shot tools. Too many to list here.
One of the well regarded ones is Greenshot. A free, open-source, tool with annotation and obfuscation tools.
WinSnap is another to consider.
Snagit
Office Watch has used Snagit for many years. It’s a full featured program with all the ‘bells and whistles’ for editing and sharing. It can record video from the screen. There’s a free trial then US$49.95. Both Windows and Mac versions.
Recording Video
Some of the advanced tools, like Snagit can record video off the screen.
Images from video
A quick mention of a favorite utility ImageGrab.
It’s possible to get a still image from a paused video but usually you’re limited to the size displayed on the screen. The popular media player VLC has this feature.
In effect the utility is taking the paused video on the screen to make the still image. That’s a problem these days because many cameras can take high resolution video that’s larger than a computer screen.
ImageGrab will take stills from the video at the full resolution of the source video, regardless of the screen size.
We often use it to get the best still images from travel videos.
Mac
Mac OS X comes with a nice range of screen shot shortcuts.
In short:
- Command + Shift + <number 3 or 4> will save an image to the desktop
- Command + Control + Shift + <number 3 or 4> will save to the clipboard
The full list:
- Command+ Shift + 3 – full screen, saves to desktop
- Command-Shift-4 – select an area, saves to desktop
- Command-Shift-4, then space – select a window, saves to desktop
- Command-Control-Shift-3 – full screen, copies to clipboard
- Command-Control-Shift-4 – select an area, copies to clipboard
- Command-Control-Shift-4, then space – select a window, copies to clipboard
In addition, you can hold down these keys to control the selection area (Leopard or later).
Space – Locks the selected region and lets you move it with the mouse.
Shift – Resizes one edge of the selected region.
Option – Resizes the selected region using the center as an anchor point.
That good range of in-built options is probably enough for most people.
Apple iPhone and iPad
There are screenshot shortcuts built into iPhones and iPads.
On modern Apple devices without a Home button, press the Sleep/Wake and Volume Up buttons at the same time.
If there’s a Home button, hold the Sleep/Wake button (on top or side) then the press the Home button.
The screen-shot image is saved to the Camera Roll. If setup, it’ll be copied to your cloud storage (iCloud, OneDrive etc).
Android
It’s more complicated on Android devices. Early Android versions didn’t have any screenshot shortcut and the developer tools made it difficult for third-party apps to fill the gap. Google made a small and largely useless effort to fix this.
All Android devices should have the same two in-built shortcuts:
Press the Power and Volume Down buttons at the same time.
or
Press the Power and Home buttons at the same time.
The problem is the timing – you have to press both buttons at the same time (not hold down one then press the other). This takes some practice and too often it doesn’t work at all.
Each brand and even model of Android phone/tablet has it’s own screenshot options. A common option on Samsung devices is the palm swipe (check Settings | Motions and Gestures).
The best approach is to search the web for screenshot help specific to your device. Search for ‘<device name> screen shot’ e.g. ‘Samsung Galaxy 9 screenshot’.
Screen images are usually saved to the camera roll of recently taken images.
There are screen shot apps, but many require ‘rooting’ your devices which is only for advanced users.
Another option is using a mirroring app that displays the device screen on a Windows or Mac computer. You can then take screenshots using the Windows/Mac tools. Again, there are many apps and options available, depending on the device and Android version available.