Let’s explore the basic options for making a Table of Contents (TOC) in a Word document. Table of Contents is very easy to do in Word and it’s not just for people who are making books. TOC’s can be useful in any long document such as a contract.
Beyond the simple Table of Contents there are a lot of extras and tricks.
Table of Contents tricks in Word
Choose the words to show in a Word Table of Contents
Four Word tricks to shrink a Table of Contents
The look of the dialog boxes and galleries changed with Word 2007 however under those superficial features, the fundamentals are the same for well over a decade.
A table of contents can be there for ‘in house’ use while making the document, and later removed or reduced in the final version. It’s a good way to see an overview of a long document and ensure that it’s in a logical structure.
Finally, it can be a way to jump to parts of the document if you don’t like using the Document Map/Navigation Pane feature in Word.
Preparing your document
Before you make your Table of Contents (aka TOC) you need to setup your document with headings that will make up the TOC.
Word takes the text from paragraphs in nominated styles to make up the TOC. Normally you’ll use the ‘Heading 1’, ‘Heading 2’ etc styles in Word to define the headings that you want to show in the Table of Contents.
If you haven’t already, go through your document applying Heading styles to heading and sub-headings.
That’s the easy way and what we’ll use in this article. However, you can assign any paragraph style to a level in the TOC.
It’s a common misunderstanding that Word uses the Heading styles to make the Table of Contents but that’s not strictly true. TOC’s are also made from Outline Levels a hidden paragraph attribute.
Making a simple TOC
Once you’ve got some headings formatted in your document you can make a Table of Contents. The basics haven’t changed much for many versions of Word. Word 2007 and later it’s under the ‘References’ tab on the ribbon.

In Word 2003 and before you’ll find it under Insert | Reference | Index and Tables | Table of Contents.
If you just click OK you’ll get a standard Table of Contents showing headings from ‘Heading 1′, Heading 2′ and Heading 3’ with a heading for the ToC included.

The pull down menu at left shows the same Table of Contents gallery to quickly change the look of the ToC.
Chances are you’ll notice some anomalies in your initial TOC – headings missing or items that should not be there. Just go through your document, adjust the Heading styles accordingly then click ‘Update Table’.
Updating a Table of Contents.
A Table of Contents does not update automatically when headings or pagination changes. The Update Table button will give you two choices.
- Update Page Numbers only
- Update entire table
The default is ‘Update Page Numbers only’ which is fine if you’ve not changed or moved any headings – only added or removed text. This choice is faster but we generally avoid it because a change in the headings, however minor, may be overlooked.
We prefer to use ‘Update entire table’ to ensure the TOC is fully up to date. It rarely takes a noticeable time to update even on a long document. It’s a wise move to fully update the TOC before sending a document out.
Alternatively pressing F9 will also update the ToC because underneath the modern buttons and boxes is an old-fashioned Word field code { Toc }.
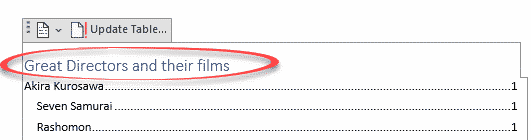
TOC Title
Some ToC templates come with a title which defaults to the word ‘Contents’. Change that to whatever you prefer.
Add Text
The ‘Add Text’ button on the References | Table of Contents tab might win the prize for the most misleading Office button. It’s not really adding anything.
‘Add Text’ lets you manually control which headings appear in the Table of Contents. In Word nerd speak, you can change the Outline Level of a heading without changing the look of that heading.
Select a heading in the document then choose ‘Add Text’. It will show the Outline Level assigned to that heading/paragraph. In this case ‘Level 1’.

To remove that heading from the Table of Contents, change it to ‘Do Not Show in Table of Contents’. In Word terms you’re changing the Outline Level to ‘Body Text’ which is an option also available in the Paragraph | Indents and Spacing | Outline Level.

Headings can also be changed to a different Outline Level without changing the document appearance. For example, a single Heading 2 is upgraded to Outline Level 1 or downgraded to Outline Level 4 for the ToC.
Note: changing an Outline Level does NOT alter the levels for sub-headings. Any sub-headings must be manually changed as well. If not, the sub-headings will still appear in the ToC with strange results.
Changing the ToC
As always in Office, the initial offerings on the menu are just the beginning. They can, and probably should change to suit your needs.
For example, quite often modern documents don’t need page numbers because the document won’t be printed out. Clickable links to the document headings are more useful. Or maybe you’d like both links and page numbers so the document is useful in both printed and on-screen form.
Clickable links in a Table of Contents are also great if you’re making a PDF from the Word document. It’s how we make the clickable Table of Contents in Office Watch ebooks.
All that and more is possible from References | Table of Contents | Table of Contents | Custom Table of Contents. You’d think the custom ToC option would be easily available from the building block menu or a simple right-click on the ToC but Microsoft has decided to hide the important ToC options away … go figure.

The dialog stills says ‘Web Preview’, a label that hasn’t been changed from the days when Word was being positioned as a web page editor. It should really say ‘Onscreen’ or ‘Online’..
Show Page Numbers – turn on or off.
Right align page numbers – justify the page numbers on the right edge of the page while
Tab Leader what character to use between the TOC entry and the page number (to guide a readers eye along the line).
Use hyperlinks instead of page numbers – an important choice where documents are more commonly read on screen than on paper. The headings become clickable links to that part of the document. The hyperlinks work in a PDF exported version of the Word document.
Combine this option with page numbering or instead of numbering.
Format: select a look for the Table of Contents. There are six in-built styles plus ‘From Template’ which uses the ‘TOC n’ styles in the current template.
Show Levels: how many Outline Levels / Headings appear in the Table of Contents. This is a simple option to choose from Level 1 to whichever Level you want. More options are available by delving into the field codes.
You don’t have to show all the levels of Heading in the TOC. For example, you can have a document using Heading styles 1 to 9 but only display in the TOC the main headings. Do this from the ‘Show Levels’ settings.
Options
Table of Contents Options lets you change what makes a ToC. Usually it’s Styles with Outline Levels.
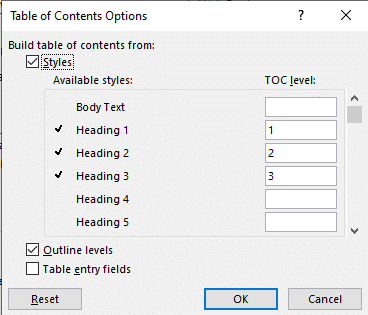
As you can see, it’s possible to change the TOC Level (Outline Level) assigned to each Heading style. Usually the relation is simple i.e. Heading 1 to Level 1 but that can change here.
Table Entry Fields is an advanced option. It’s possible to make an entirely custom ToC by inserting {TC} fields into the document or add entries to a Heading created ToC.
Style Separators are yet another way to build a Table of Contents from just some words in a heading, instead of the whole line.
Modify
Change the look of each Table of Contents level.

If you’ve selected the Format ‘From template’ then each ToC level is formatted with the matching ‘TOC n’ style. The Modify / Style dialog lets you change the formatting of each level.
It’s really a mini version of the standard Modify Style options.
Multi-level Table of Contents
A table of contents doesn’t have to use only main headings in the document. The TOC can have multiple levels just like a numbered or bulleted list.
For example, a book in its final form could have these headings based on Heading 1 only:
- Akira Kurosawa
- Stanley Kubrick
Changing the TOC settings to include ‘Heading 2’ would change the TOC to show the sections under each main heading.
- Akira Kurosawa
- Seven Samurai
- Rashomon
- Yojimbo
- Stanley Kubrick
- Paths of Glory
- 2001, A Space Odyssey
- Barry Lyndon
- Full Metal Jacket
There’s no need to create and remove Headings to do this, leave the document unchanged and just change the ‘Show Levels’ option in the TOC options dialog.
We often do this for drafts of long documents. The Table of Contents is expanded in the draft to show more and deeper levels of Headings. Before final release the ToC is changed to show only the main headings.