Choose specific words from a heading to appear in the Table of Contents (TOC) of a Word documents, instead of the whole heading. Welcome to the strange world of Word’s Style Separators.
We’ve already explained Lead in emphasis which is easy to use. Simply select the text you want at the start of a paragraph and apply the Heading style. The selected/styled text will appear in the TOC.
But that only works for heading text at the start of a paragraph. If you apply a Heading style later in the paragraph, it won’t appear in the TOC. No, we don’t know why Microsoft designed it this way.
For more complex needs, you need style separators. They’ve been in Word since Word 2002 (XP).
Style Separators are hidden formatting marks that let you put different linked styles on the one line.
One thing to keep in mind is Style Separators act a little like normal paragraph marks. In fact, they appear similar to the standard Word paragraph mark.

A Style Separator mark (left with dotted underline) and a standard Word paragraph mark (right).
Style Separators will:
- Seem to join paragraphs together.
- Act on the text to the RIGHT of the first style separator.
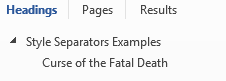
Style Separator example
Here’s an example of style separators at work. First the headings and text:

Now here’s the Table of Contents based on that text:

The table of contents doesn’t have the ‘Harry Potter and the …’ prefix for each of the three sub-headings – yet they appear in the heading themselves. How is that happening?
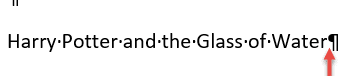
Choosing ‘Show All’ from the Home ribbon gives a clue … each heading line has a style separator

(we’ve marked two of the three style separators)
You just insert a style separator in a heading line and it’s all done? You wish!
Style Separators are messy
Hard to get right and way too easy to get mixed up. That’s especially true in a collaborated document unless everyone involved knows exactly how style separators are being used.
Truly – the best solution for style separators is to avoid them altogether. If possible, rearrange the document so that lead in or standard headings are OK.
That said … there are situations where style separators are necessary. Here’s two ways to use them.
Create as typing
The official style separator advice assumes that you create the heading as you type it. That’s somewhat idealistic situation but we’ll start with that, then move to more likely scenarios.
- Show All formatting marks Home | Paragraph | Show All.
You need to see the Style Separator to figure out what’s happening. - (optional) Add the Style Separator to the Quick Access Toolbar. Customize | All Commands | Style Separator. The shortcut Ctrl + Alt + Enter is usually all you need.

- Type the first words of the heading until you reach the place where text for the TOC wants to appear.
- Insert the Style Separator – Ctrl + Alt + Enter
The Style Separator is inserted but, in some of our tests, the cursor stays BEFORE (to the left) of the style separator. This is contrary to Microsoft’s own documentation which insists that “When you click the Style Separator button, the insertion point moves to the right of the separator so that you can continue typing.“.
- If that happens, move the cursor so it is AFTER the style separator. Right-arrow key presses should be enough. This is a tiny but vital detail.

- Type the words you want to appear in the TOC
- Insert another Style Separator – Ctrl + Alt + Enter
- Select the text between the two style separators. This will include the style separator AFTER the selected text but not the preceding/first separator.
- Choose the heading style to apply to the selected text.

(Apologies for the mix of Potterverse and an old Dr Who joke)
So far, so good. We have the selected words in the Table of Contents and in the Navigation Pane.
But the heading is a mess of two different styles. Sadly, Microsoft’s advice for style separators leaves you with something like this:

That’s probably not what you want. More likely you’ll want the heading to look like a standard heading but with only the selected words in the TOC and Navigation Pane.
We’ll show you how to fix that a little later in thsi article.
Change an existing heading
It’s much more likely you’ll be editing a document to change the existing ‘full’ headings into something with part of the text in the Table of Contents.
We’ll start with a line in Normal style because this is the clearest way to explain the process (ie the difference in text between Normal and a Heading is obvious)

You’d hope that it would be as simple as putting the cursor where you want the heading text to start and adding a Style Separator. Keep hoping, but that’s not the way it works.
- Show all (Home | Paragraph | Show All)
- (optional) Put your cursor at the end of the text but before the paragraph mark.
- Add the Style Separator (Ctrl + Alt + Enter). If you try to add the separator from somewhere else on the line, it will be added to the end of the text anyway. Word will insert the separator and a space after it.

- Retype the table of contents text into the gap between the style separator and the final paragraph mark. Or move the existing text to the spot between the two formatting marks.
- Insert another style separator which should be added after the heading text and before the final paragraph mark.
- Select the text between the two style separators. This will include the style separator AFTER the selected text but not the preceding/first separator.

- Choose the heading style to apply to the selected text. The selected text will appear in the Table of Contents and the Navigation Pane.

But like the first example, we have two mismatched styles on the same line.
Making text look like a heading – when it isn’t
This is an essential part of ‘real world’ use of style separators that usually overlooked.
To recap, we have a heading line with only part of the text appearing in the Table of Contents and Navigation Pane like this:

Which works but the heading text is in two different styles (non-heading and heading style).
We need the heading line to look consistent while keeping the limited text in the TOC and Navigation Pane like this:

The solution is to format the leading text ‘Harry Potter and the’ so it looks like the heading text. One line – two styles.
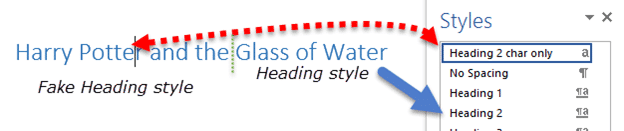
You could manually format the leading text to match the heading formatting but styles are a much better way. With the right style setup, any change in the Heading style will automatically change the rest of the line too.
Character style based on a Heading (paragraph) style
The trick is to make a character style based on the Heading style. The two give the same formatting result but the character style lacks the ‘Outline Level’ which Word uses to make the TOC and Navigation Pane. (character styles don’t have an Outline Level’ property).
Here’s how to make and apply the character style, step-by-step.
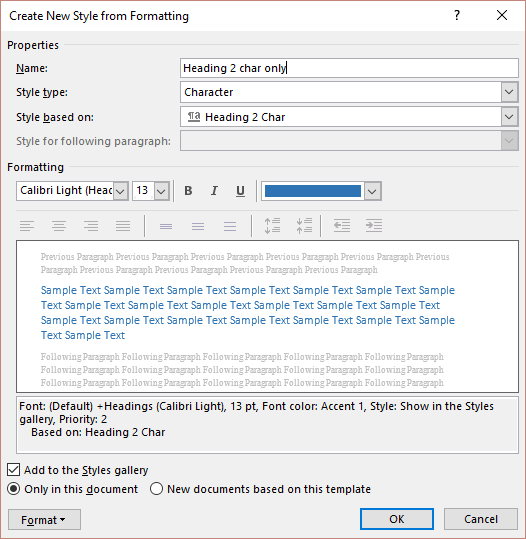
From the Style pane, create a New Style:
Name: anything you like but usually something starting with the heading style name (so the styles appear near each other in some lists). We use ‘Heading 2 char only’.
Style type: Character
Style based on: the ‘char’ style associated to the main heading. Each of Word’s in-built Heading styles also has a ‘Char’ version that’s usually hidden but appears in the ‘Style based on’ list:

Here’s what we used to match the existing ‘Heading 2’ style.
- Obviously, you’d base the new style on ‘Heading 1 char’ or ‘Heading 3 char’ as the situation required.
- Additional ‘Heading n char’ styles are added to Word if you start using those Heading styles (Heading 4 ).
- If you’re going to use this style often, keep the ‘Add to Styles Gallery’ box checked.
- Choose ‘Only in this document’ or, if you want other documents to have the style ‘New documents based on this template’.
Having made the new character style, select the leading (non-heading) text – but NOT the following style separator – then apply the character style you just made.

Why?
You might be wondering why we’re making a new style when there’s already a ‘Heading 2 char’ in-built style?
The ‘Heading n char’ character styles only appear in the ‘Style based on’ style list. Those styles aren’t on any other style selection list and you can’t type them into a style selection pull-down either. For most purposes they are hidden.
We have to make a new ‘un-hidden’ style that’s exactly the same as the hidden style.
Choose the words to show in a Word Table of Contents
Four tricks to shrink a Table of Contents in Word
Table of Contents basics in Word