Setting up and testing a microphone to work with Windows 10 is necessary before using Dictate in Office.
Go to Windows settings to control which microphone is used by Word 365’s Dictate. Dictate has no microphone settings of its own (in Word for Windows or Word Online). Both use the Windows default recording device. That’s unlike most other audio programs which have their own play & record settings
As you probably know, Windows 10 has two places for settings. The new ‘Settings’ panes and the older Control Panel | Sounds dialog boxes. We’ll explain the options in both places because the controls and options are different.
We’ll also explain the difference between two Windows audio defaults: Set Default Device and Set Default Communication Device.
Windows Microphone or Sound Input Settings
Start at Settings | System | Sound or right-click on the speaker icon at bottom right and choose ‘Open Sound settings’

Scroll down to ‘Input’ and select the pull-down list to see what audio input or microphone options are available. They might be a surprise.

The above list is from an ordinary laptop with in-built microphone but there are five different audio input options! This happens a lot and a common cause of microphone trouble. More than one input option available and Windows has set the wrong, maybe unexpected, one as the default.
Three of the input options are ‘virtual’, created by programs to capture audio from other sources like a smartphone being used as a webcam or merging various sources into a single source.
There’s also a Bluetooth connected mic and headphones. Bluetooth devices can connect automatically without you realizing it.
The ‘real’ microphone (inbuilt to the laptop) is called, in our case, ‘Microphone Array (Realtek(R) Audio)’ depending on the laptop model.
How to tell which microphone is working?
A simple way to test that a microphone is working or which input selection matches a certain hardware microphone.
Select the microphone then lightly tap on the microphone ‘hole’ on the device. We tap on the little mic hole on the laptop lid.
As you tap, look for the ‘Test your microphone’ indicator to move. Now you know that you’ve selected the right device and it’s working!

Microphone test, set and rename
Click on Device properties to reach some very useful options.

Rename
Give your microphone a better name than the default. As you can see, we’ve renamed the microphone to make it obvious.
Disable
if the input device is getting in the way, disable it here.
Volume and Volume Test
Adjust the volume level going into Windows. If your microphone is on but not loud enough or seems silent, check this setting.
Microphone volume level is usually 50 or above. Too low and Windows can’t ‘hear’ anything. Too high and the sound is distorted.
Start test – click that button and start speaking. Windows will figure out the best volume level. You can change that manually.
Control Panel, Sounds, Recording
Back on the taskbar, right-click on the volume icon is another way to control the microphone via the older Control Panel options. Choose Sounds ..

That opens the old pre-Windows 10 Sound | Recording dialog. In many ways this is a better way to control microphone and speaker.

All the recording / microphone options are visible. The status is each is shown (Default, Ready, Disconnected etc._And there’s a little ‘VU meter’ for active microphones that will move if sound is ‘heard’.
Right-click on any microphone to see the options

Configure Speech Recognition – is not needed for Office Dictate features. This option is for Windows Accessibility voice commands.
Properties – opens the device settings.
There are important options on the bottom row of the Sounds | Recording dialog.

Configure – should be called ‘Configure speech recognition’. It opens Control Panel | Speech Recognition.
Set Default Device – see below. If in doubt, turn on.
Set Default Communication Device – see below. If in doubt, turn on.
Properties – opens that devices properties dialog.
Set Default Device vs Set Default Communication Device
These two options are as clear as mud. Most people select both defaults Set Default Device and Set Default Communication Device and leave it at that (it’s what we do).
For Office Dictate, you should only need to select ‘Set as default device’ for the microphone you want to use. But selecting both is a safer option.
What’s the difference?
A sound Default Device – is an individual playback or recording audio device. Playback can have a speaker or headphones as a default playback device. Recording can have a separate microphone or other default recording device.
Later Microsoft added the concept of a Communications Device. A device that can record and play sound, like headphones with a microphone.
If there’s no combined device attached, a pair of separate devices can become the communication device. For example, a laptop with speaker and in-built mic.
This change lets Windows decide where to play certain sounds. Music, system sounds use the Default Device. Making a phone, Skype, Zoom call (i.e both recording and playing) should use the Default Communications Device.
All that is a great theory and probably works great in Microsoft’s corporate mind.
In practice, most programs have their own play and recording settings. They might accept the Windows Default Audio setting or Default Communication Settings.
Microsoft 365’s Dictate feature has no microphone selection option. It should work with the Default Device for Recording. Since Dictate is only recording and not playing audio, it doesn’t qualify as a user of a Windows ‘communication device’.
All that said, it’s probably easier to choose your microphone then set both defaults on – Set Default Device and Set Default Communication Device.
Microphone Properties
Choosing a microphone then Properties (not Configure) opens up some useful options (rename and levels) plus one trivial choice (icon).
Rename Microphone
Often the default name for a microphone, especially an in-built one, isn’t helpful.
On the General tab, rename the device to something more obvious to you.

Change Icon
A little thing, but you can change the icon associated with the audio device. Click Change Icon and choose from the selection offered. Or choose another icon source (.ico .dll etc).
Set Microphone Levels
Device Properties | Levels is more important. Use Microphone Array and Microphone Boost settings to change the incoming volume from the device to Windows.
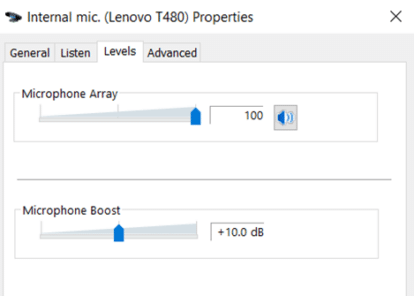
Normally these settings do not need changing. If the incoming volume is too low or high, change the Microphone Boost slider.