Why you must use the Microsoft Office Document Inspector … and why you can’t completely trust it.
The Office Document Inspector is an important tool for anyone who shares or sends out Office documents. It helps prevent legal troubles and personal embarrassment.
Inspect Document is only in Office for Windows (not Mac). Microsoft Office 365, Office 2021/LTSC, Office 2019 and earlier versions way back to Office 2010 in Word, Excel, PowerPoint and Visio
Office documents can have all sorts of hidden information in them; things that you might not intended to send to others. An extreme example is a negotiation.

But show ‘All Markup’ and you can see the thinking of the other side:

There have been many public examples of hidden document info causing trouble. Politicians sending out press statements that are revealed (from the document author and other info) to have been written by lobbyists or large donors to the candidate.
So it’s important to make sure that any document you send has just the core, visible document without any extra that might be unwanted or embarrassing.
Document Inspector is at File | Info:
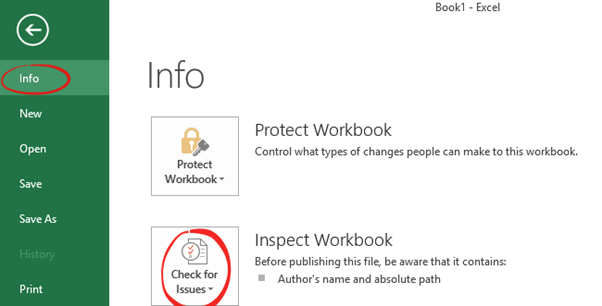
Choose Inspect Document. It will look for some hidden elements in a document.
All documents
- Comments, and Annotations
- Document Properties and Personal Information.
- Invisible Content
- Custom XML Data
Word
- Revisions and Versions,
- Metadata, Microsoft SharePoint properties, custom properties, and other content information.
- Headers, Footers, and Watermarks
- Hidden Text
- Task Pane add-ins
Excel
- Headers and Footers
- Hidden Rows and Columns
- Hidden Worksheets
PowerPoint
- Off-slide Content
- Presentation Notes
How to use
When the document is ready to send, save a copy. Inspect and send from a copy because Document Inspector will remove things that you want to keep in your original.
Go to File | Info | Inspect Document. There’s a long list of things that will be inspected, leave them all selected and click the Inspect button.
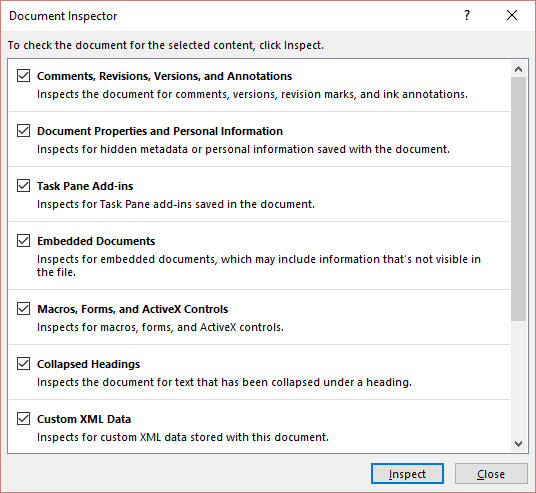
Office will check the document and report any hidden elements. Click on Remove All, to erase those parts.

You might not want to remove everything. For example, Document Properties and Personal Information might be wanted or not depending on the situation. Sometimes document properties are essential to the document. Watermarks (e.g. ‘Draft’ or ‘Final’) may definitely be required.

Go to File | Info, on the right side are all the document properties.

Delete / Keep the properties as you wish.
Document Inspector is an ‘all or nothing’ tool for each type or group of document element. If you want to remove some elements but not others, you have to do it yourself.
Recheck the document as many times as you like before sending out.
Undo
Some actions by document inspector can be reversed via Undo. Broadly the document content elements (like hidden text) can be undone but ‘behind the scenes’ things like document properties cannot.
That’s why we suggest saving a copy of the document for inspection and sending – it leaves the original document (with revisions, comments etc.) for you to use.
Errors and Omissions
Document Inspector does a pretty good job. For example ‘Invisible Content’ doesn’t just remove text formatted as ‘Hidden’ but also text that’s given the same color as the background (eg ‘White on White’).
But Document Inspector is not perfect. There are some hidden elements that Microsoft has continually ignored and others that the Inspector can’t reasonably be expected to notice.
Images ‘blind spot’
Document Inspectors biggest ‘blind spot’ is images within documents. There are two hidden parts of images that the inspector doesn’t check.
Image Editing
As we’ve noted in Office Watch – editing an image within Office will often leave the original image available with changes overlaid. Any images edited within Word should be checked.
Cropped images
Similar to the image editing problem is the excess from a cropped image. Here’s a simple photo of Stonehenge in a Word document.

What isn’t visible, and Document Inspector won’t warn you, is that it’s only part of a much larger image that’s still saved in the document.

To truly delete the cropped areas of an image, click on the image then go to Picture Tools | Format | Adjust and click on the Compress Images button.
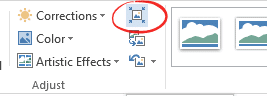
Make sure that ‘Delete cropped areas of pictures’ is checked, then click OK.

Uncheck the box ‘Apply only to this picture’ to make the same changes to all images.
Image data
When you insert an image into an Office document, all the image properties come along too. That often includes the GPS co-ordinates where the photo was taken, the type of camera etc.
Too many have been caught posting photos online not realizing that they are revealing their home address!
See Image Privacy Breach in Office for details and how to remove the image properties.
Highlighting
Microsoft’s intention when they added highlighting was for it to truly highlight text in a final document.
But in practice, highlighting is often used to note parts of the text that need another look or revision. It’s a common but unofficial form of commenting within a draft document.
Document Inspector doesn’t have an option to check for highlighted text – and really it should.
The workaround is to search for highlighted text in a document.
Other unofficial edit marks
Even though Office has comments and highlighting available, many people still use more primitive methods. Just text within the document.
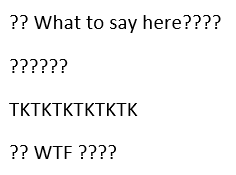
Sometimes just a series of question marks, exclamation points or ‘TK’ ( meaning ‘To Come’).
For these you need to do your own document searches.
See Also
How To Hide Personal Info In Word Documents
Highlighting Text In Word, PowerPoint, Excel And Outlook