Two ways to put left and right aligned text on the same line in Microsoft Word. There’s the commonly used option and the less well-known choice. BONUS: putting left, center and right aligned text on one line.
We’ll show how to make Left and Right aligned text looking like this.

You’ll often see it in Header or Footer.
As a bonus (because we can’t help ourselves) we’ll also have examples of Left, Right and Center positioning on the same line.
Table with left and right positioning
The easiest and most commonly used option is a table. Office Watch readers know we’ve written many times about how tables with no borders or gridlines can solve many Word formatting conundrums.
Here’s how we created the above example, this time with the table gridlines showing.

Each line is a single row table with two cells. The cells can have their own paragraph formatting (left, center, right or justified).
Make this by:
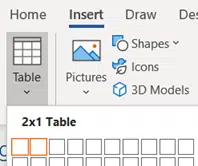
- Insert a 2×1 table with one row and two columns.

- The first cell has Paragraph Left setting. Type in the text or field codes you want.
- The second cell has Paragraph Right formatting. Add text to the cell.

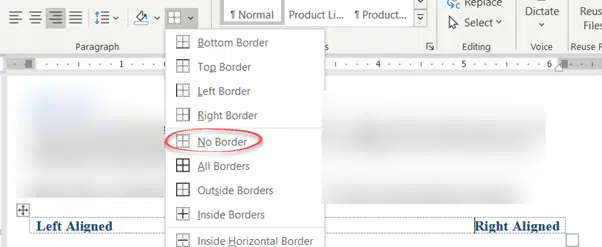
- Select the table (use the handle at top left of the table) and remove all borders with Paragraph | Borders | No Border.

The Table Gridlines are visible in Word but won’t appear in any printed or PDF version.
Table with left, center and right positioning
Clever readers will have guessed the same trick can be used to have left, center and right text on the same line. Use a 3×1 table. The center cell has Center text positioning.

Word in-depth book Formatting Magic with Word has a whole chapter devoted to Tables including using them for formatting text in unusual ways.
Tabs with Left and Right text positions
The alternative is using Tabs. Tabs are a hidden formatting marks that position text along a line.
If you’re old enough to remember a manual typewriter, there was a bar with tabs that you slid along the bar. Pressing the Tab key moved the paper along to the next tab stopper.
Word also has Tab stops but they have more power than the old typewriter stops.
Modern Word has Tab stops which can have different alignment settings. The old typewriter tabs could only be Left tabs – meaning text comes to the right of the tab.

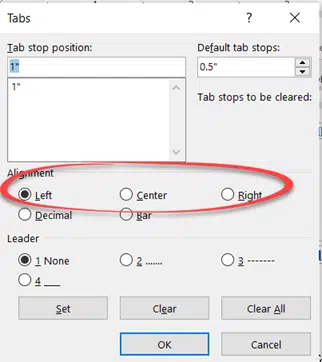
As you can see in the Tab dialog, Word has FIVE different types of tab. We’ll use three of them for single line positioning; Left, Center and Right.
Here’s some left and right text positioning using a Right align tab.

The left text is already left aligned against the left margin. Nothing needed there.
Make the right tab by clicking on the ruler to make a tab.
Double click on that tab to open the Tabs dialog.

- Click on the tab stop position you just created.
- Change Alignment to Right.
- Click Set
Now enter the text you need:
- Type the text for the left side
- Press Tab – the cursor should jump to the right side of the page.
- Type the text for the right side.
If the formatting doesn’t end up the way you want, choose Home | Paragraph | Show All – that will show the tab markers (right pointing arrows) across the page. There should only be one.

Tabs with Left, Right and Center positions
A single line with Left, Center and Right alignments is also possible with Tab stops.
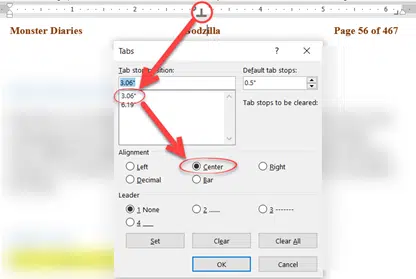
Add a Tab stop in the middle of the line and change it to a Center alignment.

A Center tab alignment means the text is centered either side of the tab stop.

The great book Formatting Magic with Word has a whole chapter devoted to Tabs, all the uses and options.
Downside of tabs for right and center margin alignments
Tabs look like a great solution to positioning, but they have a major disadvantage. All Tab stops are absolute measurements in inches, centimetres etc. There’s no way to drop a tab into a relative position like Center or Right as you can with Word objects.
If the page size or left/right margins are changed, the center and right tabs will be out of position. They’ll have to be reset manually.
That’s not a problem with a table because the whole table (single row in this case) is set to 100% of the page width by default.
Four Word fixes for stretched out last line
Free sign to keep in touch with customers while in lockdown
Merge or Split cells in Word tables
Make a Table or list of Tables in a Word document