It’s possible and practical to make ‘handwritten’ notes or edits direct on your Word, Excel or PowerPoint documents. Instead of printing them out and using a pen/pencil, do it on-screen with a digital pen. Here’s a real-world guide to how you can do it, leaving aside the hype and flashy demos.
Even these days, it’s very common to print out a document and review it on paper making notes with a pen. Later you revise the Word document based on your pen notes. Editing on paper is easier and it’s a break from the screen and typing.
You can get much the same or even better experience by editing with a digital pen on a tablet or convertible laptop. You can ‘write’ or ‘scribble’ on an electronic version of your document just like a paper version, there’s even some advantages. Use different digital ‘pens’ or ‘highlighters’. Do some editing during your commute (bus, train etc.) or just sitting on the sofa.
In this article our head honcho, Peter Deegan, explains how he does ‘handwritten’ markup. As a regular traveler, printing out isn’t an option so he’s switched to reviewing documents on a tablet.
We’ll include the important steps and precautions that Microsoft omits.
Warning: this article includes messy handwritten spaces, ragged lines and truly dreadful handwriting!
The way it’s supposed to look
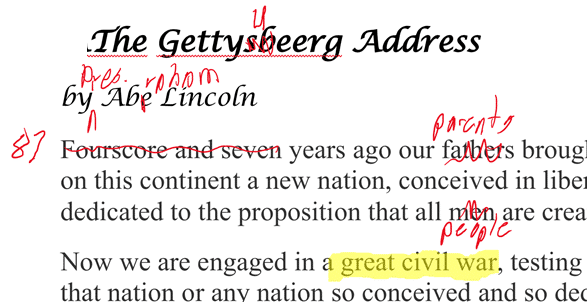
Microsoft has been promoting the draw capabilities of Office for some years, but their examples always seem too neat and tidy. Nice straight lines, neat ovals and almost inhumanly tidy handwriting.

That’s not how it works in the real world. Most people can’t draw a perfectly straight line, let alone a circle. Handwriting doesn’t look like it came out of a typeface book. Highlighting isn’t perfectly straight and aligned with text.
How handwritten document markup really works
Here’s how ‘handwritten’ editing works in the real world. We’ll use a Word document for our example but that same applies to PowerPoint or Excel.
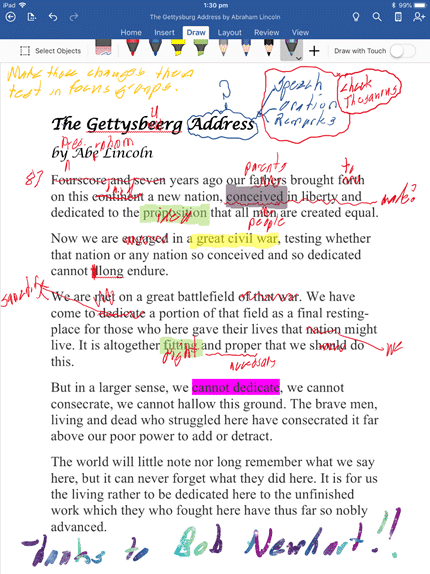
In other words, more like a paper with ink edits than the neat and tidy marketing images.
That’s OK. These are comments/markup for personal use. All that matters is you understanding your own notes!
What you need
You’ll need a digital pen and a tablet or laptop touch screen to use it on. Selecting a digital pen is a whole ‘thing’ itself because many of the pens on sale don’t work very well or in all situations.
For this example, we’ll have a standard Windows 10/Mac computer plus a tablet with pen. The tablet is an iPad Pro with an Apple Pencil.
If you’re new to digital ink/pen, open a blank document and play around. Get used to the pen, digital ink and options first.
Make a copy
You could make your hand drawn edits directly onto the original Word document. But our cautious preference is making a copy of the original document and draw on the copy.
Drawing on a copy means the original is ‘safe’ and unmarked. There’s no risk of accidental deletions, drawings or hand notes appearing in the final document by mistake.
Save to cloud
Whether you work on the original or a copy, save the document to cloud storage that’s available to all the devices you have. Most likely you’ll save the document to OneDrive because that’s easily available and integrated with Office.
With modern Office collaboration, any edits you make on a cloud stored document will appear very quickly on the desktop machine or other device.
See Starting with Document Collaboration for the basics of sharing a document with yourself across multiple computers.
Open the document (or the copy) on your tablet. On the View tab choose Print Layout view and Page Width. That should use most of the screen while leaving enough space for your scribbling.

Mobile View would seem more appropriate, but that view doesn’t display any drawing or ‘ink’.
The on-screen keyboard isn’t necessary so make that disappear for the moment.
Optional: On the Review tab, switch ‘Track Changes’ ON so Word can show all changes
Switch to the Draw tab to see the pens and options available.
Draw with Touch
Normally the Draw | Draw with Touch option is OFF. That means the tablet will only recognize the pen tip for drawing, not any accidental taps you make with your hand.
Pens
Office mobile comes with a range of preset digital ‘pens’, ‘pencils’ and ‘highlighters’. Microsoft has included many fancy options with patterns and rainbow designs that you can ignore.
The digital pens for editing are usually a different color from the text, so the handwritten notes are easy to see. For our simple needs maybe one or two basic colors plus a highlighter. We use Red and Blue plus a standard Yellow highlighter.
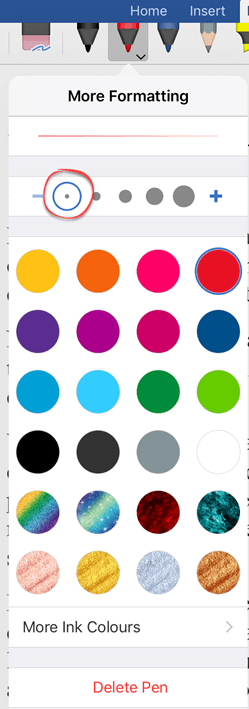
Thickness
The pen thickness can be changed. Peter finds the default too thick for his scrawl and changes to the thinnest width available (see above image).
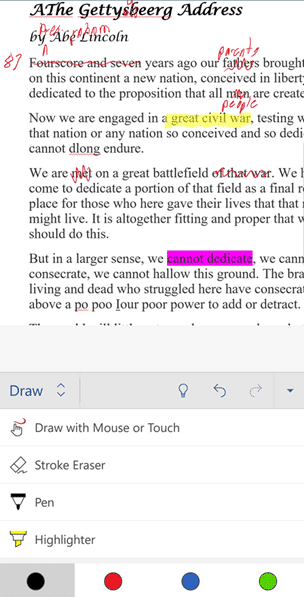
Erasing
One great benefit of digital markup is the ability to erase. Digital ink can be removed in a way that real ink cannot.
There are two ways to erase: the Eraser tool and the Undo button.

Eraser: Click on the eraser button then ‘rub’ over the drawing to remove. Eraser deletes drawing / digital ink but not typed text or other objects.
Undo: if you want to remove what you just drew, Undo is faster than the Eraser.
On a smartphone
The same digital ink features are available on a smartphone (iPhone or Android) but the smaller screen makes it harder to use.
Some smartphones, like the Samsung Note series include a pen with their larger screen.
On the Desktop
Of course, you can open the document on your desktop computer (Windows or Mac) to see all the edits.

On the Review tab there’s a Hide Ink option to make all the drawings temporarily disappear.
Starting with Document Collaboration in Word, Excel or PowerPoint
Review only collaboration option in Microsoft Word
How to accept an Office document share or collaboration
Document collaboration with Office in a browser