Have all your favorite Office features and buttons in one place. Commonly used buttons or options that aren’t on the regular ribbon. The Office ribbon lets you make a personal tab filled with your choices. We will show you how easy it is to make in Word below, but this can also be done the same way in Microsoft’s other programs such as Excel and PowerPoint.
Choose your own ribbon buttons
Each person will have their own preferences for the buttons on a personal tab. As an example, I’ve sneaked a look at Office Watch Editor-in-Chief, Peter Deegan’s own tab of buttons missing from the standard ribbon.

Keep with Next – a commonly needed paragraph setting.
View Field Codes – toggle to show/hide the fields, because he can never remember the keyboard shortcut!
Advanced Find – the full find/replace dialog, because Microsoft removed the direct shortcut.
Style list – the older style list which shows the current style (unlike the Style Gallery).
Customize the Ribbon
In Word, you can right-click anywhere on the ribbon and select Customize the Ribbon.

Alternatively, you can also select File | More… | Options | Customize the Ribbon – but the first option is quicker.

The right side will display the Main Tabs currently showing in the Ribbon. To create your own Customized Ribbon, select New Tab | OK.
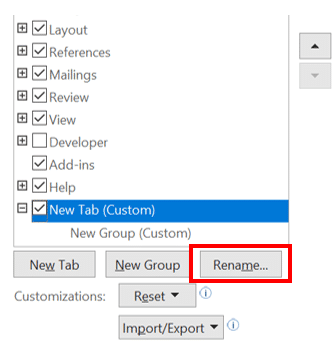
Rename tab
Then select Rename… | Type in Display name | OK

Move tab along the line
You can use the arrows on the right to move the position of your Tab within the Ribbon, make sure to select the tab first prior to using the arrows.
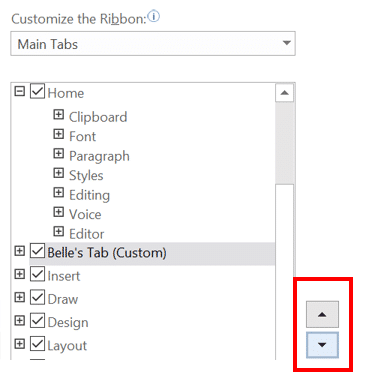
Here we have positioned Belle’s tab underneath the Home Tab.

Group on the Office ribbon
Each Tab will have at least one group of command’s attached to it, and New Group will automatically be added to your new Ribbon. You can easily rename the new group by right clicking on New Group (Custom) | Rename.

Add a symbol
You can even assign a symbol along with the rename.

Add commands
From there, you can begin to choose commands to add to your Group. Here we have themed the Group as Tables and added some popular Table commands.

Firstly, you will need to add a command to the group on your tab by choosing one from the list on the left side. It is easy to narrow down the list by selecting an option from the drop-down menu underneath Choose commands from:

We have chosen from the list of All Commands which is in alphabetical order, we have quickly navigated to Table commands by selecting a command in the list and typing ‘T’.
Drag the command to the right below the group name on your tab until you see a horizontal bar. You can also add commands by first selecting the group, then the command, and finally clicking Add > >.
Likewise, if you need to remove any commands from that group, or the total group or ribbon, you can click on the command and click < < Remove, or you can right click on the command and select remove.
You can also drag the commands to adjust their position within the group or select the command and use the arrows on the right side to change the position.
Once you have added all your preferred commands, make sure to select OK to save changes, you can then see the results within the Tab menu.


Add more sections aka groups
You can create separate sections by Adding a New Group and renaming them each time.


Backup Customized Ribbon
Word has the option to back up your customized ribbons, which is handy if you need to reinstall the Office programs or need to move the customizations to a new computer.
Simply select Import/Export | Export all customizations
Save the file in a dedicated area of your PC which you can also back up on OneDrive or an External Hard drive.

Make the Office ribbon suit you … not Microsoft
Single line ribbon in Microsoft Office for students only