Pictures in Word, Excel, PowerPoint and Outlook can make the file sizes at lot larger than you expect. Here’s how to make images smaller (in file size) for Office documents without changing the look of the document, slide etc.
The images in a document are what take up a lot of space in most documents. These days, images can be quite large; digital cameras make JPG images over 5MB. It only takes a few of those to make a document or email get very big, perhaps too big to email.
Because Office document files (.docx .xlsx .pptx etc) are compressed, the text doesn’t usually take up a lot of space. However most pictures are already compressed in their original format (e.g. JPG).
These days cameras, even small smartphone cameras, create image files larger than most regular documents or emails need.
Let’s focus on how to shrink the file size used by images in documents and emails as well as debunk some myths along the way.
Important Clarification – Size vs Dimensions
There can be confusion about the word ‘size’ when it’s used with digital images.
In this article mentions of an image size means the amount of space (bytes, megabytes) the image uses within a document or email.
An image dimensions means the height/width of the image.
Size vs Dimensions
Inserting an image into a document or email will copy the entire image into the document/email. For example, inserting a 4MB picture will usually add 4MB to the document or email size.
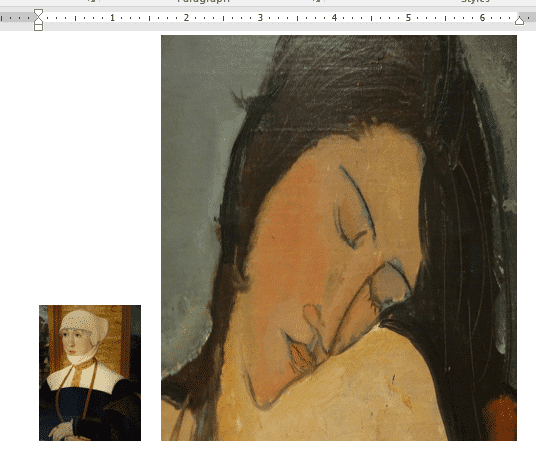
Reducing the dimensions of the image as it appears on the screen does NOT change the saved image size. Here’s two images in a document, both add 5.5MB to the document size despite the very different visible dimensions.
Cropping
Cropping an image doesn’t change the image size either, even though you seem to have removed parts of the picture.
These two images might take up the same amount of disk space, even though one image is a heavily cropped version of the other.
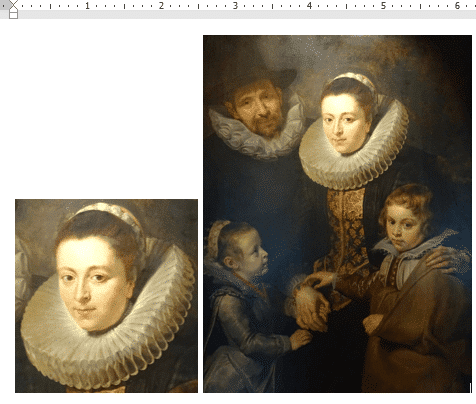
That’s because cropping does not edit the photo saved in the Office document. Instead, it shows the part of the image you’ve specified, leaving the rest unseen.
Compress Pictures
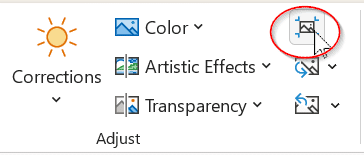
To remove the unwanted parts of a cropped image, click on the image and go to Picture Format | Adjust | Compress Pictures. This is the smallest of buttons and given no importance, but it’s arguably more important and useful than the other buttons and menus around it.
For the moment, we’ll focus on the second option ‘Delete cropped areas of pictures’, which does exactly what it says.
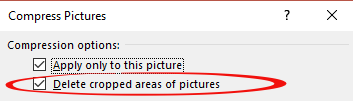
The top option lets you choose whether to apply the changes to just the selected image or all images in the current document.
Repeating images
Sometimes you have the same image, multiple times in a document. For example, a company logo or product shots.
Office is pretty good at dealing with the same image added many times. It’s usually smart enough to figure that the picture you’re now inserting is the same as one already in the document. When that happens, it won’t add the second image, instead it will link to the already stored image.
But that’s not 100% reliable. We’ve seen plenty of cases where the same image (or what appears to be the same image) is saved more than once in the document file.
As we’ve already seen, the same image in different sizes or even cropped can be saved just once in the document. For example, a large logo or product shot on the front page then repeated in smaller forms later in the document.
Insert once, then copy
The simple way to ensure that the image is saved once in the document is to insert a high-resolution version of the image just one time. Then copy that image and paste to any other place needed in the document.
Don’t insert the image again from the original file; copy/paste the one that’s already in the document. The copied versions can be resized or even cropped without changing the source image. Office is smart enough to know that a copied image is the same and will link to a single saved picture in the document.
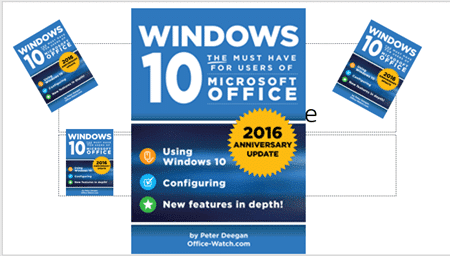
That applies even if you make some changes to one of the images. For example, we’ve inserted the same image four times into this slide then rotated and resized some of them. Despite that, PowerPoint has saved just one copy of the image, keeping the overall file size quite small.
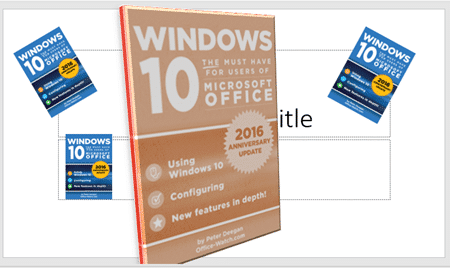
But there’s a limit. We made some major changes to one image; adding effects from the Picture Format ribbon. PowerPoint saved a second copy of the altered image.
Changing Resolution
Many images from cameras, even simple smartphones are much more detailed than necessary for printing or emailing. So those images in a document/email are a lot larger than necessary.
It’s about the image resolution. Put simply, the quality of the image (pixels or dots per inch) is greater than the printed page or screen can display.
That means you can reduce the resolution of a document image without affecting the end product on the page or screen.
Do that from the same place that trims cropped images. Select the image then Picture Tools | Adjust | Compress.
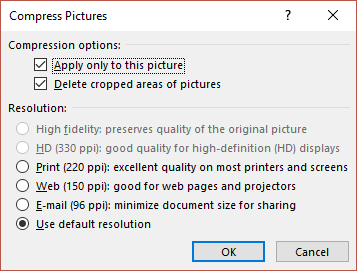
The available resolution options depend on the selected image. There are choices for Email, Web, Print, HD or original. All but High fidelity have a ‘ppi’ or pixels per inch value.
For screen output only, like emails, we usually choose ‘Web’ which reduces the image size for messages but is more than enough to show the images well.
The default resolution in Word is set at File | Options | Advanced | Image Size and Quality | Default Resolution.
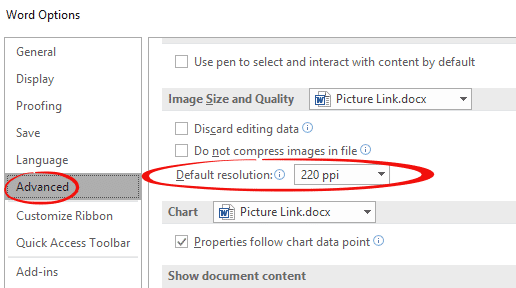
It’s almost the same option in PowerPoint except that the default is ‘High Fidelity’.

Discard editing data
There’s another option at File | Options | Advanced | Image Size and Quality that might shrink a document size.
‘Discard editing data’. When you edit an image, Office keeps a track of the changes so it can, if asked, revert to the original image. Choosing this option removes that extra info. This saves some document size but you lose the ‘undo’ options.

What size is an image in a document?
There’s no direct way to know how much space a document image is using. You can see the image dimensions “Original Size” by right-clicking the image | Size and Position | Size | Original Size.

The only way to know an images true size is to dig into the document innards to see the images stored within the .docx etc. The images are saved in <application>/media. For example, Word/media

We used this method to determine how many copies of an image is saved by Office in various situations mentioned above. But it’s clumsy for regular use.
Need more?
Check out Making pictures smaller – some more options for other image shrinking suggestions.
How to look inside an Office document
Premium Stock Images now in Office for Apple devices
How to use HEIF/HEIC/HIF Apple images in Microsoft Office
Quickly add images with PowerPoint’s Photo Album
Extra Drop Cap trick using online pictures in Word