Selection Pane is essential in Word, Powerpoint and Excel to hide or display the objects or to change the order, rename objects, group / ungroup, and delete objects. If you’re using images, graphics, Text Boxes, charts, SmartArt or other objects, the Selection Pane is a must.
So, let’s start with some basic details of how best to use Selection Pane in Microsoft Office applications.
Make Selection Pane appear
You can make the Selection Pane appear either by Inserting the Objects or directly going to the Layout tab. So, do either of the following:
- Look for the Selection Pane option on the Picture Formatting or other object tab.
- Go to the Layout tab and click Selection Pane in Word, Excel, or PowerPoint applications.


Wanna start faster? Try the Keyboard shortcuts for the Office Selection Pane
Blank Selection Pane in PowerPoint
On Selecting the Selection Pane in Word or Excel with no contents inside your Document or Worksheet, you will see the Selection Pane with an empty list, but not in PowerPoint. Even a blank Title slide will showcase you with two objects: Subtitle 2 and Title1 representing 2 text boxes available for use.

Another option to make the launch the Selection Pane on your screen of Word, Excel or PowerPoint is to do the following:
- Go to the Insert tab
- Insert objects into your document using the Pictures and Shapes option
- If you are inserting Pictures, a Picture Format tab shows up and if you are using Shapes you will notice the Drawing Tools Format tab on your screen.
- Go to the Picture Format Tab or DrawingFormat tab and click on the Selection Pane
- Selection Pane appears towards the right of the document page.

Hide / Show All
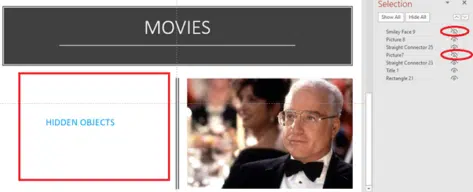
The Selection Pane lets you hide objects. They stay in the document, just hidden.
To hide all the objects, click on the Hide All options in the Selection Pane to make the objects disappear across the Word, Excel, and PowerPoint screen. Notice the hiding objects also closes the eye icon next to the object name in the Selection Pane.

To reverse the effect, click on the Show All optionsin the Selection Pane to make the objects visible across the Word, Excel, and PowerPoint screen. The eye icon appears next to the object name in the Selection Pane when you click the Show All options.

Show or Hide Individual Objects:
You can choose to hide or show individual objects. Click on the eye icon which appears at the right of the object name in the Selection Pane to hide an individual object or objects

To Show the individual hidden objects, click on the closed eye icon which appears at the right of the object name in the Selection Pane.

Renaming objects
If your document, spreadsheet, or presentation consists of numerous objects then renaming the objects become necessary so that you can easily identify and select the objects through the Selection Pane.
Naming is really useful when there are a lot of objects. Office gives objects bland names and you can end up with many ‘Picture’ images but no way to tell which one is which.
Select the object from the Selection Pane list left-click and rename it. Does not matter if it is a single or a grouped object, you can also rename any item within a grouped object using the same method.

Positioning a Selection Pane Dialogue Box
Selection Pane in Word, Excel and PowerPoint can be moved and placed to a different location. By default, the Selection Pane appears to the right side of your document or slide. You can change the position and also resize the Selection Pane.
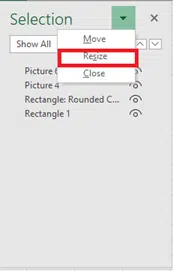
Click the Task Pane Options button from the Selection Pane to make use of the following dropdown menus: Move, Resize, or Close

Select Move to move the pane anywhere in the document for your convenience, On Clicking the Move option, you will notice a 4 headed arrow on top of the Selection Pane. Hold and drag the arrow around the document and place it anywhere you desire. the Selection Pane will automatically get attached, wherever you drop it.
Change the order of the objects
While working with various objects, you also need to take care of the order of those objects. In Microsoft Office applications, you can change the order of objects from the Selection Pane using up (Bring Forward), and down arrow (Send Backward).
Note: Recently inserted objects in Microsoft applications always stay on the top and the initial inserted object is at the bottom of the list in Selection Pane.
Bringing Objects Forward using the Selection Pane
- Keep one object on top of another object
- Then select the object which is behind of another
- Then click on the Up Arrow (Bring Forward) on the Selection pane to bring the object forward

Alternatively, In Word and Excel you can also use the Bring forward option next to Selection Pane from the Picture/Shape Format Tab, Arrange group to bring the object forward.

Sending Objects Backward using the Selection Pane
- Keep one object on top of another object
- Then select the object which is front of another
- Then click on the Down Arrow (Send Backward) on the Selection pane to send the selected object backward.

Alternatively, In Word and Excel you can also use the Send backward option next to Selection Pane from the Picture Format Tab, Arrange group to bring the object backward.

However, In PowerPoint, Click the Arrange option which has a set of dropdown menu to help you bring the object forward or send it backward, bring to front of text and send to back of text.

Group objects
Often objects work together, like an arrow or shape over a picture. Office lets you combine these into a single object by grouping.
- Select an object in your file or press Ctrl + Click to select multiple objects to group.
- From the Format tab, go to the Arrange group, click Group. This will group your selected objects under 1 Group.
- You can choose to ungroup later if you want to remove objects from the group by pressing Ungroup option.

Grouped objects are managed and moved together.
Maybe rename the group to something you’ll understand later.

Resizing and Closing the Pane
Click the Task Pane Options button from the Selection Pane and click on Resize.

Move, the mouse in any direction without clicking the mouse button, then click the mouse to release it to fit its size.
Closing the Selection Pane
Click the Task Pane Options button from the Selection Pane and click on Close to close the Selection Pane. You can also click the cross button to close the Pane.

Keyboard shortcuts for the Office Selection Pane
Tabbed panes come to Microsoft Word
Apply the same picture format to many images in Word or PowerPoint
Hidden Text, Images and objects in Word