Reducing the line spacing or vertical gap between lines in Word paragraphs can be done in six different ways depending on your needs.
Adjusting line spacing to put lines very close isn’t usually necessary for regular text. It becomes useful when trying some design tricks for headings, for example the title in our Millennium poster.
Here’s an example of standard line spacing (left) and very close spacing (right).

The left example has selected the top line. Selecting a line shows the amount of space Word has allocated above and below the line. That’s a clue to what needs adjustment.
There’s no one setting to check. Instead a few options to try and adjust until you get what you want.
Paragraph Break vs Line Break
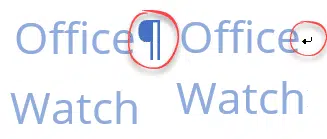
A simple way to reduce the line spacing is to switch from the usual Paragraph Break (pressing Enter) for a Line Break (Shift + Enter)
A Line Break will usually make a smaller gap between two lines.
Turn ‘Show all’ on (Home | Paragraph | Show All) to see both Paragraph marks (the reverse P or pilcrow, left) and line breaks (angled arrow, right).

Change line space before/after
Open the paragraph spacing dialog from the little button at bottom right of the Paragraph section of the ribbon.
Check the Spacing, Before or After settings.

Maybe all you need to do is reduce one or both of those.
Don’t add space between paragraphs of the same style
Just below those choices is “Don’t add space between paragraphs of the same style”.
Checking that box will remove the before and after spacing, assuming both lines have the same style.
Less than single line space
If those options don’t work, it’s time to break out the major nerd tricks. Reducing below single line spacing.
To set less than 1 line space go to Paragraph | Line Spacing and choose ‘Multiple’ – yes ‘Multiple’. Sounds screwy but it works.
Set the Multiple line spacing value to less than one eg 0.7

Try out various line spacing fractions until you get what you need.
There’s a catch. Reduce the line spacing too much and the letters will be cut off. Here’s an example with 0.5 line spacing.

We usually settle for something in the 0.7 to 0.8 range to get the lines close together without clipping the tops of letters.
Tables – the Word formatting friend
Tables are the secret trick for all Word nerds.
Put each line in a cell then adjust the row heights until they are as close as you need. Turn the table gridlines off and it appears as two lines of closely formatted text.

Close line spacing with a table (left, gridlines showing) and how it appears in the final document (right).
Text Box
The ultimate in line positioning is using a text box. Put one or both of the lines in a text box. Set the text box to Shape Fill | No Fill (ie transparent), no border and positioning in front of text. Drag the text box until it’s exactly where you want it. Because the box is transparent and ‘floating’ it can be overlaid on the rest of the document to give exact positioning.

Make a Word text box with rounded corners
Hidden Text, Images and objects in Word
Two ways to circle text in Word documents
Using Text Boundaries view in Word – how and why