Microsoft Word’s Transcribe feature makes converting recordings into text faster and easier than ever. Whether you’re documenting meetings, lectures, or interviews, this built-in speech-to-text tool automatically transforms your audio into an editable Word document. Learn how to use Transcribe in Word for Windows or Word Online, its supported formats and languages, tips for editing your transcripts and the unfixed annoyances.
Record a speech, lecture or meeting then later get a written transcript from an audio file. Virtual meetings can be recorded and now that can become a written record as well.
In 2020, Transcribe was originally available in Word Online (aka Word for web) and later spread to OneNote for Windows. In February 2023, Transcribe appeared in Insiders releases of Word 365 for Windows. It was promised to Office Mobile apps before the end of 2020 but hasn’t appeared yet.
The limited availability isn’t a big problem. Make your transcription document with Word in a web browser then open the final document in any other Word software.
Update: Transcribe is now in OneNote for Windows and Word 365 for Windows.
Transcribe is mostly a cloud service and works the same for all apps.
What you need
All you need to start is an audio file up to 200MB. Officially in .mp3 .m4a .mp4 or .wav format but we discovered Three extra audio formats that work with Microsoft 365’s Transcribe
The speech should be clear with little background noise or music to confuse the ‘speech to text’ system.
Transcribe can also record live, saving the audio file to OneDrive and offering a Word document of the text.
Start from Home tab, over on the right side under Dictate or microphone icon is now a Transcribe option.

If this is your first time with Dictate or Transcribe in Word Online you’ll be asked if the microphone can be connected to the browser. Here’s the prompt in Chrome. Choose ‘Allow’ to continue.

The Transcribe pane opens

Upload audio – use an existing audio file, officially in .mp3 .wav .mp4 or .m4a format. In practice, there are three extra audio formats that work with Microsoft 365’s Transcribe
Start recording – records audio using the default microphone. That’s saved to your OneDrive account and converted to text.
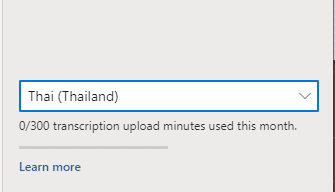
At the bottom is a note about the number of transcription minutes used that month.
Many Languages
At the bottom of the Transcribe pane is a language selector. A wide range of languages and dialects are listed, far larger than the twenty-ish that Microsoft 365’s Dictate supports.
Here’s Microsoft’s list of supported languages.

Tip: Transcribe might be the workaround, if you’re frustrated with your language not being listed in Word/Outlook Dictate.
Uploading and converting to text
Click ‘Upload Audio’ and select the file to transcribe.
It’s strange that you can’t directly select an audio file on OneDrive. It has to be saved or synced to the local computer then uploaded again for Transcribe. Audio files are automatically saved to OneDrive in the /Transcribed Files folder.
Then wait while the audio is uploaded and converted to text.

When it’s finished the recording and transcription text appears.

In this pane, there’s a lot more going on than first appears. See ‘Editing a Transcription’ below.
Live recording
Clicking Start Recording then the mic icon turns on the default microphone. Start speaking and it’ll be recorded.

There’s a pause/record button available.
When you’re finished choose ‘Save and transcribe now’ to upload and convert the recording into text. See ‘Editing a Transcription’ below.
Difference between Dictate and Transcribe recording
At first, Dictate and Transcribe recording might seem the same. They are similar but there’s important differences.
Dictate
Dictate is live real-time conversion of text of what you say. Word and phrases appear in the document moments after you speak.
Different speakers aren’t marked in any way.
There’s no pause option (though we wish there was).
Voice commands like ‘New Paragraph’ work in Dictate.
What you say isn’t recorded for later playback.
Transcribe
Transcribe recording records your speech or meeting first. Then it’s uploaded and converted to text once the recording is over.
Different speakers are noted under separate headings.
There’s a Pause button.
Voice commands don’t work.
The transcription can be edited in the Transcribe pane.
The entire recording is saved in your OneDrive /Transcribed Files folder.
Editing a transcription
The transcribed text appears in the Transcribe pane and might seem simple but there’s a lot of useful features hiding here.

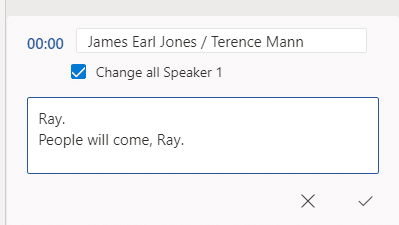
We tested Transcribe with a recording of James Earl Jones and his ‘People will Come’ speech from the movie ‘Field of Dreams’. Transcribe did a reasonable conversion job despite the music underlying the voices.
Fixing or editing transcript
Look for the pencil icon and click to edit a section of the transcript.

Now you can change the name from Speaker n to a proper name.
And fix up the transcribed text …
Just like any text in a browser, you can select it, right-click and see what browser options are available like Copy or Search.

Change all Speaker names.
If you choose the ‘Change all Speaker …’ option in Edit a section, the name will be changed all through the transcript.

A speaker’s name can be changed once or throughout the transcription.
Playback
At the top of the pane are the usual Play, Pause, Forward, Back and Volume buttons.

Forward and Back jump to the next section of the transcript.
Playback speed
The nice addition is the speed controller on the left. Change the speed of playback from slow (half normal) up to twice normal to skip through the recording.

As you listen, the relevant part of the transcription is highlighted.
Listen and edit
Clicking on any time indicator will jump to that section of the recording.

If necessary, click the time stamp again to listen repeatedly and catch what was said.

Same speaker, over and over again
Transcribe makes separate sections for one speech. A single speech is broken up into (too many) separate sections.

It’s unclear if this is deliberate or a bug. Since it’s not been fixed for years, it appears to be deliberate .. Grrrr.
Perhaps the developers are ‘erring on the side of caution’ in case it’s not the same person talking? Separating the transcription lets the customer change the speaker name.
There’s no way to join sections together to make a large spoken block.
Copying to Word document
There are various way to copy some or all of a transcript to the Word document.
Add all to document
Most obvious is the ‘Add all to document’ button at the bottom of the Transcribe pane with some choices:

- Just Text
- With Speakers
- With timestamps
- With Speakers and timestamps
The transcription is copied to the document looking very plain, which is the polite way to say it.

Or with timestamps it looks like this:

The ‘Audio file’ and ‘Transcript’ lines use Heading 1 style. The rest is all in Normal style.
Transcript problems
There’s nothing to separate speakers names from the spoken words. It’s a shortsighted decision that makes it unnecessarily difficult to reformat the transcript.
Surely it would be better to use Heading 2 for speakers names? Then users could easily reformat the naming either by changing the look of Heading 2 or Replacing that style with another (e.g. ‘Speaker Name’).
At the least, transcribed words should have a separate style (e.g. ‘Transcript’ or ‘Spoken’), even if the initial style settings are the same as Normal? Ideally, each speakers words should be in a separate style (e.g. ‘Speaker 1 text’ etc.).
As Microsoft has done it, customers must manually go through the document reformatting it. Grrrr.
Question for Microsoft — What’s the point in having powerful and long-standing features in Word, if Microsoft itself won’t use them?
Add section to document
Or click the + icon to copy that section of transcript to the document.

Reopening a document with a transcription
Closing a document with a transcription, saves the document and the transcription.
If you reopen the document, go back to Home | Dictate | Transcribe. The Transcribe pane will open with the transcription there.
The audio file needs to remain in the OneDrive /Transcribed Files folder with the same name. It’s not saved in the Word document.
Of course, that only works with Word that supports Transcribe. Opening a transcribe document in another Word (like Word for Windows/Mac) can’t show the Transcribe pane (yet) but the transcription details are still in the .docx file.
Transcribe requirements and limitations
There are some requirements for Transcribe in Word:
- Microsoft 365 customers only – any plan, personal, education or corporate.
- Edge or Chrome browser for Word on the web.
- Many languages and dialects supported, see selector at bottom of Transcribe pane.
- Each uploaded file must be under 200MB.
- Audio formats: .wav .mp4 .m4a or .mp3.
- Apple’s .aac format is accepted see Three extra audio formats that work with Microsoft 365’s Transcribe
- NO limit on the transcription time but Microsoft might impose a limit in the future.
- There was a five hour limit – a total of 300 minutes of transcribing per month.
- Look at the bottom of the Transcribe pane to see how much time has been used.

One Transcription per document
Only one audio file or recording can be saved in a Word document.
If you choose ‘New Transcription’ at the bottom of a current transcript, you’ll get this warning.

You can only store one transcript per document.
When you create a new transcript, the current transcript will be removed/deleted.
The workaround is to start a new Word document and do a separate Transcribe there.
This limitation appears to be linked to the way a transcription is saved within a Word document.
Transcripts can be copied between Word documents (just like any other text) to make a combined transcript document. Or even link/embed the transcription documents into another Word doc.
Privacy
According to Microsoft:
Your audio files will be sent to Microsoft and used only to provide you with this service. When the transcription is done your audio and transcription results are not stored by our service.
As usual, those assurances don’t tell the whole story.
Audio files are automatically saved to OneDrive in the /Transcribed Files folder. The transcribe text is normally saved to OneDrive, though that’s optional. Anything saved to OneDrive is subject to intrusion by Microsoft.
Microsoft can be compelled to hand over any customer data to government agencies in accordance with local law. That can happen without a warrant or notice to the affected customer.
Three extra audio formats that work with Microsoft 365’s Transcribe
Turn talk into text in Word 365 for Windows
Read Aloud in Word 365 and 2019 in depth
Read Aloud in Word for Mac
The full story on Dictate with Office 2013 & Office 2016