The ultimate in PowerPoint Handouts aren’t made in PowerPoint at all. Link a presentation to handouts in Microsoft Word, where you have all the powerful Word formatting features available to you.
You’re forgiven for not knowing this option existed, because it’s not immediately obvious and you need to go several steps down in menus before there is any mention of Word.
PowerPoint presentations have various in-built handout options – with and without slide notes. They have limited positioning and formatting options.
Master PowerPoint Handouts, make printouts look better
Notes Print with PowerPoint Slides
PowerPoint Notes Master for more handout control with slides
Watermarks with text on PowerPoint Handouts
PowerPoint to Word
To get your handout into Word, you are not immediately printing the file like you did with the other handout options.
Instead export or link your presentation to Word. To do this we go to File | Export | Create Handouts. Then it tells on the right-hand side that we are creating handouts in Word, so we then click Create Handouts.

The Send to Microsoft Word dialog then opens, with a couple of things to select.

Page Layout
The options here are fairly self-explanatory. You can choose whether you want to add the notes from your slides or blank lines for people to add their own notes, and whether you want these to appear next to or below the slides.
You can also choose Outline view, which will print only the heading and content text from each slide, without any graphics.
Paste or Paste Link
If you have chosen any layout other than Outline, you then need to choose between Paste and Paste Link. The distinction here is similar to that between embedding or linking an object into a Word document.
If you click Paste, the slides will be inserted into the Word document, but there will be no link to the original PowerPoint file. Any changes you make to the original slides will not appear in the Word document. You can also double-click on the slide in the Word document and edit it, but these changes will not be reflected in the original PowerPoint file.
- Larger document. Choosing the Paste option can result in a much larger file size than if you choose Paste Link. This is because the Paste option embeds the entire slide into the document, whereas the Paste Link option only saves a link to the slide.
If you click Paste link, there will be a live link to the original PowerPoint file. Any changes you make to the slides in PowerPoint will be reflected in the Word document, up to a point.
Paste Link warnings
The Paste Link option doesn’t work in the way you might expect. The links are on a ‘per slide’ basis not for an entire presentation that might change after the initial links are created. And the links are for slides only, not for notes.
- No slide order changes. Pasting the link also does not recognize if slides have been rearranged, deleted or added. It only changes the actual slide content of any slides that have been changed, but leaves the same slides in the same order as they started out..
- Slide links only. The Paste Link option only maintains a link to the actual slides in the PowerPoint file, not the notes. Changes to the notes in the original file after you have exported it will not be reflected in the Word document.
Paste Link then break the link
Given the larger file size of the Paste option, and the limitations of the Paste Link option, it may seem like you’re damned if you do and damned if you don’t with this feature.
There’s a way to get the best of both worlds. You can create your Word document using the Paste Link option, at any time after that, you can break the link between the two files.
Once the link is broken, changes in the presentation won’t appear in the document or vice-versa.
In Word, right-click on any of the link slides and choose Linked Slide Object | Links.

Each of the links / slides are listed. For any link, select it then choose ‘Break Link’.
Just remember, though, that if you later make changes to the PowerPoint slides, you will then need to re-export to create an updated Word document.
Formatting the Word Handouts
Once you have exported your presentation to Word, you can then edit content and format just as you would with any Word document.
The formatting setup in Word depends on the slide/note format you chose in PowerPoint.
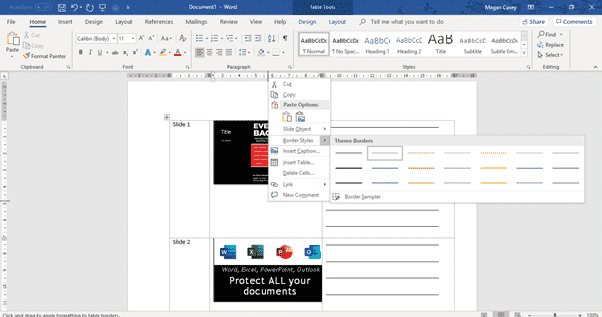
If you have selected the option to place notes or lines next to slides they are within a three-column table. The first column contains the slide number, the second column, the slide itself, and the third column contains either your notes or blank lines, depending on which option you selected. Each slide will be a separate row in the table. The borders are not shown on the table, but if you find it easier to manage a table when you can see the borders, you just need to right-click and then go to the arrow next to the Border Styles option to add visible borders to the layout.
If you have opted to print the notes or blank lines below the slides, no table is created; each element is just inserted as a new paragraph and can be edited like any other paragraph.
No styles are used in the Word document. Everything gets dumped in with ‘Normal’ style, formatting in notes is applied as direct formatting. That’s a shame since it would be better to have styles defined for ‘Slide Numbers, ‘Slides’ and ‘Notes’ so overall handout changes could be applied quickly.
As a Word document, you have all the power of Word available. Add headers and footers beyond what’s possible in PowerPoint, Watermarks, rearrange the table etc.
Troubleshooting
Occasionally, if you are attempting to export a large PowerPoint file to Word, the process may fail with an error message that says, “PowerPoint couldn’t write to Microsoft Word”. This is because the process uses a lot of memory, and your computer may not have enough memory available to complete it. In this case there are two things you can try:
- Restart the computer and try the process again with only PowerPoint open, so that it has access to all available memory for the process. It might help to start Word with no open documents.
- If this still doesn’t work, you may need to break your presentation up into two or more smaller files, and export them separately. Then you can combine the two or more Word documents back into one Word document.
Rainbow gradient or effect in Office, Word or PowerPoint
Quickly add images with PowerPoint’s Photo Album
Make captions for PowerPoint video and audio
Quick PowerPoint Handouts
Master PowerPoint Handouts, make printouts look better
Notes Print with PowerPoint Slides
PowerPoint Notes Master for more handout control with slides
Watermarks with text on PowerPoint Handouts