If you’ve ever struggled with getting images positioned just right in Microsoft Word, here’s a quick, effective shortcut you need. Instantly gain far greater control over how pictures move and integrate with text. This easy step is backed by clear instructions for both Windows and Mac, along with explanations of why the default “In Line With Text” mode can drive people crazy.
The standard Word image positioning option (the default) doesn’t match what most people want. It’s easy to change once you know how.
In brief: change the image layout to Square. That lets you move the image more easily around the document.
Note: this suggestion is given in some places as a ‘fix’ for placing images in Word. It’s not. Changing the default placement can help because the ‘Square’ wrapping option makes more sense to many people.
What to do
Change the way Word first positions an image when you add it into a document.
Add an image to a document in any way you like; Insert Pictures , Copy/Paste or drag and drop. It doesn’t matter.
Square
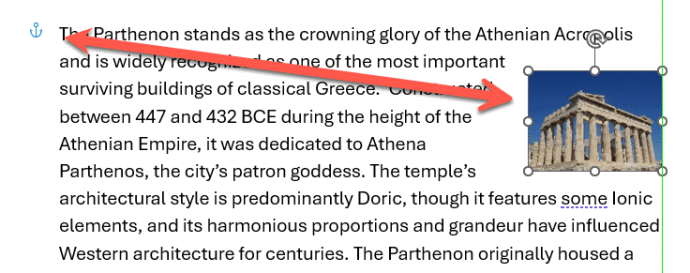
When it’s inserted, click on the little icon at top right of the image and choose Layout Options | With Text Wrapping | Square like this.

In Word for Mac, right-click on the image and go to Wrap Text | Square.

Now you can drag the image around that part of the document. To one side (left or right) or middle, the text will wrap around the image.

Green positioning lines
In modern Word (and PowerPoint) look for the green positioning lines that help guide you. In the above example, the vertical green line means the picture is against the right margin of the document.
Other choices
There are many other positioning choices available, the other two you might want are:
Tight
Tight – same as Square but will less white space between the image and the text.
Top and Bottom
Top and Bottom – the picture is on a ‘line’ of its own with text above and below, but not wrapping around it. The image can be dragged along the line to left, center or right.
Change position for every image
You can change the way Word first inserts every image (the default in tech speak).
In Word for Windows go to File | Options | Advanced | Insert/paste pictures as | Square.

Word for Mac
Go to Word | Preferences | Edit | Editing Options | Insert/paste pictures as … change to Square.

Why this works
Word has many positioning options for a picture but the default setting doesn’t match what many people expect. Word’s ‘out of the box’ positioning is ‘in line with text’ which treats the image like a big character in the text, like this in the middle of a line.

Changing to Square With Text Wrapping is more like what many people expect.

Now you can drag the image around to the place you want – within reason.
Move with text – see the little anchor icon at left? That shows were the image is linked to the paragraph. In simple terms, if you move that paragraph with the anchor the image will also move.
Fix position on page – the other choice. A more advanced topic
There’s a LOT more
This is just the start of the many image positioning choices in Word.
Experienced Word users know that we’ve just scratched the surface of this topic.
And the same position and wrapping options also apply to other things you can add to a document, such as Shapes, Icons, 3D Models, SmartArt and Charts.
Making pictures smaller – some more options.
Simple image overlays and grouping in Word
Using text wrapping breaks for images in Word
Insert a background image on a Word page