How to Make an Index in Word: Mark Entries and Build It
An index is the alphabetical list of terms and page numbers at the back of a book, and Microsoft Word can build one for you. We show you how to make an index in Word, starting with the basics: preparing your document, marking index entries and generating a simple, professional looking index. It takes some setup, but the result is a proper index that readers can actually use.
In this and a following article we’re going to talk about creating indexes in Microsoft Word. ‘Real’ books often have an index at the back which Word can create for you with some preparation. Online publication (web page, Word doc or PDF) usually don’t have an index because a Find or Search option is available via Ctrl/Cmd + F shortcut.
An index is a list of terms or topics that can be found within the document. Each index entry has an associated page number or page range within the document that allows readers to find specific pieces of information with a minimum amount of effort.
Unfortunately, creating an index in Microsoft Word can be difficult and time-consuming to do on a large scale. This isn’t a slight against Word whose features are more than adequate, but rather a testament to a conceptually difficult process.
Hence this two-part series starting with the basics; setting up a document to be indexed and then making a simple index.
PREPARING FOR YOUR FIRST INDEX
Before jumping in at the deep end, we recommend that you first create a copy of your document (or another smaller document) to practice on without having to worry about messing up the real thing. A file with a large index can get extremely complicated and confusing if you’re not certain about what you’re doing.
Once you have grasped the fundamental and more complex indexing techniques, settle on a method that suits your needs. Then you can transfer that knowledge to the real document with confidence
Creating an index for an existing document involves two distinct steps:
- marking index entries
- generating the index
MARKING A SIMPLE INDEX ENTRY
An index entry is a Microsoft Word “field code” that marks specific text for inclusion in an index. When you mark text as an index entry, Word inserts an {XE "Index Entry" } field formatted as hidden text.
To use existing document text as an index entry, you must first select a word that you wish to include in your index. To enter your own text as an index entry instead, simply click where you want to insert it.
Next, go to Reference | Index and click the “Mark Entry” button to bring up the “Mark Index Entry” dialog box. We recommend that you learn to use the Alt+Shift+X keyboard shortcut to save time.
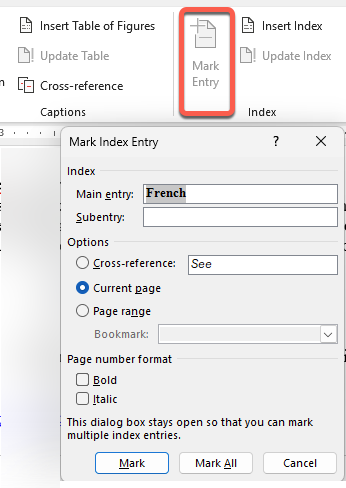
The Mark Index Entry dialog box provides “Main entry” and “Subentry” boxes. Most terms will fall under the “Main entry” category – a single term with its corresponding page number(s). You can however use the “Main entry” as a general heading or category for a collection of other terms otherwise known as subentries. For example, the main index entry “Animals” could have subentries “Birds” and “Mammals” – each which would be entered separately.
While the “Mark Index Entry” dialog box only has two boxes for entry levels, it actually allows for indexes to be up to seven layers deep if you want to get a little tricky. To do this, type the entries (in either of the entry boxes) in hierarchical order separated by colons. For example, you could enter “Animals:Birds:Lorikeets” to create a triple-tiered index entry.
OTHER INDEX ENTRY OPTIONS
If you have selected a word and opened up the “Mark Index Entry” dialog box, the text will appear in the “Main entry” box. The “Mark” and “Mark All” buttons are both available to you by default. The “Current page” option is also selected by default.
Mark or Mark All
By clicking the “Mark” button, you are simply adding an index entry for the currently selected word into your index on the current page.
By clicking the “Mark All” button you are searching your document for every instance of the selected word and marking each occurrence as a separate page number (separated by commas) in the same index entry. For example “Lorikeets, 1, 7, 12” would mean that the term “Lorikeets” was marked on pages 1, 7 and 12.
Cross-reference or “See …”
You can also choose to “Cross-reference” one index entry with another. For example, “Lorikeets” could be cross-referenced with “Rainbow Lorikeets”. This would appear as “Lorikeets. See Rainbow Lorikeets” without a page number.
We will look at the “Page range” option later.
If you have opened up the dialog box without first selecting any text, then you can only use the “Mark” button to place an index entry at the current cursor location.
Other options include checkboxes to make the page numbers bold or italic for a specific entry, while the entry itself can be formatted by right-clicking in the “Main entry” or “Subentry” box, clicking on “Font” and choosing the desired options.
After marking one index entry, it is possible to select another piece of text in your document without closing the “Mark Index Entry” dialog box. You can then repeat the index entry process without having to constantly open and close the dialog box.
CREATING A SIMPLE INDEX
After marking an index entry, you will notice that the show hidden text and show all character options have both been enabled by Word. We’ll explain this later so just ignore it for the moment and focus on creating your index.
Click the cursor at the end of your document (or wherever you want your index to appear), then navigate to Reference | Index and select the “Insert Index” button.
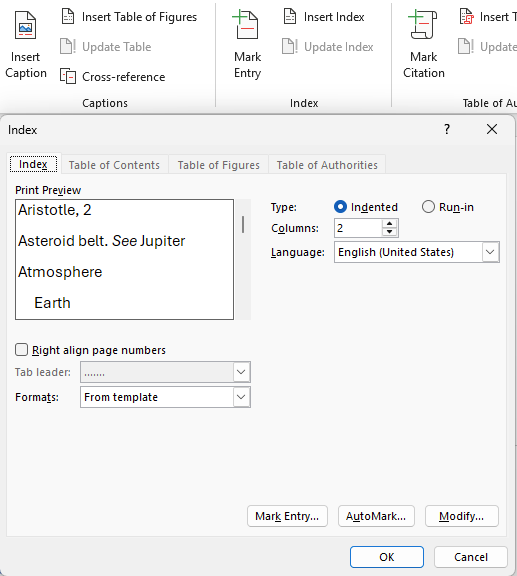
The Index dialog gives you a number of formatting options. The current formatting settings are displayed in example form in the “Print Preview” pane.
Type: Indented or Run-in
The “Type” radio-button allows you to specify either an “Indented” or “Run-in” type of hierarchical display. The “Columns” box allows you to specify the number of columns that the index will be displayed on per page. The “Right align page numbers” checkbox gives more of a “Table of Contents” look to the index.
Formats
The “Formats” drop down box gives you a number of pre-defined styles to choose from that can be seen in the preview pane. The available styles haven’t changed in over two decades, the same choices are in both Word 2003 and Word 365 in 2026!
- From template
- Classic
- Fancy
- Modern
- Bulleted
- Formal
- Simple
To design a custom style click the “Modify” button, choose a style and customize as you see fit.
When you are happy with your index layout as it appears in the preview pane, click the “OK” button and your index will be displayed in all its glory.
Please note that it is always possible to add new entries, modify existing entries and delete unnecessary entries. So if you’re not happy with your index, keep molding it until you are!
If you have made any changes to your index entries, always remember to click anywhere on your index and press F9 for those changes to appear in the index itself.
How to Make a Better Word Index: Page Ranges, Hidden Tags and AutoMark
Indexing Bug in Microsoft Word Tables
Table of Contents Basics in Word