How to Make a Better Word Index: Page Ranges, Hidden Tags and AutoMark
Making an index in Word by hand gets tedious fast, but Word hides three real time savers most people never touch. In this second part of our indexing guide we show you how to mark an index entry that spans a range of pages using bookmarks, why Word fills your document with hidden {XE} tags and how to switch them off cleanly, and how to index a whole file automatically with a concordance file and the AutoMark button. Get these right and the index for a long report or book comes together in minutes instead of hours.
In another article, we looked at the basics of indexing in Word – setting up a document to be indexed and then generating a simple index. See How to Make an Index in Word: Mark Entries and Build It.
Now we’ll look at marking index entries across multiple pages, hidden text and an AI shortcut.
Indexes are somewhat ‘old-fashioned’ in that they are good for longer paper documents like books. They aren’t necessarily needed for online documents like web pages, Word documents or PDF files read online because you can search for any word in the document.
HIDDEN TEXT AND THE {XE} TAG
After marking an index entry, Word will automatically turn on the “Show hidden text” and “Show all characters” options making your document appear full of strange characters. There is however “method in the madness”.
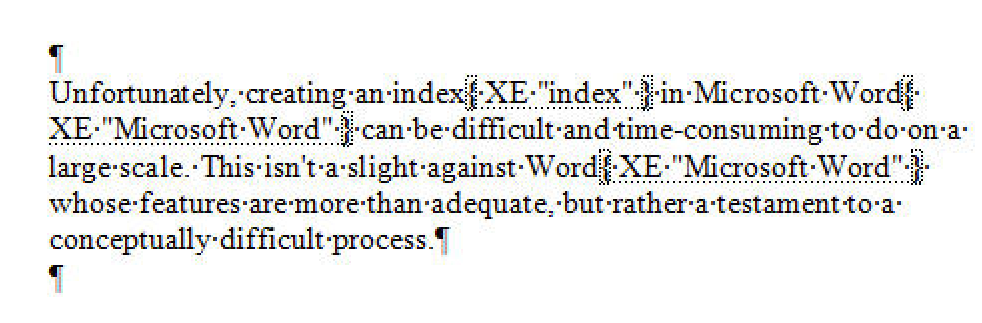
Every index entry will have an { XE “index entry” } tag next to it. The {XE} tag is a hidden text index entry field that can only be seen when the show hidden text option is selected.
With the show all characters option selected you are able to “see” whitespace formatting elements. For example, spacebar presses are represented by what looks like a slightly thicker full-stop vertically centered between two words. Paragraph symbols are also displayed where the “Enter” key was pressed. While this is not totally necessary, it does display the exact formatting of the {XE} index entry fields.
Turning off the “Hidden Text” option is especially important after you have completed your index. While the hidden text is displayed, the page numbering related to index elements can quickly become inaccurate (as the {XE} index entry tags themselves increase the amount of text on any given page). Only after turning off the show hidden text option and updating the index’s page numbers will the index truly reflect the document and be ready for printing or distribution.
A word of warning – if you turn off the show all characters option and/or the show hidden text option and then attempt to mark more index entries, Word will immediately switch the options back on.
MARK ENTRIES THAT SPAN A RANGE OF PAGES USING BOOKMARKS
So how do you create an index entry for a commonly recurring theme or topic that spans a number of sequential pages in your document? Simple – use the “Page range” option in the “Mark Index Entry” dialog box after performing some foundation work that will enable this functionality.
To begin with, select the range of text (this could be a number of pages) that you want an index entry to refer to and navigate to “Insert | Bookmark”. In the “Bookmark name” textbox, type a name that describes the section and click “Add”.
Back in the document, click at the end of the text you marked with a bookmark and use the ALT+SHIFT+X keyboard shortcut to bring up the “Mark Index Entry” dialog box. Type the index entry name in the “Main entry” textbox. Next, select the “Page range” radio button and in the “Bookmark” box select the bookmark you just created.
Clicking “Mark” will place the index entry into the index along with the page range that is associated with the bookmark selection. For example, “Microsoft Office, 7-11” refers to a range of pages referring to “Microsoft Office” that have been bookmarked.
AUTO MARK ENTRIES WITH A “CONCORDANCE FILE”
A more efficient way to mark index entries is via the use of a concordance file. A concordance file is a list of words to be included in the indexing of another document coupled with their index entries.
To create a concordance file, open up a new document and navigate to Insert | Table” Create a two-column table in the dialog and click the OK button.
In the left column, enter the text you want to search for and index in your document. In the right column, enter the text you would normally type into the “Main entry” textbox of the “Mark Index Entry” dialog box.
Entering “Microsoft Word” into the left column and “Microsoft Word” into the right column on the same row will find all instances of the phrase “Microsoft Word” in the document text and create a corresponding index entry for them.
Entering “Lorikeet” into the left column and “Bird:Lorikeet” into the right column will find all instances of the word “Lorikeet” in the document text and create an index entry with a “Main entry” of “Bird” and a Subentry of “Lorikeet” within the index.
Save the document when you have exhausted your list of possible search terms and related index entries.
To run the concordance file, open the document you wish to index. Navigate to Reference | Index | Insert Index then the AutoMark button.
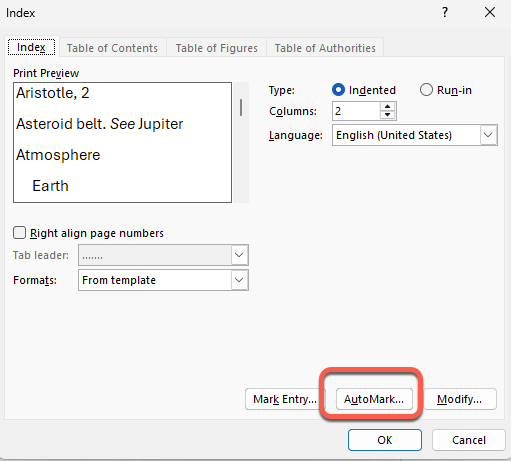
Next click the “AutoMark” button. Select the concordance file you have previously created and saved (the one with the table) and click “Open”. Word will then generate the index automatically from your concordance file directives.
List all word forms
List all forms of the text you want to search for to ensure that Word indexes everything you would expect. For example: type “erupt”, “erupting”, and “eruption” in three separate cells in the left column, and then type “volcanoes” in each of the matching cells in the right column. This is because if Word does not find an exact match, it will not mark it as an index entry.
Use Copilot for indexing
Copilot in Word can help with marking index entries in two ways. In our tests, one prompt worked but another did not.
Add Index Entries
A prompt like “Add Index entries (XE) for important words in this document” should work with Copilot in Word.
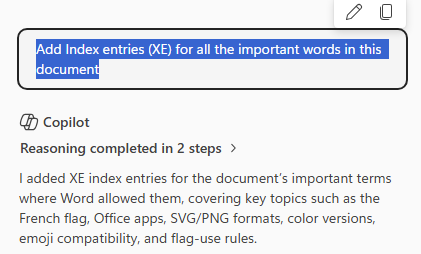
Despite the response, Copilot did NOT change the document at all. We could not get Copilot to add XE index entries to any document but the AI constantly insisted that it was doing that.
From the side-pane response did list the word or phrases it allegedly indexed. Based on that, it seems Copilot indexes too many words. That might suit you because it’s easier to remove XE field codes than add them.
You’re welcome to try Copilot to see if indexing works for you.
Make an AutoMark concordance file
What did work was asking Copilot to make an AutoMark or Concordance file. This file is used by Word’s AutoMark feature to setup the Index Entries.
Use this prompt “Suggest a concordance or Automark table to index this document“.
Copilot in Word will respond with a table that you can paste into a Automark document.
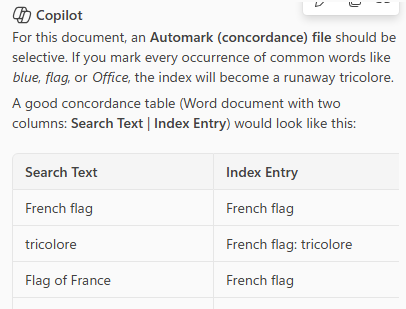
This is a better choice than getting AI to index directly. You can edit the concordance document to remove unwanted words/phrases. Add any that it’s missed and also add more word forms to enhance the index.
Making the AutoMark / Concordance file can be done in any AI, not just Copilot within Word. Here’s the result from ChatGPT using the prompt “Create a Microsoft Word compatible Automark or Concordance table for the attached document.“
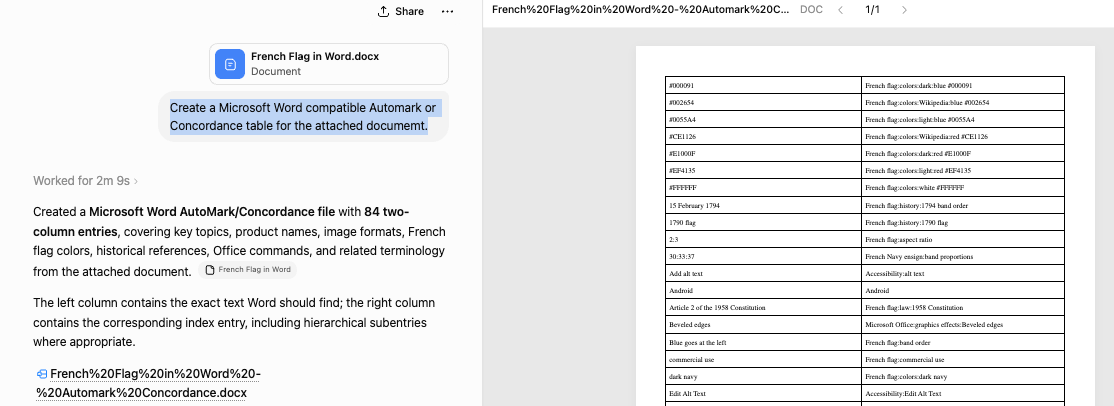
AI made AutoMark files are overflowing with indexing entries. For example, ChatGPT suggests indexing each separate Hex color code and Pantone color in the source document. However the table is easier than making one from scratch.
The Complete Guide to Word’s Table of Contents Options
Start Cross Referencing in Microsoft Word