If you’ve ever needed to split dates in Excel into separate day, month, and year, there are several options to choose from. Excel has different functions, Text to Columns or Flash Fill which can do the job.
Here’s a quick guide on several methods:
- Using the DAY, MONTH and YEAR functions
- Using Text to Columns
- Flash Fill
- TextSplit() a new Excel 365 function combined with Text()
DAY, MONTH and YEAR Functions
Using these simple Excel formulas, you can extract the day, month, or year only from a date cell.
This is the best way if the dates might change or more added but only works for dates that are saved as Excel dates (not in plain text).
Day Function
The DAY function returns the day of the month as a number (obviously between 1 and 31).
Syntax
=DAY(serial_number)
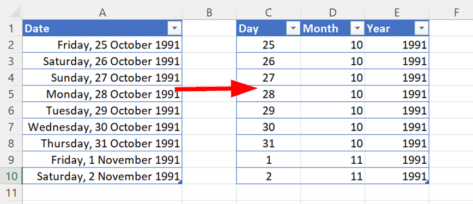
So, for the example above, if we select cell C2 and input =DAY(A2) and then press Enter, we will receive the DAY result of 25.

Month Function
The MONTH function returns the month of the year as a number (obviously between 1 and 12).
Syntax
=MONTH(serial_number)
So, for the example above, if we select cell D2 and input =MONTH(A2) and then press Enter, we will receive the MONTH result of 10.

Year Function
The YEAR function returns the year component as a four-digit number.
Syntax
=YEAR(serial_number)
So, for the example above, if we select cell E2 and input =YEAR(A2) and then press Enter, we will receive the YEAR result of 1991.

Alternatively, you can use the date within the formula instead.
For example, instead of selecting the cell, you would use =YEAR((DATE(1991,10,25))) for the 25th of October, 1991 – which would produce the results of 1991. We think that having the date already inputted within your cell and using the cells only, is a simpler and less complicated way to go about it.
Text to Columns
Another way around it would be using the Text to Columns function in excel to split your date into the day, month, and year within three columns.
This works with either Excel date cells or dates as plain text. It’s a ‘one-off’ process which won’t split any dates that are added or changed later.
Firstly, you’ll need to highlight your existing date column.

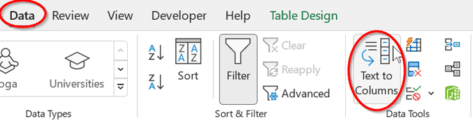
Next, go to Data | Data Tools | Text to Columns
This will bring up the Convert Text to Columns Wizard.
You’ll need to ensure Delimited is selected, in this case the Text Wizard has already determined that the data is Delimited.
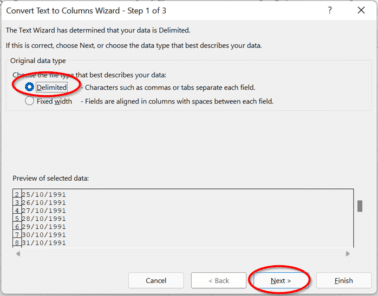
Then you can click next, which will bring up the option to set the delimiters.
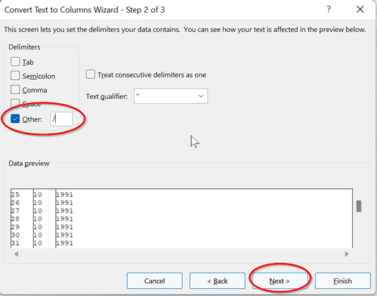
Under the delimiters section, tick the Other box only, and input / within the box. Then you can select next.
For Step 3 of 3, click in the box next to Destination, then select the cell within your Excel spreadsheet like we’ve done so below.

You can also select the Column data format from General to Date and choose which Date format you would prefer from the drop-down list.
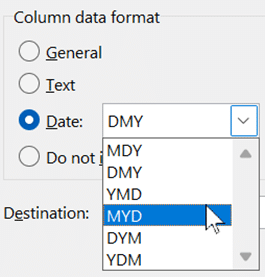
Then select Finish so that Excel can input the results. Now we have three separate columns with the day, month, and year.
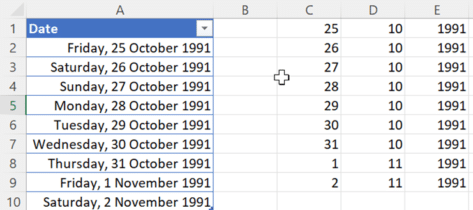
From there, you can format the results into a table if you prefer.

Flash Fill to split dates
Flash Fill is like ‘Text to Columns’ but is done automatically. You type in some examples of the split you want, Excel detects that and continues it down the column.
This works with either Excel date cells or dates as plain text. It’s a ‘one-off’ process which won’t split any dates that are added or changed later.
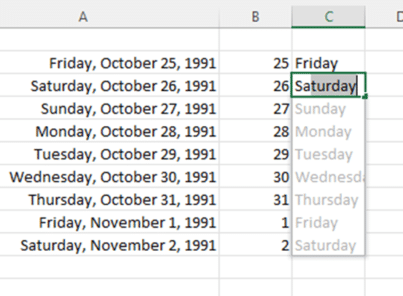
Here, we’ve started typing the day numbers in column B, Excel detects the match with text in Col A and shows what it will ‘Flash Fill’ if you simply press Enter.
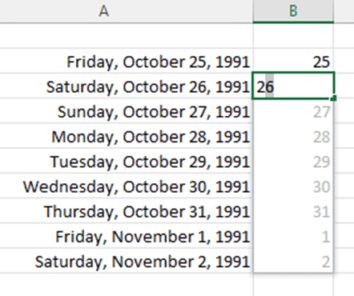
You can do the same with the day name, month or year.
TextSplit
TextSplit() is one of the new text splitting functions in Excel 365. They work for cells with text strings but not date cells that appear as text. Converting Excel dates to text and vice-versa
Here’s an example of the difference.
Row 18 has a date cell in Col A, TextSplit can’t work and returns the serial date value.
Cell A19 is plain text, TextSplit(A19,”,”) works OK and separates each part into it’s own cell. Note there’s no comma between month and day.
Row 20 has another date cell and shows how to text split from a serial date cell. In Col B we’ve added Text() function to convert the date into text with commas separating each element (including Month) so that TextSplit() can separate out all four parts.

How to use Excel’s Accessibility Ribbon
More powerful Excel Autofill using Series
Converting Excel dates to text and vice-versa