I said there are at least six tricks with the Excel Name Box and that’s before you get into using named rangers and objects. The Name Box lets you select a cells and give them a name or jump to an existing named range.
It’s the same as going to Formulas | Define Name | Define Name … but a lot faster.
Make a new Named Range in the Name Box
Let’s say we want to work with our expenses per quarter, so we decide to name them Quarter1, Quarter2, etc. To start we select the first three months’ worth of figures, type Quarter1 in the Name Box, and press Enter. Now there’s a named range called ‘Quarter1’.

We then go on and do the same for Quarter2, Quarter3 and Quarter4. We now have some handy names that we can type into formulas rather than having to select or type in cell ranges every time.
As a quick example, if we want to add together the first and second quarter expenses, we would simply type:
=SUM(Quarter1,Quarter2)

Modern Excel colorizes the formula bar and matching cell selections, making checking formulas a lot easier. Much less squinting over a worksheet to ensure the formula has the right cell reference.
Named Range Rules
The standard named ranges rules apply:
- There are restrictions on what characters you can include in a name:
- The only characters allowed are letters, numbers, period (.), backslash(\) or underscore (_).
- The first character can only be a letter, backslash or underscore.
- Names cannot include spaces.
- Names cannot consist of only numbers.
- You can’t use anything that looks like a cell address, such as B2 or C5.
- You can’t use the letters R, r, C, or c, because they are used to select a row or column, as described above. (Other single letters are OK.)
- Names are not case-sensitive. So Quarter1 and quarter1 are treated as the same name.
- Names must be unique to an entire file, not just a single worksheet. We cannot have a Quarter1 range on Sheet1 and Sheet2 – we would have to name them differently on each worksheet.
Jump to a Named Range
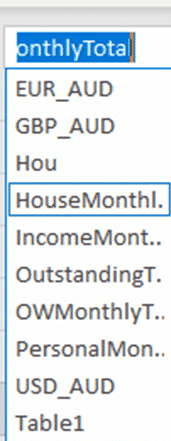
Once you have set up some named ranges, you can then use the Name Box to jump to that named range. Just type the name in the Name Box and hit enter to be taken straight to the desired range of cells.
Type a few characters then select the named range from the pull-down list.

As names must be unique across the whole file, you don’t need to be on the right worksheet to find a range – Excel will automatically take you to the worksheet that contains the named range you have searched for.
Naming Objects
You can also use the Name Box to name objects such as charts and pictures in your worksheet. Changing them from the bland and unhelpful defaults like Chart1.
Simply select the object, type a name in the Name Box, and hit Enter.

Named Object Rules
The Name Box behaves a little differently for named objects:
- There are less restrictions on the characters a name can contain. Spaces and most punctuation characters are allowed, as are names containing numbers only.
- Named objects do not appear in the Name Manager.
- Object names can be edited and deleted by simply selecting the object again and editing or deleting the name in the Name Box.
- Searching for an object only works on the worksheet it is on. If you try and search from another worksheet Excel will display an error.
Deleting or Changing Names
If you have named a range incorrectly or want to remove it, the Name Box is no help.
Instead, go to the Name Manager, which is over on the Formulas tab.

Then in the Name Manager, we just select the Name that we want to edit or delete, and click the Edit or Delete button.
If we choose to edit the name, the Edit Name dialog will open, where we can make the changes. Note that we can also enter a comment or description of the name here as well.
Six clever tricks (at least) in Excel’s Name Box
Excel convert Range to Array in VBA
LET() assigns names to calculations in Excel
Faster SumIFS in Excel 365 for Windows