Word Spell Check: 10 Hidden Options You’re Probably Missing
Clicking a red underlined word in Microsoft Word shows more than a few suggested spellings. Word’s spell check menus hide ten useful options, including Change All to fix every copy of a typo at once, Add to AutoCorrect so Word fixes that mistake for you in the future, and Ignore All, which only appears when you right click. Here’s where to find each one and when to use it, so you stop fixing the same errors over and over.
Simply click the underlined word to view suggested corrections. Choose the right option, and Word will replace it instantly. So far, so easy.
Hidden Options Below Word’s Spelling Suggestions
What people often overlook are the options below the suggestions.
There are choices to:
- Change the typing to one of the suggested words
- Ignore the spelling mistake once only
- Ignore the mistake throughout the document (right click menu only)
- Fix the mistake throughout the whole document
- Fix the mistake automatically in all future typing
- Add the ‘mistake’ to Word’s dictionary so it’s accepted as correct in the future
Many of these choices are hidden behind menus or little buttons.
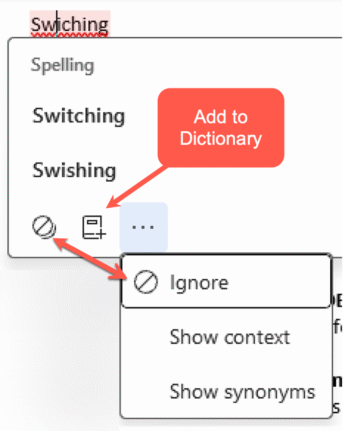
Ignore: tells Word not to show this word as a spelling error in this document only.
Add to Dictionary: puts the word into the Office dictionary so it won’t show as a spelling error in any Word document, Excel sheet, Powerpoint slide or Outlook email. Strictly speaking, it’s added to a Custom Dictionary.
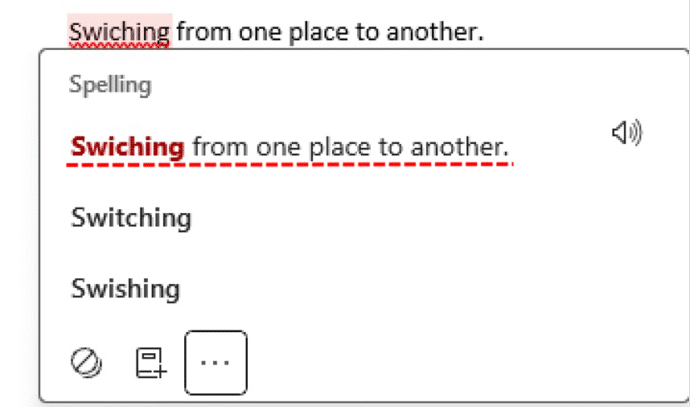
Show context: Shows the sentence containing the error above the spelling suggestions. Click on the speaker icon to hear the sentence read aloud.
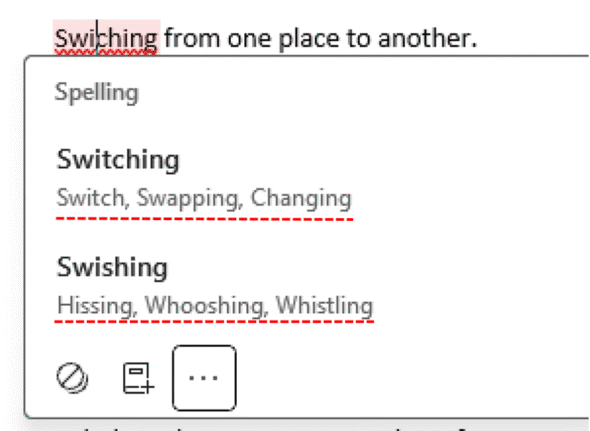
Show synonyms: adds similar words under the spelling suggestions. You can’t select these alternatives; they’re there to help you understand each suggested word.
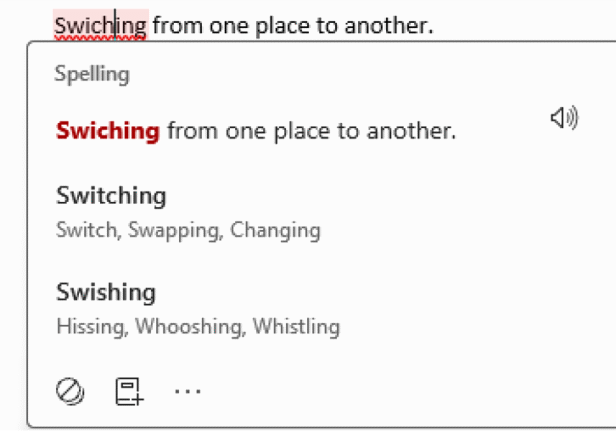
The complete spelling menu
Turn on both Show context and Show synonyms to see everything Word has to offer.
Where is Ignore All?
Ignore All isn’t on the left click menu. Right click the word instead.
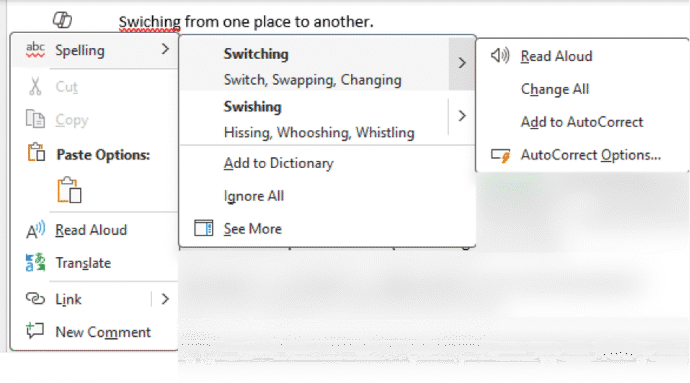
Read Aloud, Change All and AutoCorrect Options
For each spelling suggestion, there’s another menu of options.

Read Aloud: speaks the word
Spell out: speaks the letters of the word
Change all: fixes every instance of the same misspelling in the document. In other words, it’s a quick Find and Replace through the whole document.
Add to AutoCorrect: whenever you mistype this word the same way in the future, Word changes it automatically.
Right-click on a misspelled word
Right click a misspelled word to see a similar menu, with Ignore All in place of Ignore (which only skips that one instance).
Ignore All isn’t permanent. Go to File | Options | Proofing and click Recheck Document to make Word flag those words again. To remove a word you added to the dictionary, go to File | Options | Proofing | Custom Dictionaries, select your dictionary and click Edit Word List.
The “See More” option opens the Editor side pane.
Which Word Spell Check Option Should I Use?
With so many Word spell check options, it’s tempting to click the first one you see. Here’s a quick guide based on what the red underline is actually telling you.
- A one time typo or deliberate spelling: Pick the correct suggestion, or choose Ignore if you meant it, such as a misspelling inside a quote.
- A name or term used throughout this document only: Right click and choose Ignore All. A client’s unusual surname in a single proposal is a good example.
- A word you use in every document: Choose Add to Dictionary for your own name, company, product names and industry jargon. It’s accepted in Excel, PowerPoint and Outlook too. Check it carefully first, because a misspelling added by mistake will never be flagged again.
- The same mistake repeated through the document: Use Change All, especially after pasting in text written by someone else.
- A typo your fingers always make: Use Add to AutoCorrect for habits like “teh” or “recieve”. Be careful: AutoCorrect changes text without asking, so never add a typo that’s also a real word, such as “form” for “from”.
- Not sure which suggestion is right: Turn on Show context and Show synonyms, or use Read Aloud and Spell out to hear the difference.
- Dozens of red underlines: Click See More or press F7 to open the Editor pane and work through them in order.
More Ways to Master Word’s Spell Check
Clicking Add to Dictionary is only the start: Adding your name and other personal words to Microsoft Word explains the capital letter trap that catches most people. For the opposite problem, How to remove words from the Word dictionary puts a red underline under easily confused words like principal and principle that Word would otherwise let slip through.
Change All is handy, but Six useful Replace tricks in Word goes much further with formatting and style swaps across a whole document. If Add to AutoCorrect saves you a few keystrokes, Making AutoText or AutoCorrect entries in Word shows how to turn short codes into whole phrases you type every day.
That little speaker icon does a lot more than say one word, as Read Aloud in Word 365 and 2019 in depth shows, including having Word read your document back to catch errors your eyes skip over. And despite the rumors, Word Thesaurus Still Available: Debunking the Misinformation proves the full Thesaurus is still there when the spelling menu synonyms aren’t enough.
Word’s dictionary isn’t always up to date, and Merriam-Webster new words vs Microsoft Word reveals which new words still get flagged and how to fix that in seconds. If you write for readers in more than one country, Why Word doesn’t always show US and UK spelling correctly? explains why the wrong spellings can sneak past.
Spelling is only half the story, and Stop Microsoft Word’s Grammar Checker From Driving You Crazy shows how to silence the blue underlines you disagree with.