Microsoft Word’s Replace does a lot more than just replacing one bit of text for another. It can quickly change formatting, enforce a style, paste from clipboard and use special characters.
You’re probably familiar with the basics. Press Ctrl + H to open the Replace dialog. Type in the text to look for ‘Find what’ and the text to replace it with ‘Replace with’.

Replace – will find the next instance of the text and replace it.
Replace All – will go through the entire document replacing each instance of the ‘Find what’ text.
Find next – lets you check the ‘Find what’ by finding but not replacing the next instance in the document. You can click in the document to see what was found.
Both of the fields have pulldown lists to let you reselect past replaces.
As usual with Word, there’s a lot more going on than the simple feature.
Replacing formatting
You can use Replace to change the formatting of text. You can search not just for text, but also for text with particular formatting – see Find in Word for details.
Not only can you find with formatting, you can enforce formatting in the Replace.
Using Replace to change formatting
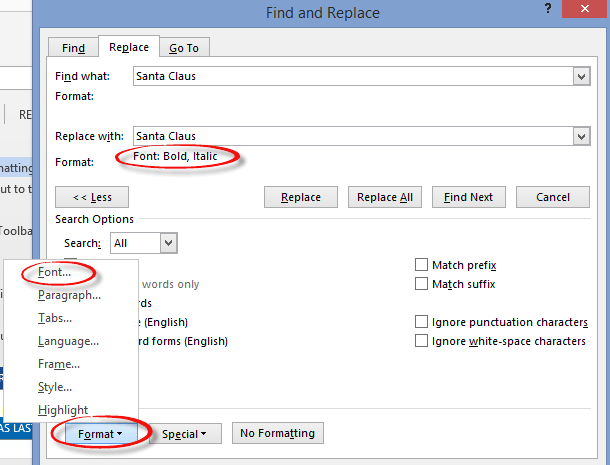
For example, you’re told that the boss’s name must always be in bold, italics throughout a document. Replace can do that for you in seconds.
Here’s the Replace dialog to do that. ‘Find what’ searches for the boss’s name. ‘Replace with’ is the same text with formatting added.
To change the formatting, click on the More button to reveal the extra options. The Format button reveals various formatting options. Each of the formatting dialogs (Font, Paragraph etc.) look almost the same as their standard formatting counterparts.
Find What Text
A little known but very handy Replace trick is the code ^& in the replace field. This is called the ‘Find What Text’ code. It will use as the Replace text whatever was found in the Find search.
This Replace is exactly the same as the one above. Instead of typing ‘Santa Claus’ again using ^& will insert the same text.
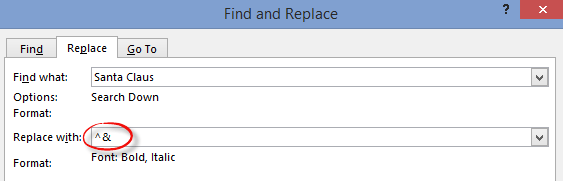
Find What Text is on the Replace | Special menu so you don’t have to remember the ^& code.
It’s a useful trick for two situations:
- Many replaces with the same settings but different Find text. It saves you typing the text twice (Find and Replace) and reduces the risk of a typing error in the Replace field.
- If you’re using wildcards or other complex finds that return differing results. Using ^& will use the found text in the replace on each occasion.
Replace to enforce a style
Rather than apply direct formatting, it’s better to apply a style. Once text has a style, all you have to do is change the style settings to change the look throughout the document.
This example is the same as the ones above, except now the Replace formatting is a style instead of Font formatting.

No formatting
To clear any formatting choices from either Find or Replace, click in the correct field then click the ‘No Formatting’ button.
Clipboard contents
Ever wondered how to use Replace to insert a large block of formatted text, image, table or other Word elements – perhaps a mix of them? It seems like you can only Replace with text, and even then, text with a single type of formatting.
Hiding under the Special button is a trick that will help you insert all manner of things into your document using Replace – Clipboard Contents.

Load up the clipboard with whatever you want to add to the document then use the ^c code to paste it automatically into the document.
Here we’ve replaced some instances of the bosses name with his picture in the middle. The text ‘Santa Claus’ with image in the middle is made in Word then copied to the clipboard (Ctrl + C).

Special characters
Just like Find – you can insert special characters like Paragraph Marks, Tabs, Em and En dash and hyphens.

There are two extra special cases in this list that we’ve mentioned above. Find What Text and Clipboard Contents.
All the special characters have the caret ^ symbol plus a character — ^p is the Paragraph Mark. ^^ will find or replace the caret mark itself.