There are two ways to drop a PowerPoint slide into a Word document. A simple, one-time method or a slightly advanced but dynamic trick which lets the Word document slide change if the original slide is updated.
A few months ago we showed how to add Excel worksheets into a Word document. This time we’ll look at adding a PowerPoint slide into a Word document.
Why do this? Maybe you have a slide summarizing financial results in a nice graph or chart? Instead of recreating it in Word, simply copy it across.
There are two ways to do this:
- One-time – a copy of the slide is taken from the deck and pasted into a document. Any later changes to the PowerPoint deck do not appear in the document.
- Dynamic – a linked copy of the slide is inserted into the Word document. If the original slide changes, the copy in the document also changes.
Here’s how to do both:
One-time
Copying slides into Word is easy-peasy.
Select the slide in PowerPoint and choose Copy (or Ctrl + C).
Switch to your Word document and Paste. Word inserts the slide as a picture.

Because it’s a picture, you can reduce, enlarge, rotate and do all the other nifty things possible with images in Word.
Curiously, you can’t copy multiple slides into Word. If you select and copy multiple slides in PowerPoint, only the first slide is pasted into Word.
Of course, you can also select, copy and paste individual elements within a slide, like a picture or graph. This can only be done as a ‘one-time’ operation not dynamically.
Dynamic
Copying a slide with a link to the original is a little harder, but only because Microsoft had somewhat buried the option to do it (at least in Microsoft 365, Office 2021/2019/2016 for Windows).
First, select and copy the slide in PowerPoint.
Switch to Word and look at the Paste menu

Unlike when pasting from Excel, there’s no ‘link’ options. That doesn’t mean it’s impossible … it’s just hiding.
Go to Home | Paste | Paste Special choose ‘Paste Link’ then ‘Microsoft PowerPoint Slide Object’.
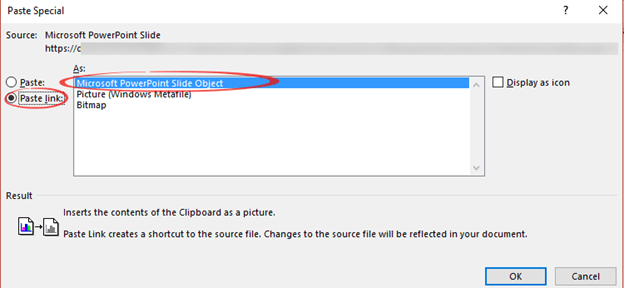
Now the slide appears but with different handles in each corner and no Picture tab when you select the object.

Use the handles to resize the object.
To re-position the object right-click and choose Picture. That will display the options for text wrapping and positioning.
Just like an Excel object, right-click to see the Update Link option (or press F9).

Linked Slide Object gives you options, the most useful is Links …

Here you can see all the links into the document with options to Break Link, open the original source and change the update (Automatic or Manual).
Locked – lets you keep the link but stop updates.
Avoid the traps when adding Excel info into a Word document
Hiding stuff in Word, Excel and PowerPoint
Highlight tricks for Word, PowerPoint, Excel and Outlook