Powerpoint is a quick way to make a photo collage or presentation that you can use as a separate photo for any purpose, including as a virtual background!
Today is the 80th birthday of an amazing man. We’ll be meeting up on Zoom to celebrate the big day and we’d like to make a special virtual background for the occasion.
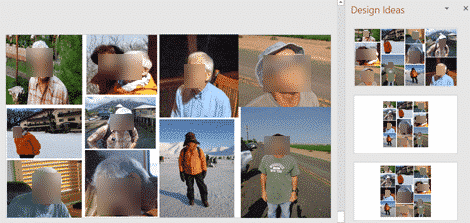
We’ll take a selection of separate photos (left) and turned them into a simple collage (right).

Best of all, it took just a few minutes using PowerPoint 365 for Windows or Mac.
As a picture, the slide collage can be selected as a Virtual Background, used as a desktop image, used in a digital photo frame or anywhere a photo can be displayed.
Adding Virtual Background or blurred video to Teams
How to make a photo collage
Choose the photos you want. We’ve put them in a separate folder and cropped some to show just the birthday boy.
Open PowerPoint to a blank slide then copy all the images from Explorer into the slide. You can do that via Insert | Picture | from this device or just drag-n-drop them into the slide area.

PowerPoint will dump all the photos into the slide. Look at Design Ideas at right for suggestions on how to arrange them. If necessary, choose Home | Designer | Design Ideas to make the pane appear.

Note: there seems to be a limit to the number of photos that PowerPoint’s Design Ideas can cope with. In our example, any more than nine photos were too much. If Design Ideas shows no suggestions, try removing photos one at a time until it works.
The result is a quick collage of the images. That’s all you need do but, if you can spare a few minutes, improve the PowerPoint suggestion.
Tweak the Design Idea
Feel free to rearrange the images once Design Ideas has done the ‘heavy lifting’. We moved key images to the four corners and left/right sides where they will be visible as a virtual background (with the head & shoulders in the middle).
Make some images larger and move them around. The thin red alignment lines will help you position images as you drag them around.
Add some text
Add some heading text to the images before looking at Design Ideas.
We added a ‘Happy Birthday’ heading so Designer added some options with that text. For an online call background, the text is best at the top (i.e. above the head) and none of the Design Ideas did that directly. Some rearrangement of the design suggestion would be necessary.
Another option is to make the slide layout with just photos then add a Text Box over the photos.

PowerPoint Slide to Image
There are two ways to convert a slide into a photo. The official way and the quick way.
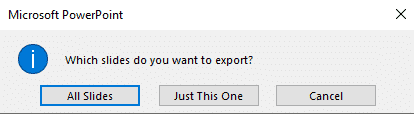
The official method is to select the slide you want to export (you’ll be given the choice of exporting the current slide or all slides in the deck).
Go to File | Save As or Save a Copy then choose the image format you want. We chose .PNG because it’s compatible with Teams and Zoom. Choose the folder to save the photo to.

Click OK, then tell PowerPoint which slide/s you want to export. We chose ‘Just this One’.
Smarties know a faster way. Take a screen-shot of the slide in PowerPoint then paste or save that image wherever you like.
There are other tools to make a photo collage. Most photo editors have a feature to display a group of photos but not all let you edit the result. PowerPoint 365’s Design Ideas is simple, effective, easily available and lets you change the design suggestion as well.
Using Designer for more eye-catching PowerPoint slides
Tricks to get more from PowerPoint Designer
Getting More from PowerPoint Designer
Make PowerPoint Designer better, add some words