The Background Removal Tool in Microsoft Office lets you neatly delete the background of images with just one click. It makes the photo subject stand alone with a transparent background. We’ll explain how remove background really works, it’s not quite as simple as Microsoft’s demonstrations make out.
- Start Remove Background Tool
- Refine background Removal
- Areas to Keep
- Background areas to Remove
- Delete Marked Area
- Another Background Removal example
Windows 11 Paint is getting a ‘Remove Background’ tool in a coming update. That’s nice but it’s been in Microsoft Office for over a decade. Any image adjusted in an Office document can be exported to another app via the right-click “Save as Picture” option or just take a screen-shot to paste elsewhere.
Microsoft’s examples are carefully chosen so the Background Removal Tool works with a single click. In the Real World™ it’s a little more complicated, Office Watch will show how the Tool works on some more realistic examples. Similar features in Photoshop or Photoshop Elements are better but the Office versions is enough for many jobs.
In Word 2007 you could set a transparency color which was OK for images of uniform color. For example, expose only a corporate logo without the colored background. For photos it wasn’t so good.
The Background Removal Tool is a much better feature that’s in Microsoft 365, Office 2021 and all versions of Office back to Office 2010.
Start Remove Background Tool
To work with this tool, first insert an image in a document by clicking on Insert | Picture and select the required image to insert.

Click on the image to view the Picture Format ribbon where you can find “Remove Background” link.

When you click on this tool, the background that will be removed will appear in purple shade in the image.
Also more options related to refining the removal of background further are displayed under “Background Removal” menu. If you wish to remove the background marked by the purple shade then click on [enter] button. You will get the image with the background removed.

Refine background Removal
If you wish to edit the area of the background to be removed then click on the image and select Picture Tools | Format | Remove Background.

You can resize the blue marker around the image by dragging at the corners or moving it and placing it at required area of the image. After making the changes you can click on [enter] for the changes to take effect.
Areas to Keep
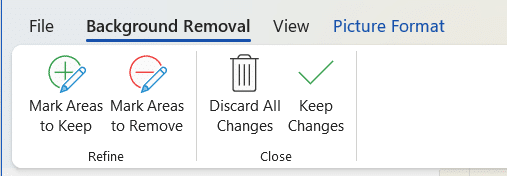
In the selected area for background removal, you can further select specific areas to keep or remove from the background. For this click on the image and select “Remove Background” tab from the picture format tools. In the “Background Removal” menu options if you want to retain certain areas of the background from the selected area then click on Background Removal | Refine | Mark Areas to Keep.

Using the “pencil” pointer, mark the area in the image to retain. You will observe that, from the area marked to keep the purple shade will disappear. To revert back press [ctrl Z]. Notice from the below screenshot that the areas that you mark to keep has a “+” symbol enclosed in a circle. This indicates that such areas have been additionally added to be part of the image to be retained.
Click on Background Removal | Close | Keep Changes to retain the modifications and close the “Background Removal” menu.

Background areas to Remove
Likewise to remove certain portions of the background that is not shaded, click on Background Removal | Refine | Mark Areas to Remove. Using the pencil pointer mark the area to remove. As you draw the line on the image to remove you will notice those areas covered by purple shade. To revert back press [ctrl Z]. Notice from the below screenshot that the areas that you mark to remove has a “-” symbol enclosed in a circle indicating that such areas will be removed from the image. Click on Background Removal | Close | Keep Changes to retain the modifications and close the “Background Removal” menu.

Delete Marked Area
After marking the areas to keep or remove if you want to delete some of the markers then click on Background Removal | Refine | Delete Mark. Now on the image click on the “+” or “-“symbol based on the marker that you want to delete. Once you click on the symbol that particular marker will be removed and the background restored.
To completely discard all the changes and close the “Background Removal” menu, click on Background Removal | Close | Discard Changes. This will return the image back to its original self. Even the purple shade indicating the background to be removed will disappear.

Another Background Removal example
Just to make the point that ‘Background Removal’ can be used to edit out any part of an image (not just a background). Check out this image from the Ulaanbaatar Opera House, Mongolia and the amazing Throat or Overtone Singers. It’s a lot harder to work with than the simple example used above.

We’re just interested in the guy on the right. By default, Office picks out the orchestra.

If you adjust the selection box, Word will change what it thinks is the foreground and background.

Now you have to do some finer editing to select what you want and remove anything else.
Tip: Changing the document zoom will help you see those details

The ‘Mark Areas to Remove’ lets you draw a line to place a boundary between an area you want and one you don’t. See the dotted line with the ‘minus’ symbol on bottom right along the edge of the singer’s costume. Word had trouble automatically discerning the costume from background but once the line was inserted it was easy to select wanted elements to the left of the line.
Here’s the final result with some more parts of the image selected or removed.

The image has been cropped to reduce the size. The result isn’t perfect by any means, but pretty good for a few minutes work inside a document.
Office 365 ‘Save as Picture’ is nothing new
Taking screenshots, your guide for Windows, Mac, iPhone, iPad and more
Images in Excel Cells – at long last
Copying images from Designer to Office documents