Overlaying images, arrows, or shapes in Microsoft Word should be simple, yet many Word users struggle with it because of default settings that don’t tie images to text. In this easy, step-by-step guide, learn how to change text-wrapping and layout settings so you can group, overlay, and move graphics together as a single object, making your visuals look professional and stay aligned even when you edit your document. Or use the experts cheat instead.
You can insert an image into Word or a Word created email in Outlook but the defaults make it hard to add overlays. Adding an arrow or caption over the image where the overlaid text or graphic stays with the picture.
Picture with extra won’t stick together
Look at this image and the arrow. The image was inserted normally then Insert | Shape to add the arrow.
It looks OK but if you move the picture or reformat the document you’ll see that the arrow is separate from the image.

What you need to do is link or ‘group ‘the image and the arrow so they act as a single object. Once they are grouped together, they’ll move around as one.
Here’s where it gets tricky, you can’t select the image plus the shape! The Group button on the Picture toolbar is greyed out.
What’s wrong?
To allow objects to be grouped, like a picture plus shape or text box, the trick is to change the image setting that links the image to the text around it and to do that you have to change yet another option!
Move object with text
Right click on the image, choose ‘Size and Position’. On the Position tab, turn off ‘Move object with text’.

Text Wrapping to Square or Tight
Often the ‘Move Object with text’ check-box is greyed out.
To fix that, go to the Text Wrapping tab and switch away from the ‘In line with text’ option. The Square or Tight options are good choices if you’re not sure. Top and Bottom will put the image/object between paragraphs.

Under the hood, about Word Layers
What’s going on with all those settings about ‘Move with text’ and Text Wrapping changes? Why are they necessary?
All Word documents have Layers. Think of them like clear plastic sheets, one on top of the other. Similar to old hand-drawn animation cells.
There’s a Text Layer which is the one we normally use and type onto. Despite the name, the Text Layer can have non-text objects like Pictures.
The Object Layer has images and other objects, like Shapes. There are features, like Grouping that are only available for items in the Object Layer.
When you change a picture etc from ‘In line with text’ wrapping to one of the other options, you’re also moving that object from the Text Layer to the Object Layer.
That’s why a change in Wrapping makes Grouping possible.
Group objects
Now that’s done you can hold the Ctrl key and select each object by clicking. Alternatively, show the Selection pane (Home | Select | Selection Pane) and select the objects while holding down the Ctrl key.
At Drawing Tools | Format | Arrange select Group which will link the selected objects (image and shapes) into a single object that will move together.

You can unlink the objects using the Ungroup command.
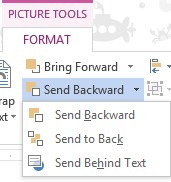
If the shape or arrow disappears when you move it over the image, mostly likely the object is there but hidden by the overlaid image. To fix that go to Drawing Tools | Format | Arrange and choose ‘Send to Back’ under the ‘Send Backward’ button. This puts the image on the bottom layer with the shape/s over it.
The quick and dirty “cheating” trick
If you’re sure there’ll be no other changes to the picture with overlaid text, shapes then there’s a quick and easy workaround. No messing about with Selection Panes and Grouping.
Take a screen shot of the image with extras then use the screen shot as a replacement for the original.
The screen shot has the same look as the original and will definitely keep the same appearance.
- Changing Text Box backgrounds
- Text Box in Excel, PowerPoint and Word
- Changing the Text Box Gallery to suit you.
- Don’t be a Spock – Adjust your monitor height
- More Text Effects in Word 2010
- Text Effects in Word 2003 and Word 2007
- Image Correction in Office 2010
- Editing pictures inside Office
- Sending pictures by email